Master Till
The first step is to create the Master Tills. Each till requires a unique master record to be defined and then from this the user can set up the reusable tills. Each master till is used to generate the tills for use at the POS each business day. Changes in the till will not affect the Master Till that was used to create it. If a change required needs to be permanent, then the updates should be performed in the Master Till and then they will take effect from the next generation of the tills, usually for the next business day, however an updated till can be triggered immediately by closing the open till and generating a fresh one from the updated Master Till.
The Store master record has settings that can control the automatic generation and assignment of tills in readiness for the next business day as part of the End of Day process – Reassign all Tills at End of Day.
To open the Master Till window, navigate in the Management Console and select Operations > Till Management > Master Till.
Search Screen fields are explained below:
Field | Description |
Search Criteria |
Store Code | Enter the Store Id that you wish to filter your search by for the Master Till(s) |
Code | Enter the code in part or full for the Master Till that you wish to filter your search by for the Master Till(s) |
Description | Enter the description in part or full for the Master Till that you wish to filter your search by for the Master Till(s) |
Active | Specify whether the status of the Master Till is active or not to filter the search results by. |
Search Results |
Code | Displays the code of the Master Till(s) that were searched on. |
Description | Displays the description of the Master Till(s) that were searched on. |
In Use | Displays the status of the Master Till(s) that were searched on. If the checkbox is flagged, then the till has been logged into for the open session of the POS. |
Active | Display the active status of the Master Till(s) that were searched on. If the checkbox is checked then it signifies that the Master Till is available to generate new tills from. If the box is unchecked, then no new tills can be generated from the Master Till until it has been reactivated. |
[Assign Tills] | The recommended practise is to setup the Stores for the POS to reassign tills at the End of Day, which will generate a new set of tills from the Master Tills automatically ready for the next business day. However, it is possible to assign the tills from the Master Tills screen manually if needed. This is required if the auto assign feature is not enabled and/or if a till needs to be reopened after it has been closed. Select the Master Till(s) that are to be assigned. After selecting the Master Till(s) from the search results screen, click the button Assign Till. This will generate and assign the till(s) to the user and/or teams. Note: Only tills which are not in use can be generated and assigned to users and/or teams on clicking the Assign Till button. |
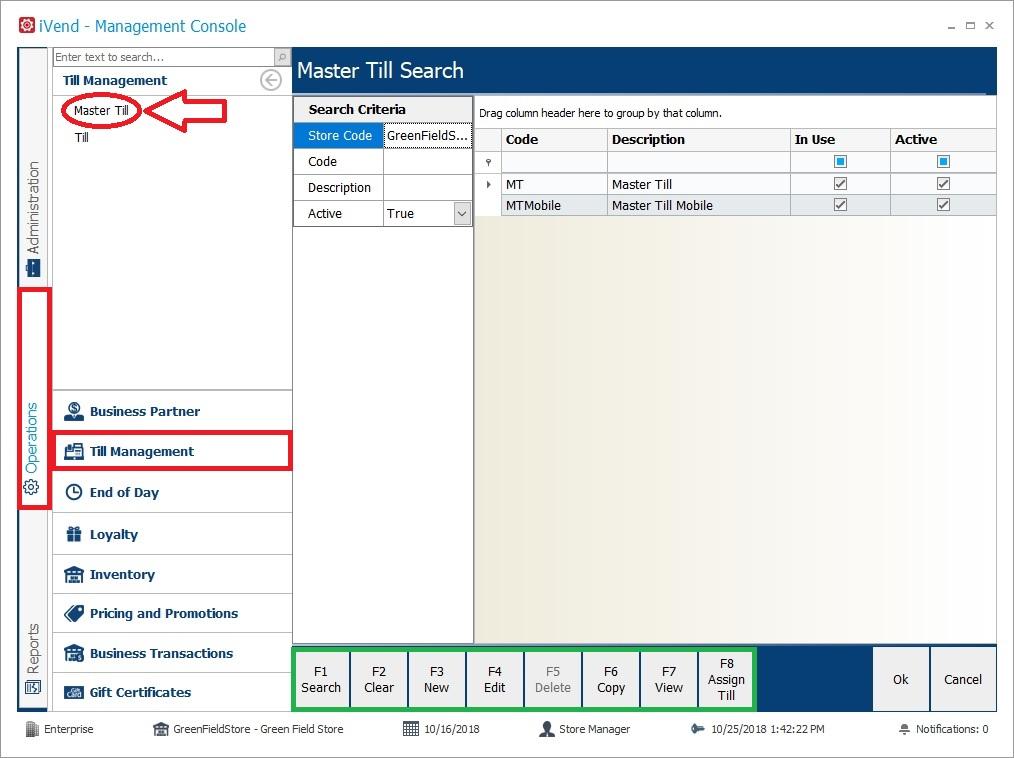
Management Console – Operations > Till Management > Master Till
Setup Screen
Enter the setup screen, Press F3 New , F4 Edit or F7 View
Functions Keys:
F3 New – Create a new Master Till
F4 Edit – Select a Master Till from the list and press this key to open the Master Till record in edit mode.
F6 Copy – Select a Master Till from the list and press this key to copy and create a new Master Till based on the record selected.
F7 View – Select a Master Till from the list and press this key to open the Master Till record in view mode. No changes can be made when in this mode.
Field | Description |
Code | Enter a code for the Master Till. A unique code with a maximum of 20 alpha-numeric characters must be entered. |
Description | Enter a description for the Master Till. A description with a maximum of 100 alpha-numeric characters must be entered. |
Mode | Select one of the following modes: · User – The till can be assigned to a single user. · Team – The till can be assigned to a team of users. All the users mapped to the team and with the “Team banking” option enabled, can access the till that is assigned to them. Team assignment is managed in the Employee Master record (Note: Employees are setup under Human Resources, located in the Management Console under Administration > Human Resources > Employee). |
User/Team | Select a user or a team to be assigned to the till. This is a mandatory field. |
Enable Self Banking | iVend has recently introduced the functionality to enable Self Banking support, which allows multiple cashiers to work on the same POS. The functionality allows more than one user to work on a single POS terminal while maintaining account of their own transactions. In earlier releases of iVend prior to version 6.5 Update 4, if multiple users needed to work on the same POS terminal then the till had to be set up to work with a team. With the introduction of Self Banking functionality, each cashier can maintain their own till while working on the same POS terminal. To use this functionality, the till must be set up with the mode of User and the setting “Login per Sale” must be turned on in the associated Retail Profile. |
Allow Multi Currency Float | Select this option if a multi-currency float is required – Upon selecting this option, the user will be presented with a screen displaying the currencies setup in the system where the floats can be defined per currency as required. |
Float Amount | Set the starting amount that is required to be assigned to the till. Assigning the till to a user or team will enforce the float amount that will become the opening amount for the till. |
Variable Float Amount | Select this checkbox to enable a variable float amount. Selecting this checkbox however, automatically enforces that a Count Required On Assign is mandatory. The action of the count will set the float amount on each occasion. |
Store | Set the store for which this Master Till is to be created for. |
POS | Set the default POS for which this till is to be attached to. If a POS terminal is assigned to the till, then the cashier will not have to select the till before moving from Till Assignment to the Transaction screen upon logging into the POS. The system will automatically associate the till to the POS for the user or team when logging in. |
Variance Rate Type | Set the variance rate allowed for the till. This specifies the permissible rate of variance between the system count and the physical count of the amounts for the various payment types used at the till. Set the variance type allowed as either amount or percentage as required. |
Variance Allowed | Set the value for the variance amount allowed between the system and physical count. |
Count Required on Assign | Select from the list of options to set whether the till count is Mandatory, Optional or Not required when the till is assigned to a POS. |
Count Required on Close | Select from the list of options to set whether the till count is Mandatory, Optional or Not required when the till is closed from the POS or Management Console. |
Count Required on Remove | Select from the list of options to set whether the till count is Mandatory, Optional or Not required when the till is removed from the POS. |
Count Required on Finalise | You can select from the list of options to set whether the till count is Mandatory, Optional or Not required when the till is finalized however, the system will actually enforce a count regardless of the setting – It is recommended to set the value here to Mandatory in order to avoid any confusion with the settings required when the user views the Master Till record. |
Warning Level | If desired, set an amount as an upper limit for the cash balance to be maintained in the cash drawer for the till. This is the tipple point beyond which the system starts giving a warning message that cash will need to be removed. For example: Setting the level to $1000, will generate a system warning message when the cash balance reaches and exceeds this amount. If the feature is not required then the Warning Level can be set to zero (0), which will effectively disable the functionality. |
Warning Interval | Set the amount for the warning interval. For example: If the interval is set to $100 with a Warning Level of $1000 then the system will warn at $1000 and at intervals of every $100 reached in the cash balance of the cash drawer above the $1000. |
Lock Out Level | Set the amount for the lock out level. The value set here dictates the balance of the cash in the cash drawer attached to the till beyond which the POS will become locked and no further transactions will be able to be performed without the intervention of a user with Manager status and authorisation. If the lock out feature is not required then the Lock Out Level can be set to zero (0), which effectively disables the functionality. |
Show System Count | Select this option if it is desired to display the payment type amounts as per the system count in the Till Count screen. If this option is selected, the variance between the system count and the actual count will be displayed in the Till Count Screen. |
[Ok] Button | Selecting this button will update the system with changes being saved to the database and closes the Master Till Setup window. |
[Cancel] Button | Selecting this button will not update the system, no changes will be saved to the database and the Master Till Setup window will close. |
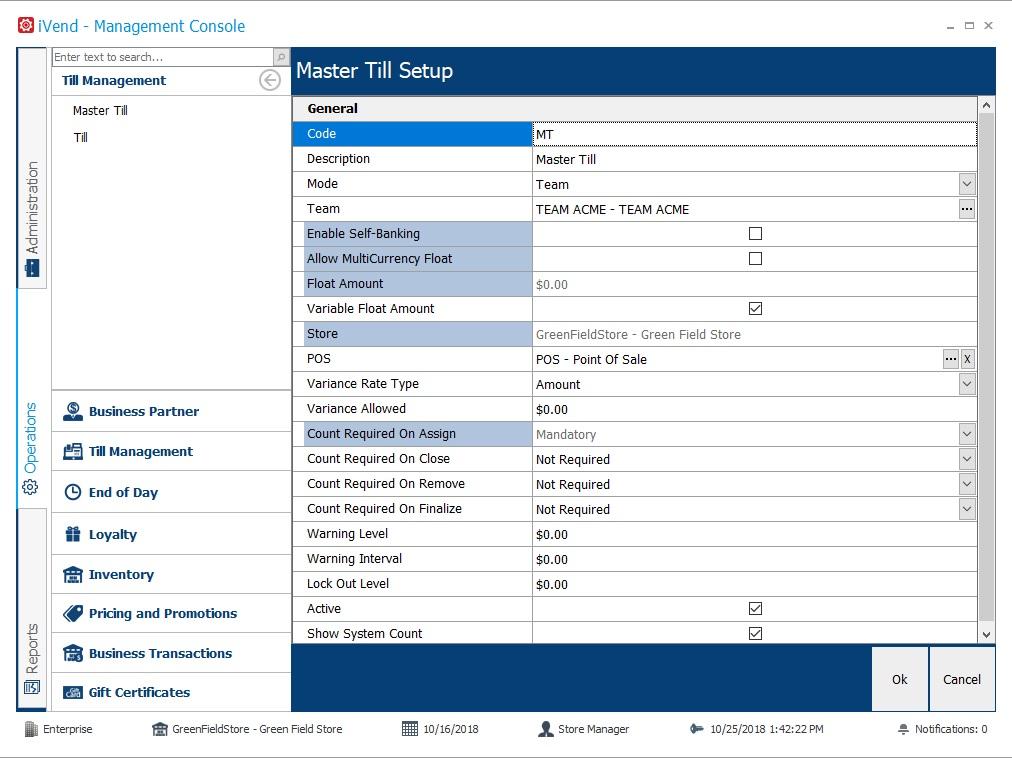
Master Till Setup
Till
This feature enables the user to search the details of various tills set up in the Management Console and create new tills if desired. The default settings for creating a new till are defined in the Retail Profiles.
Each Till created in this window will be associated with a Master Till.
Tills created in the system will display their current process position as they stand at a particular time in the trading day of the POS – these are referred to as the statuses of the tills and will be one of the following:
Status | Description |
New | A newly created till, which has not yet been assigned to any POS – Once the POS has been logged into and a till has been selected then the status will change to Assigned. Only tills with the status of New, are open for editing or able to be deleted |
Assigned | The till has been assigned to a POS. A user has logged into the POS and selected the till to use for the trading day. Once a till has been assigned it cannot be edited or deleted. |
DeAssigned | A till with this status has been removed from the POS. |
Closed | The till is closed either from the POS or Management Console and cannot be used for any further transaction processing. Only tills with the status of DeAssigned can be closed. |
Finalised | A till with this status has been finalised. Only tills with a Closed status can be finalised. |
To open the Till window, from the Management Console navigate to and select:
Operations > Till Management > Till
Search Screen fields are explained below:
Field | Description |
Search Criteria |
Store Code | Enter the Store Id that you wish to filter your search by for the Till(s) |
Code | Enter the code in part or full for the Till that you wish to filter your search by for the Till(s) |
Description | Enter the description in part or full for the Till that you wish to filter your search by for the Till(s) |
Search Results |
Code | Displays the code of the till(s) searched on. |
Description | Displays the description of the till(s) searched on. |
Status | Displays the status of the till(s) searched on. |
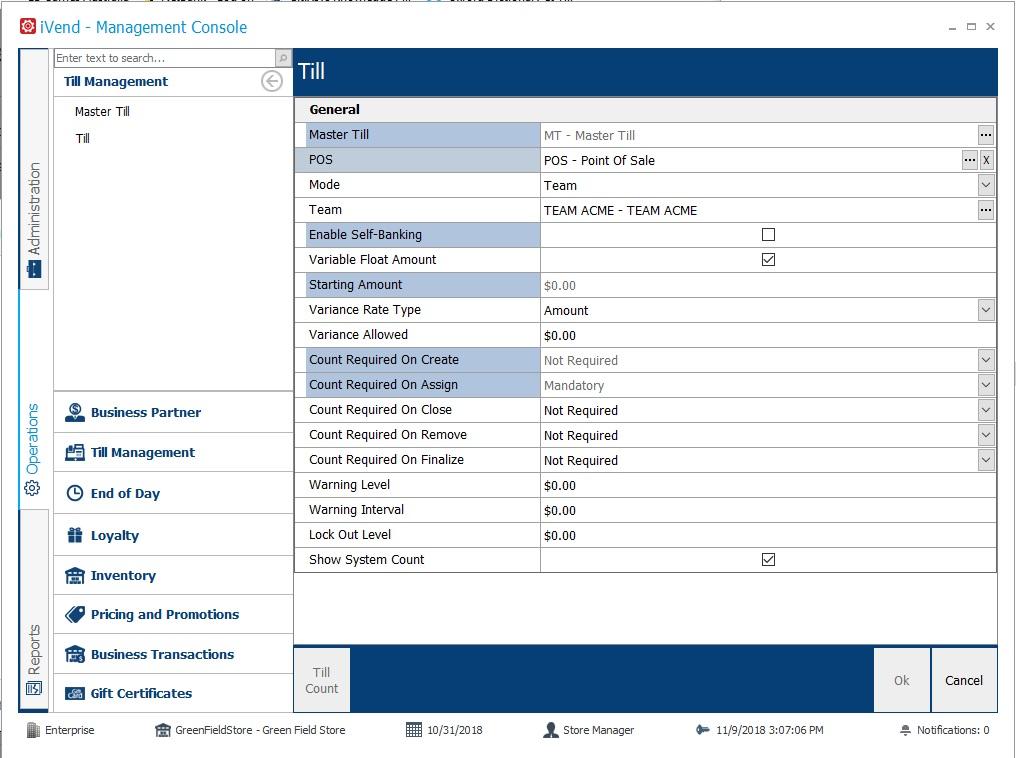
Till Management – Till Setup Screen
Field | Description |
Master Till | Select the Master Till for which the till is to be assigned to a user or a team. |
POS | Set the default POS that the till will be attached to. If a POS terminal is assigned to a till, then upon logging into the POS, the cashier will not have to select the till before moving from Till Assignment to the Transaction screen. iVend will automatically associate the till to the POS when the user logs into the POS. |
Mode | Select one of the following modes: · User – The till can be assigned to a single user. · Team – The till can be assigned to a team of users. All the users mapped to the team and with the “Team banking” option enabled, can access the till that is assigned to them. Team assignment is managed in the Employee master record Note: Employees are set up under Human Resources, located in the Management Console under Administration > Human Resources > Employee). |
User/Team | Select a user or a team to be assigned to the till. This is a mandatory field. |
Enable Self Banking | iVend has recently introduced the functionality to Enable Self Banking support, which allows multiple cashiers to work on the same POS. The functionality allows more than one user to work on a single POS terminal while maintaining account of their own transactions. In earlier releases of iVend prior to version 6.5 Update 4, if multiple users needed to work on the same POS terminal then the till had to be setup to work with a team. With the introduction of the Self Banking functionality, each cashier can maintain their own till while working on the same POS terminal. To use this functionality, the till must be setup with the mode of User and the setting, Login per Sale must be turned on in the associated Retail Profile. |
Variable Float Amount | Select this checkbox to enable a variable float amount. Selecting this checkbox however, automatically enforces that a Count Required On Assign is mandatory. The action of the count will set the float amount on each occasion. |
Starting Amount | This field displays the starting amount assigned to the till. The user cannot enter the starting amount directly into this field and will need to go to the Till Count screen by selecting the [Till Count] button. |
Variance Rate Type | Set the variance rate allowed for the till. This specifies the permissible rate of variance between the system count and the physical count of the amounts for the various payment types used at the till. Set the variance type allowed as either Amount or Percentage as required. |
Variance Allowed | Set the value for the variance amount allowed between the system and physical count. |
Count Required On Create | Select from the list of options to set whether the till count is Mandatory, Optional or Not required when the till is created. |
Count Required On Assign | Select from the list of options to set whether the till count is Mandatory, Optional or Not required when the till is assigned to a POS. |
Count Required On Close | Select from the list of options to set whether the till count is Mandatory, Optional or Not required when the till is closed from the POS or Management Console. |
Count Required On Remove | Select from the list of options to set whether the till count is Mandatory, Optional or Not required when the till is removed from the POS. |
Count Required On Finalise | You can select from the list of options to set whether the till count is Mandatory, Optional or Not required when the till is finalized however, the system will actually enforce a count regardless of the setting here – It is recommended to set the value to Mandatory in order to avoid any confusion with the settings required when the user views the Master Till records. |
Warning Level | If desired, set an amount as an upper limit for the cash balance to be maintained in the cash drawer for the till. This is the tipple point beyond which the system starts giving a warning message that cash will need to be removed. For example: Setting the level to $1000, will generate a system warning message when the cash balance reaches or exceeds this amount. If the feature is not required then the Warning Level can be set to zero (0), which will effectively disable the functionality. |
Warning Interval | Set the amount for the warning interval. For example: If the interval is set to $100 with a Warning Level of $1000 then the system will warn at $1000 and at intervals of every $100 reached in the cash balance of the cash drawer above the $1000. |
Lock Out Level | Set the amount for the lock out level. The value set here dictates the balance of the cash in the cash drawer attached to the till beyond which the POS will become locked and no further transactions will be able to be performed without the intervention of a user with Manager status and authorisation. If the lock out feature is not required then the Lock Out Level can be set to zero (0), which effectively disables the functionality. |
Show System Count | Select this option if it is desired to display the payment type amounts as per the system count in the Till Count screen. If this option is selected, the variance between the system count and the actual count will be displayed in the Till Count Screen. |
[Till Count] Button | This button enables the user to set up the starting amount for the till. Click on this button to open the Till Count screen. |
[Ok] Button | Selecting this button will update the system with changes being saved to the database and closes the Create Till window. |
[Cancel] Button | Selecting this button will not update the system, no changes will be saved to the database and the Create Till window will close. |
Till Count
This feature helps in auditing and reconciling the till amounts for the various payment types. It enables the user to map the physical and system count of the amount and the related payment type documents. The till amounts of all the tills except the finalized ones can be counted from this screen. Counts can be performed in Summary or in Detail. Typically, only the payment type of Cash is counted in detail where the different denominations of the cash are checked.
If the user checks the Show System Count checkbox in the Retail Profile setup, the fields Opening Amount, System Amount and Variance will be displayed on the Till Count screen.
To open the window, from the Management Console navigate to and choose Till Management > Till Count or click on the [Till Count] button on the till data setup screen.
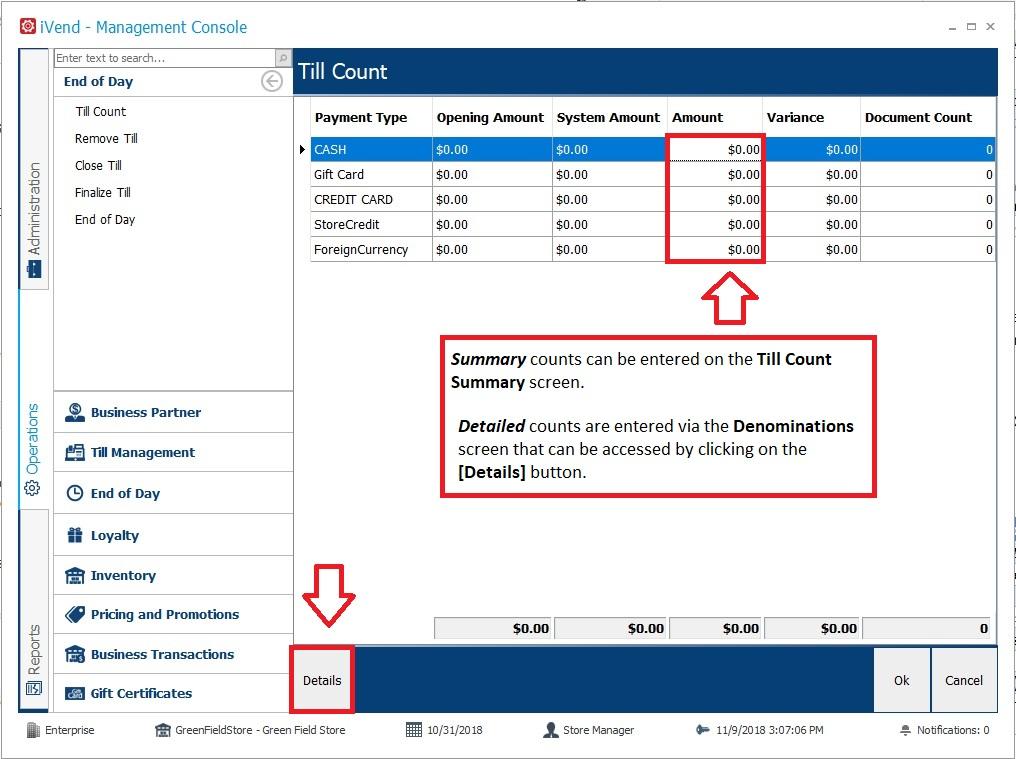
End of Day – Till Count Summary Screen
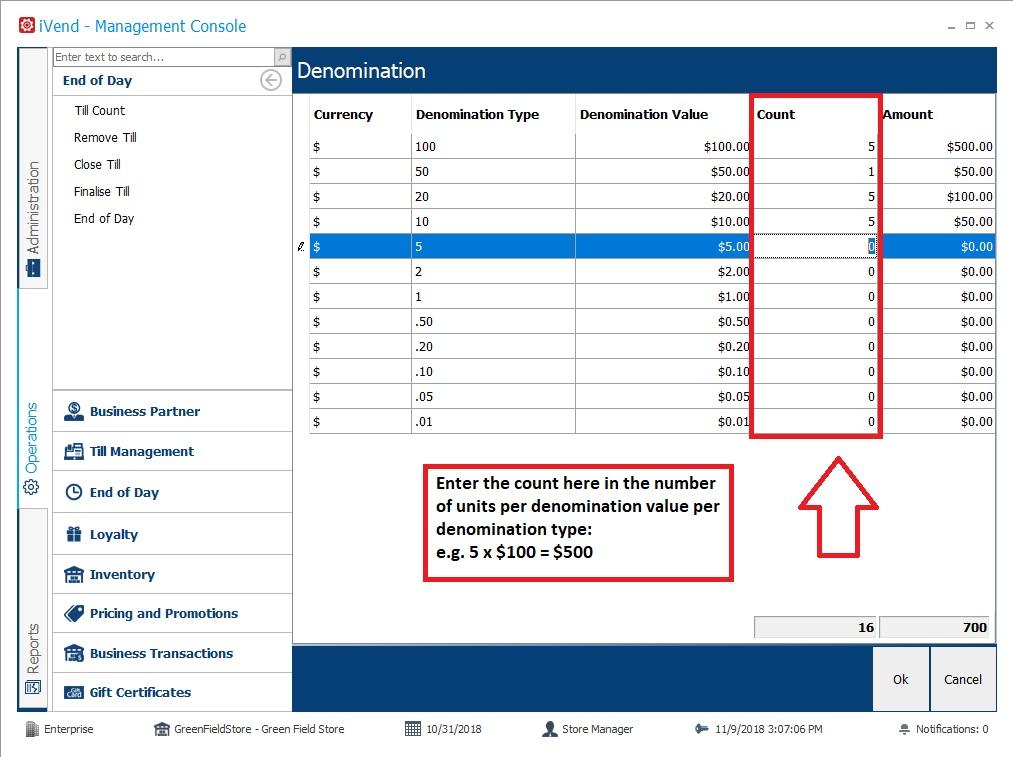
End of Day – Detailed Count Denomination screen
Field | Description/Action |
Search Criteria |
Store code | Specify the Store code for which the till(s) have to be searched by. |
Code | Specify the code of the till to be searched by. |
Description | Specify the description of the till(s) to be searched by. |
Search Results |
Code | Displays the code of the till(s) searched on. |
Description | Displays the description of the till(s) searched on. |
Status | Displays the status of the till(s) searched on. |
Select a till from the search results for which the till amounts need to be counted and click on the [Ok] button.
Till Count – Summary Data View Screen
Field | Description/Action |
Payment Type | Displays the payment types defined in the Management Console, Financials Payment Types where the Counted flag is enabled, and the Count Type is defined as either Summary or Detail. 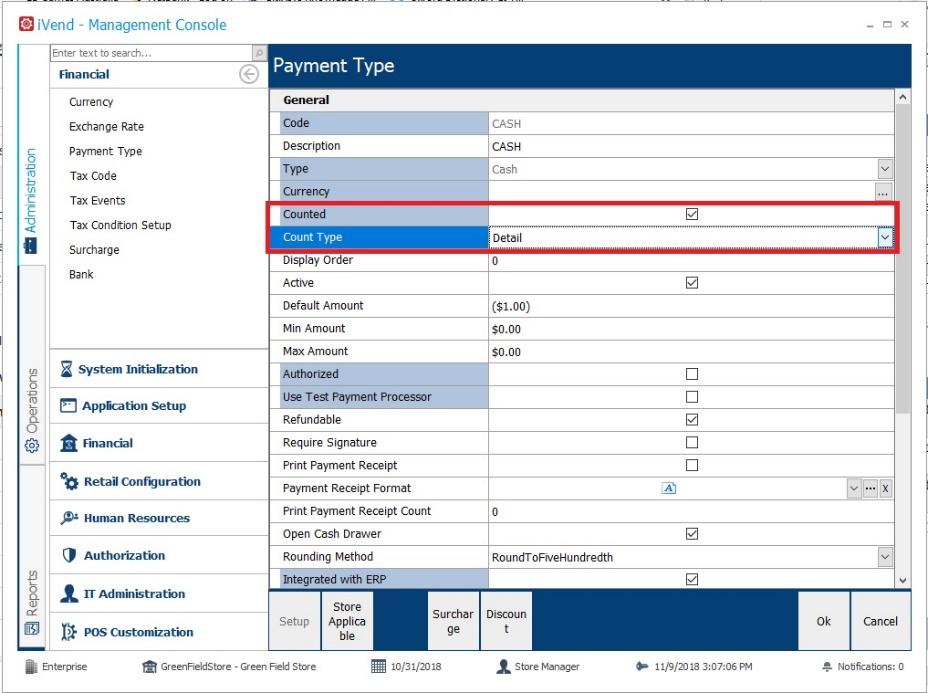
Payment Type – Count Settings |
Opening Amount | Displays the starting amount for the payment type specified while setting up the till. Note: Under normal operating conditions where the previous day's tills have been finalized, this amount should be zero. If there is a balance showing here, then it is recommended to check that the tills have been finalised from the previous End of Day. |
System Amount | Displays the total amount for the specific payment type as computed by the system for the day’s sales operations. |
Amount | Enter the Summary total amount after the physical count for the specific payment type. |
Variance | Displays the variance between the System Amount and the Amount entered by the user after counting the cash and/or payment type documents. |
Document Count | Enter the number of receipts or any other documents related to the till. This field is mainly for credit and debit card payment types. |
[Details] Button | This button enables the user to enter the count of the payment type as per the denominations in detail. Click the button to display the Till Count Detail screen and enter the counts. The button is enabled only for the payment type Cash for which the Detail option is selected in the Count Type drop-down of the Payment Type screen – See screenshot above for example. |
[Ok] Button | This button saves all changes and closes the screen. |
[Cancel] Button | This button does not save any changes and closes the screen. |
Remove Till
This feature enables the user to remove the Assigned tills. A till can be removed either from the POS or from the Management Console. Only tills with the status of Assigned can be removed. Tills will not appear in this window unless their status is Assigned.
To open the window, from the Management Console navigate to and choose:
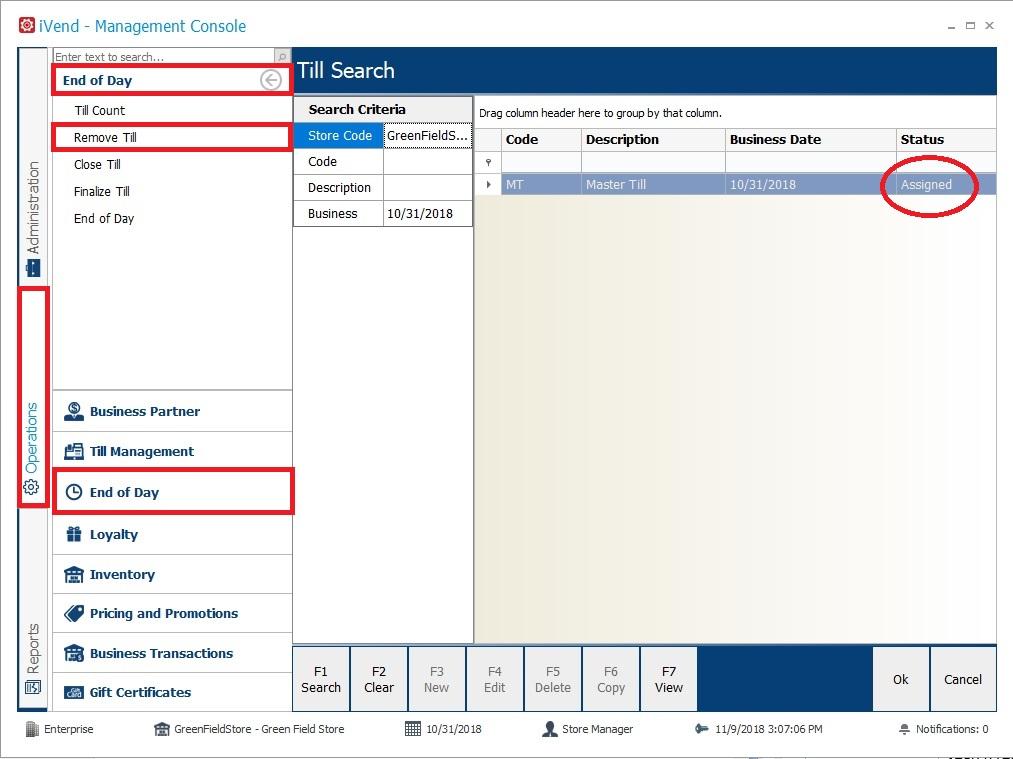
End of Day – Remove Till Screen
Field | Description/Action |
Search Criteria |
Store Code | Specify the Store Id for which the assigned till(s) have to be searched by. |
Code | Specify the code of the assigned till to be searched. |
Description | Specify the description of the assigned till(s) to be searched |
Search Results |
Code | Displays the code of the till(s) searched on. |
Description | Displays the description of the till(s) searched on. |
Status | Displays the status of the till(s) searched on. (Only tills with the status of Assigned, will be displayed in the search results) |
[Ok] Button | This button saves the changes and closes the screen. To Remove the till, the user selects a row in the search results grid and clicks the [Ok] button. This will update the status of the till to DeAssigned. If the checkbox Count Required On Remove is enabled on the Till Setup screen, on clicking the [Ok] button, the Till Count View screen will appear. Please refer to the topic on Till Count for further details on how to count the till. |
[Cancel] Button | This button allows the user to close the screen. No updates or changes will occur to the tills remaining in the search grid. |

End of Day – Remove Till Confirmation Window
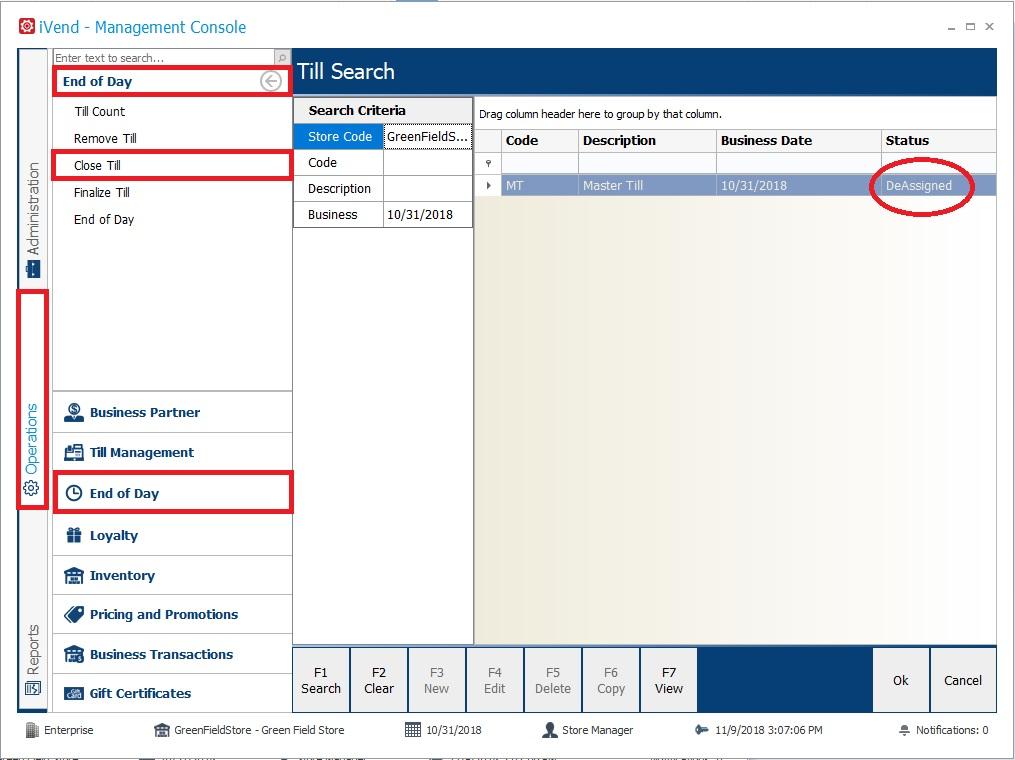
Close Till
This feature enables the user to close the tills. A till is closed either from the POS or Management Console and once closed cannot be used for any further transactions. Only tills with the DeAssigned status can be closed. Only tills with the DeAssigned status will appear in the Close Till window.
To open the window, from the Management Console navigate to and choose:
Operations > End of Day > Close Till
End of Day – Close Till Screen
Field | Description/Action |
Search Criteria |
Store Code | Specify the Store Id for which the de-assigned till(s) have to be searched by. |
Code | Specify the code of the de-assigned till to be searched by. |
Description | Specify the description of the de-assigned till(s) to be searched by. |
Search Results |
Code | Displays the code of the till(s) searched on. |
Description | Displays the description of the till(s) searched on. |
Status | Displays the status of the till(s) searched on. (Only DeAssigned tills are displayed in the search results). |
[Ok] Button | This button saves the changes and closes the screen. To close the till, the user selects a row in the search results grid and clicks the [Ok] button. This will update the status of the till to Closed. If the checkbox Count Required On Close is enabled in the Till Setup screen, then on clicking the [Ok] button, the Till Count summary view screen will appear. Refer to the separate article on Till Count for further details on counting the till. |
[Cancel] Button | The button enables the user to close the screen. No updates or changes will occur to the tills remaining in the search grid. |
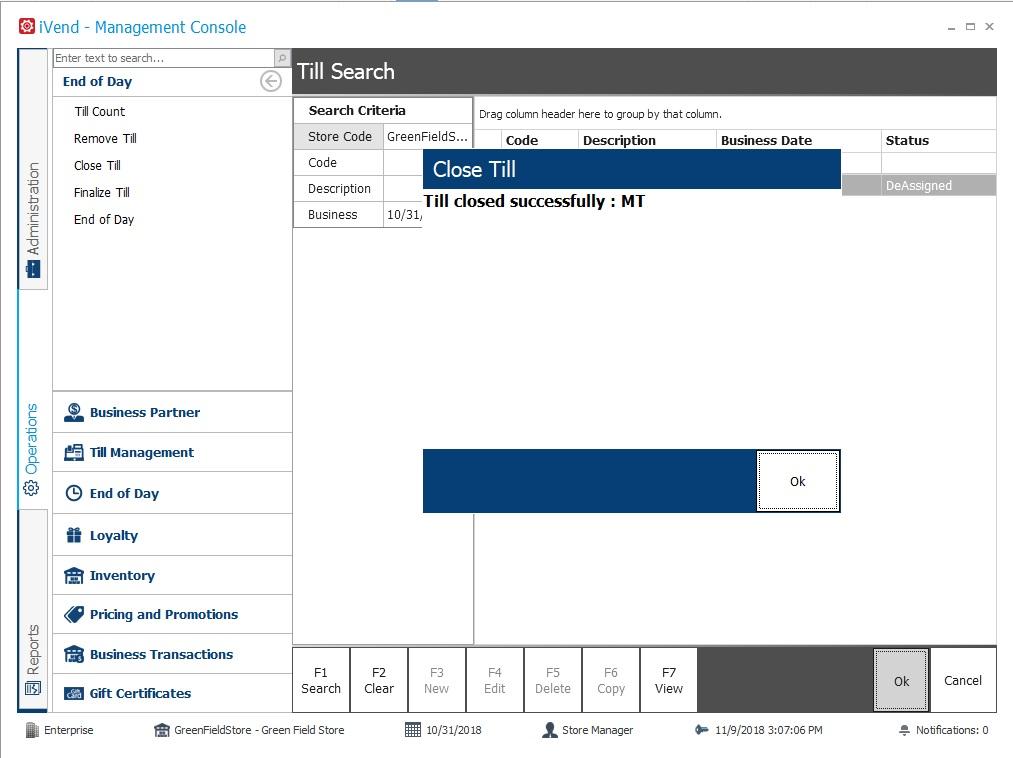
End of Day – Close Till Confirmation Window
Finalize Till
This feature enables the user to finalize the tills. With standard functionality, a till can only be finalized from the Management Console and not from the POS. Only tills with the status of Closed status can be finalized. Tills will not appear on the Finalize Till screen until their status is marked as Closed.
Note: From version 6.5 Update 6 of iVend Retail, it is possible to add an event to a customized POS screen to allow the finalization of a till from the POS in addition to Management Console. The feature does still require a customisation beyond the standard functionality that comes out of the box with iVend Retail.
To open the window, from the Management Console navigate to and choose:
Operations > End of Day > Finalise Till
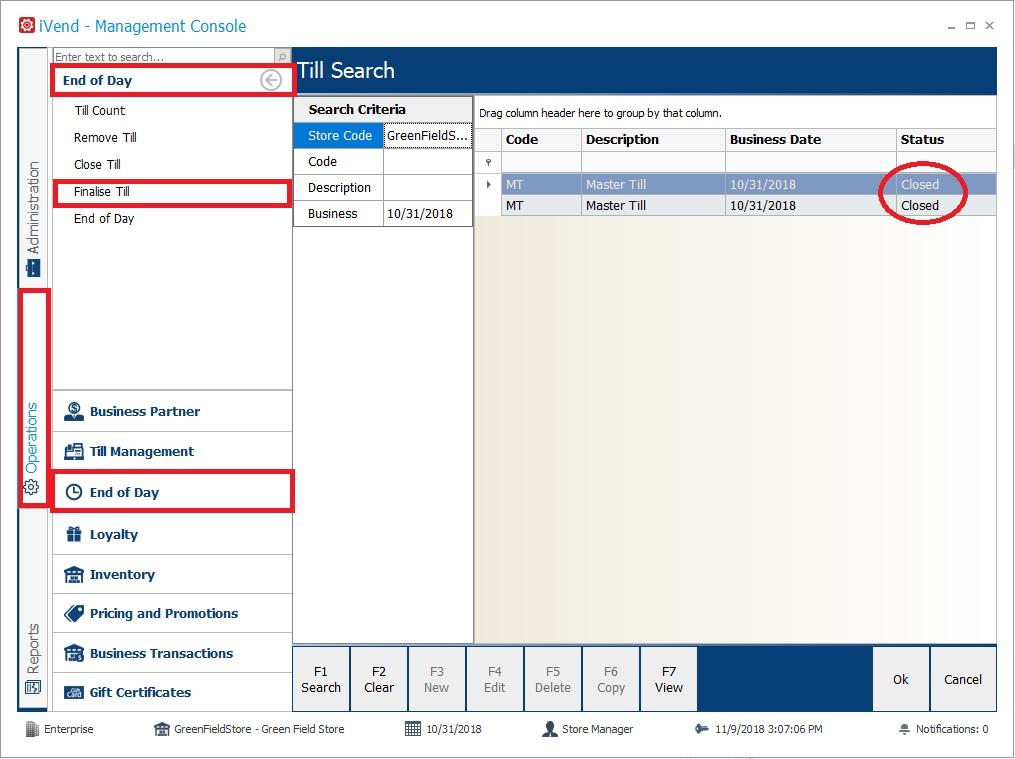
End of Day – Finalize Till Screen
Field | Description/Action |
Search Criteria |
Store Code | Specify the Store Id for which the closed till(s) have to be searched by. |
Code | Specify the code of the closed till to be searched by. |
Description | Specify the description of the closed till(s) to be searched by. |
Search Results |
Code | Displays the code of the till(s) searched on. |
Description | Displays the description of the till(s) searched on. |
Status | Displays the status of the till(s) searched on. (Only tills with the status of Closed are displayed in the search results in the Finalize Till window) |
[Ok] Button | This button saves the changes and closes the screen. To finalize the till, the user selects a row in the search results grid and clicks the [Ok] button. This will update the status of the till to Finalized.
Note: Till Count on finalizing the till is mandatory. On clicking the [Ok] button the Till Count summary view screen will appear. Please refer to the separate topic in this guide on Till Count for further details on how to count the till.
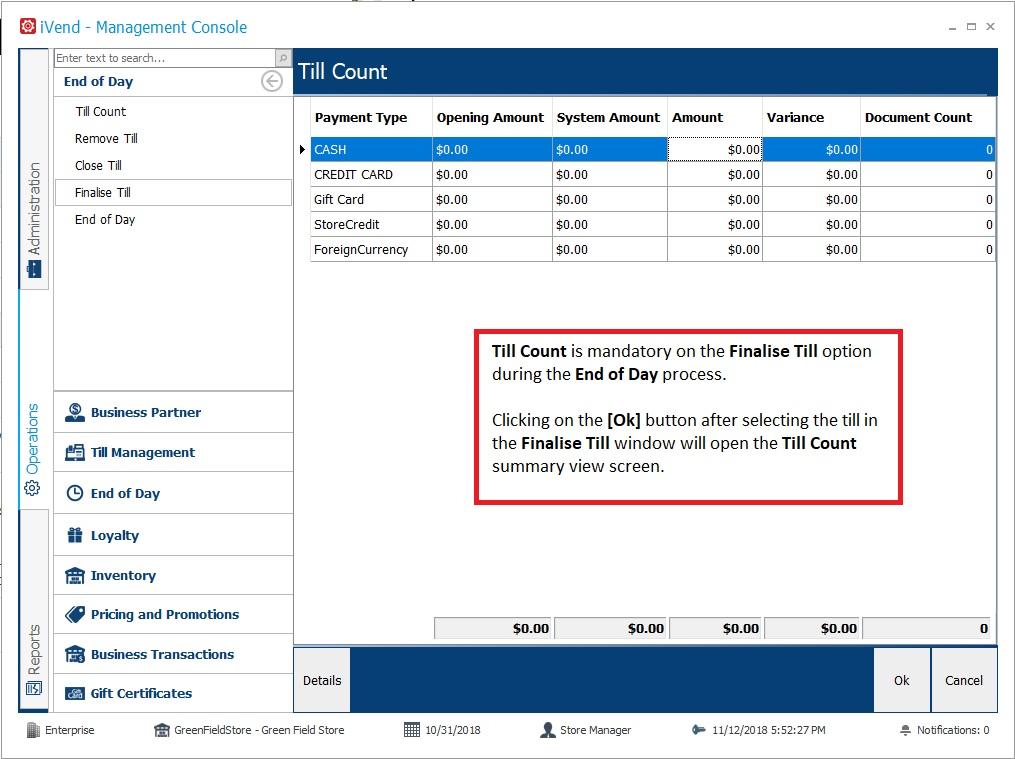
Finalize Till – Till Count Summary View Screen |
[Cancel] Button | This button enables the user to close the screen. Any tills that remain in the search grid of the Finalize Till screen will not be updated. |
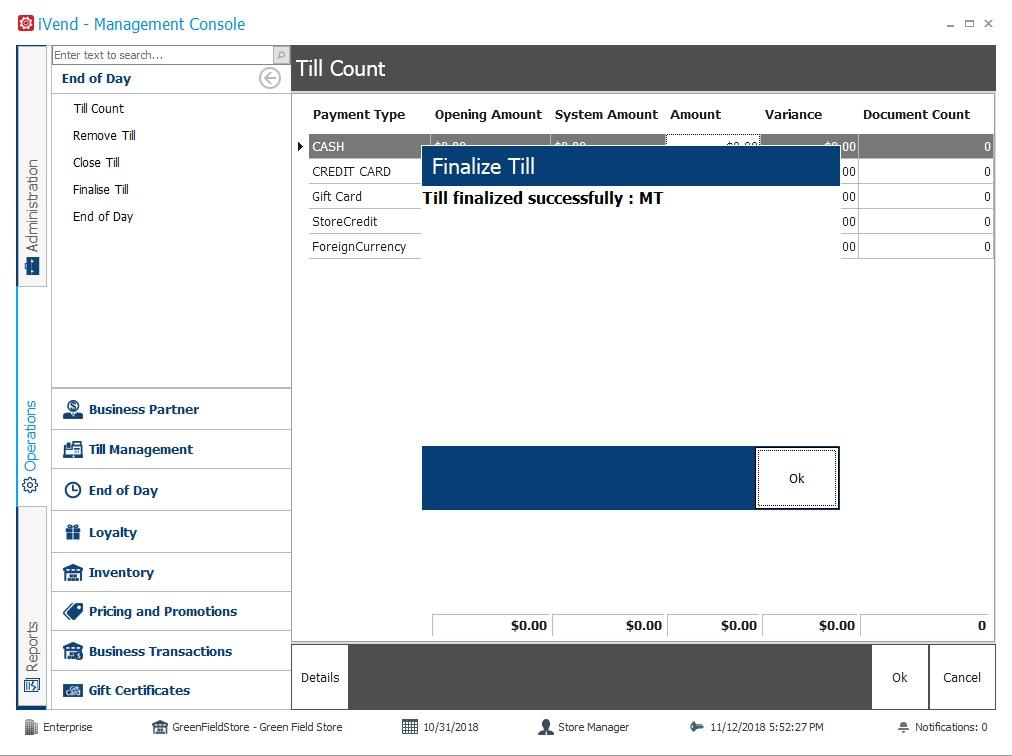
End of Day – Finalize Till Confirmation Window
End of Day
This is the closing activity for the day and closes the current business date for a store. The end of day activity can only be performed for a store when all the users have clocked out and all the tills are Closed.
Although it is possible to finalize the tills after the End of Day, it is highly recommended that all tills are finalized before proceeding with the End of Day process. Tills that are not finalized will maintain a closing balance that will then be reflected in the opening balances for the new tills that are generated for the next business day.
To open the window, from the Management Console navigate to and choose:
Operations > End of Day > End of Day
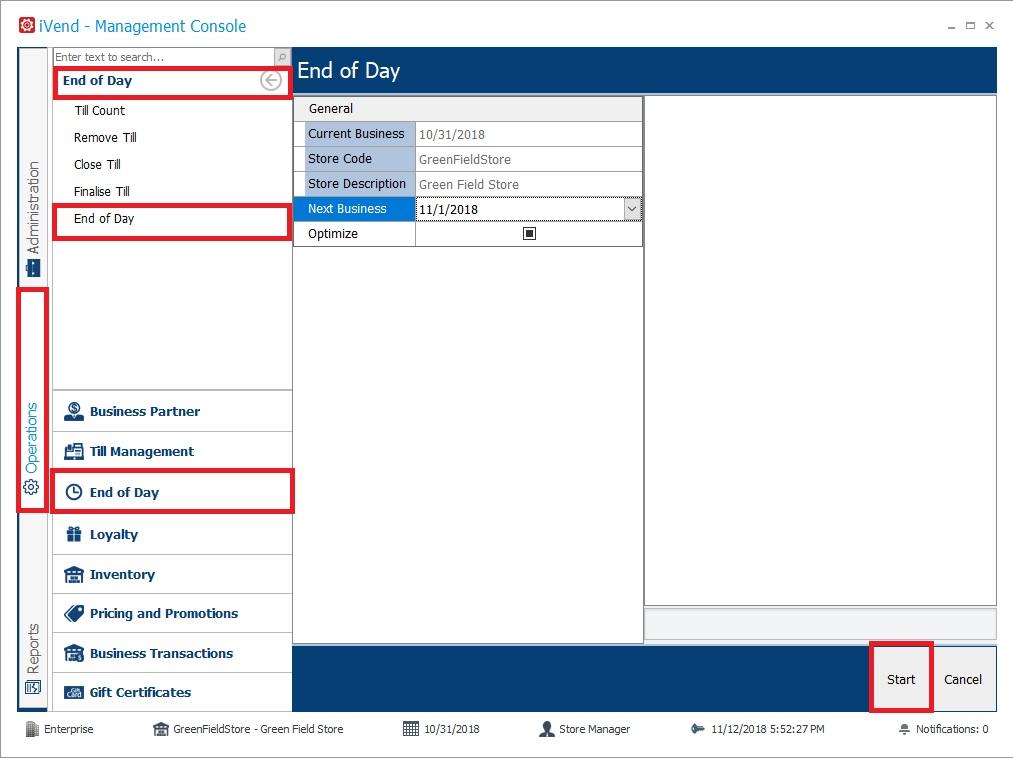
End of Day – Process Window
Field | Description/Action |
Current Business Date | This field is controlled by the system and displays the current business date for the store for which the end of day activity will be carried out for. |
Store Code | This field displays the code of the store for which the end of day activity will be completed for. |
Store Description | This field displays the description of the store for which the end of day activity will be completed for. |
Next Business Date | Enter the next business date for the store for which the end of day activity is being carried out. To select click ▼ to open the calendar control and select the date. The default value for this field is the next business date calculated as (Current Business Date + 1 day). |
Optimize Database | Check this flag if you would like to run a database optimisation script after completing the End Of Day Process. Note: It is recommended to only select this option upon advice from the iVend Retail Support team. Optimisation of the database is not normally a function that is required to be performed on a daily basis and is usually only required if a degradation in the performance of the system has been detected. |
Upgrade Available | This flag is checked by the system if there is an upgrade available for the store system. This flag is read only. Note: An upgrade has to be triggered and initialized at the Enterprise for the store network. The upgrade is run as a top down approach, meaning that the upgrade is performed at the Enterprise first then rolled down to the stores. |
[Start] Button | Click this button to perform the End of Day activity. The system displays an error message if any POS user has not clocked out or if any of the tills have not been Closed. If the system is configured to Reassign All Tills At End Of Day, then all the Master Tills will be automatically assigned to new User or Team tills for the next business day on running this activity. |
[Cancel] Button | This button enables the user to cancel proceeding with the End of Day process and will close the screen. |
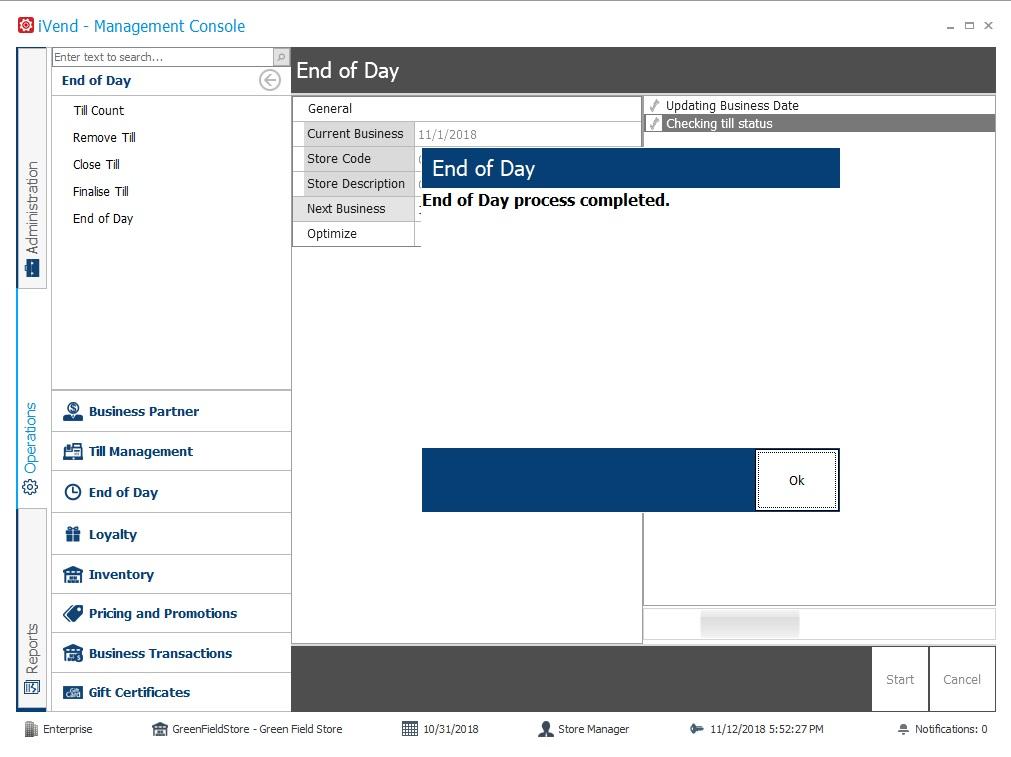
End of Day – Process completed
Note: From version 6.5 Update 6 of iVend Retail, running the End of Day process will automatically generate the End of Day report.
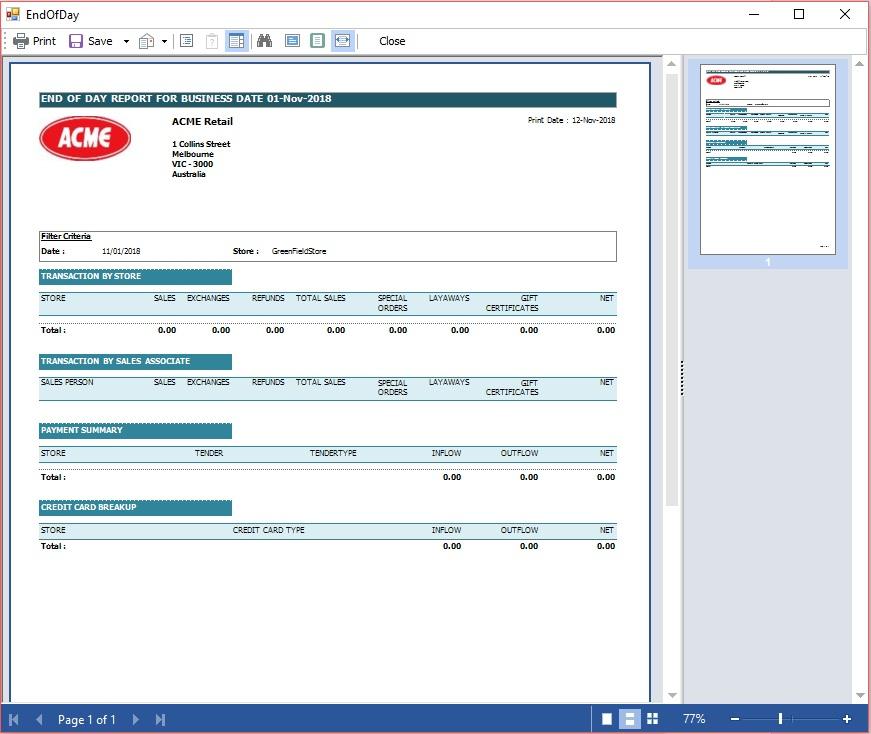
End of Day – Report
Alternatively, the End of Day report can be run from the Management Console, Reports module – Navigate to and select: Reports > Tender and Till Management > End of Day
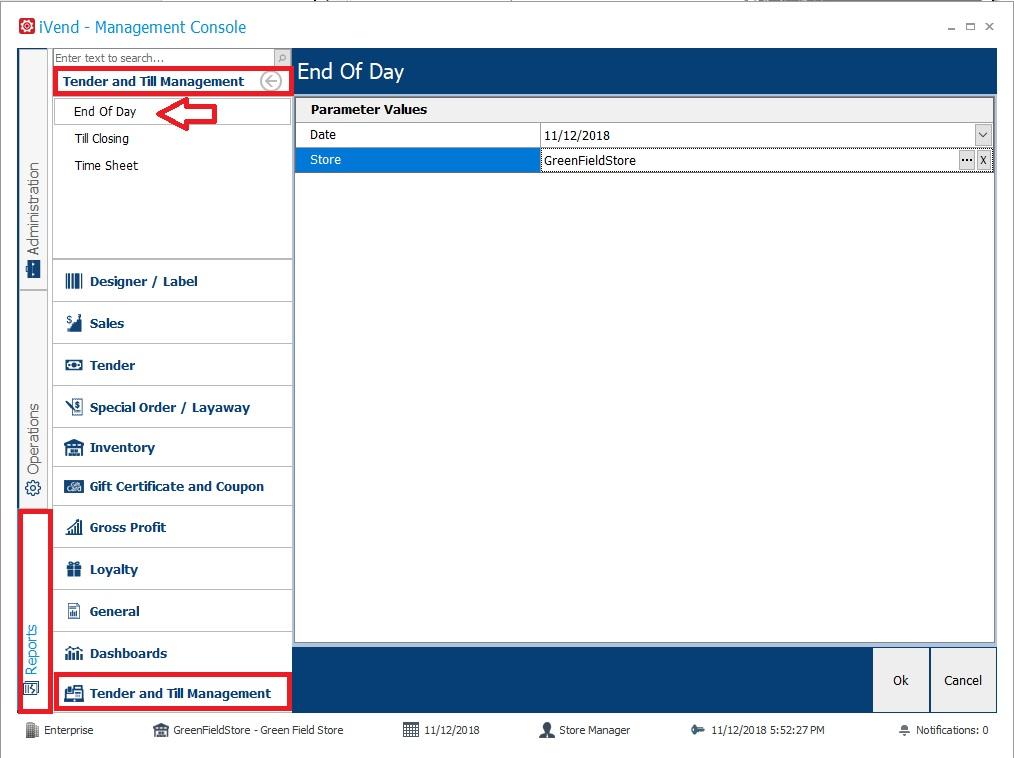
Reports – Tender and Till Management – End of Day
Reports available in the Tender and Till Management reports menu include:
· End of Day
· Till Closing
· Time Sheet
Additional Tender reports can be found in the Reports menu, Tender and include:
· Credit Card Details
· Tender Collection By POS
· Tender Collection By Sales Person
· Tender Collection By Store
· Tender Collection By Till
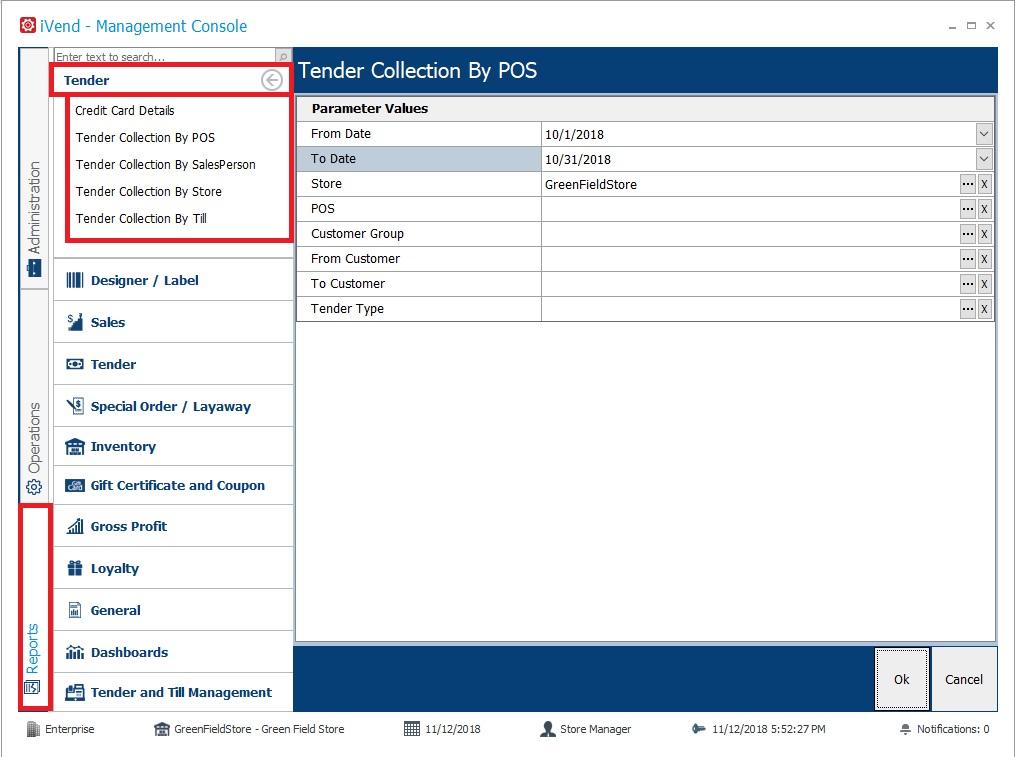
Tender Reports – Tender Collection By POS Runtime parameters
Report Examples:
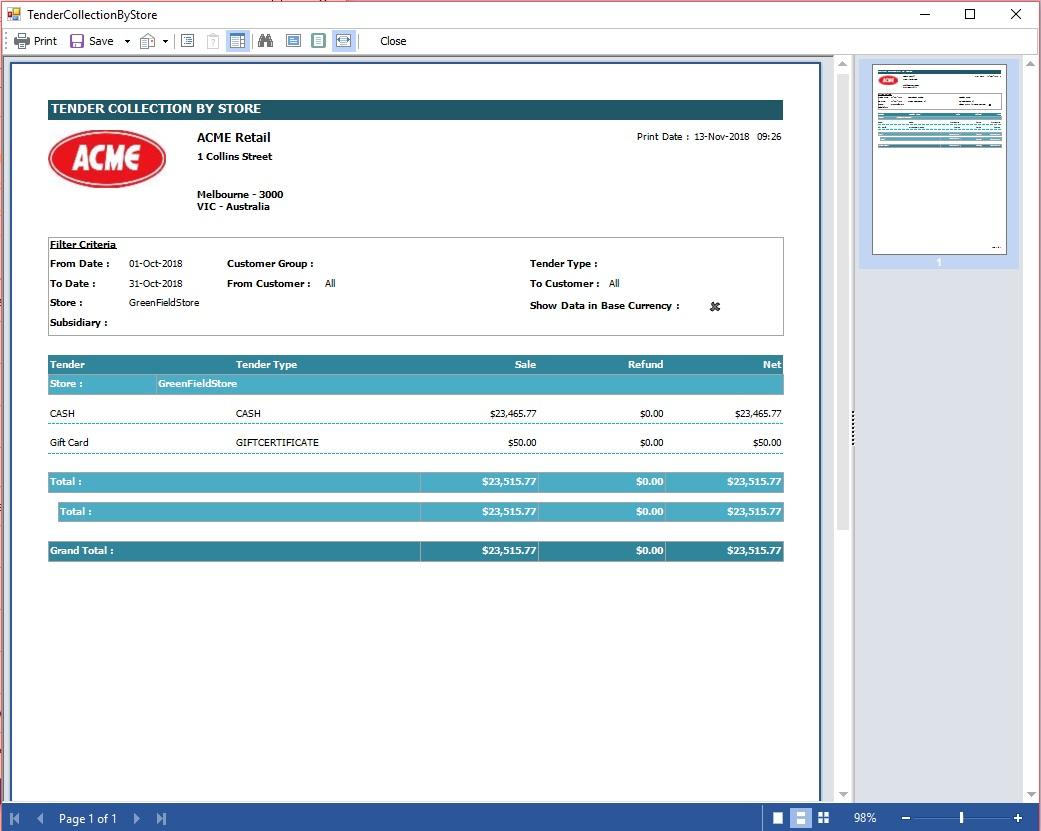
Tender Collection By Store report

Tender Collection By POS
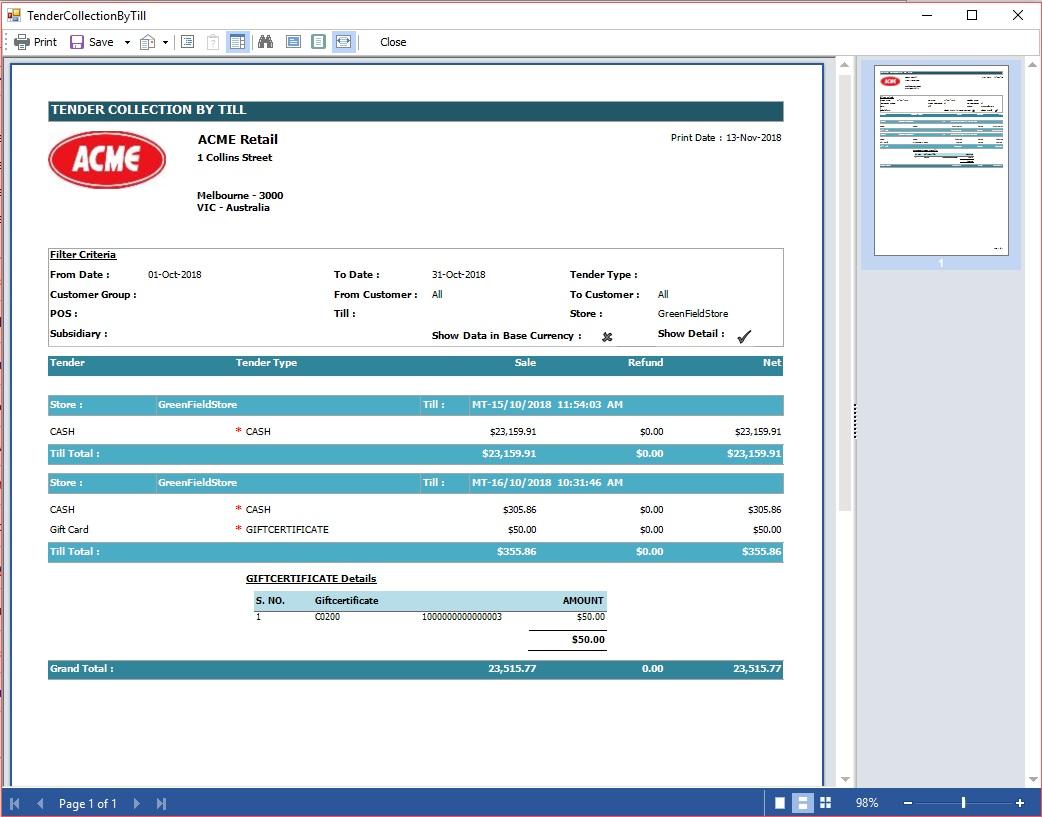
Tender Collection by Till report