Stock Management with Handheld Devices
Stock Management with Handheld Devices
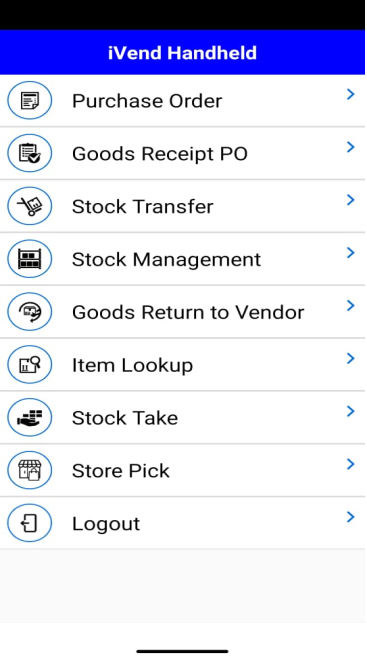
The iVend Handheld module in iVend Retail versions 6.2 and above allows its users to manage store inventory using a iVend Handheld device running on Android Mobile OS version 5.x and onwards. The application is available as a free download via the google play store. The below Inventory Transactions can be accomplished on the fly, using the iVend Handheld module.
1. Purchase Order: Creation of Purchase order for procurement of goods.
2. Goods Receipt PO: Generation of Goods Receipt PO.
3. Stock Transfer: Generation of stock transfer request, shipment, and Receipt.
4. Stock Management: Generation of Goods Issue, Goods Receipt, Location transfer.
5. Goods Return to Vendor: Register Goods returned to Vendor.
6. Item Look up: Scan or search item to know stock levels.
7. Stock Take: Audit stock level.
8. Store Pick: Reserving Stock until Order is picked.
Installation and setup of iVend Handheld Module on Android devices
iVend Handheld Module can only be installed on an Android Mobile version 5.x or above.
Note: Before installing the iVend Handheld module, the iVend API Service should be installed and running. iVend Web API along with synchronization of data between iVend Retail Mobile and iVend Retail Enterprise also enables integrating iVend Retail with third party applications or ERPs.
Steps to install the iVend APIs
1. Download the iVend Retail installation package from the CitiXsys Portal.
2. Run the installation package and follow the instructions as it appears in the installation wizard.
3. According to your scenario, choose an installation mode from the Installation Mode Selection Window:
o Single Machine Installation: Choose the Single Machine Installation option, If you are going to run iVend POS on a single machine. This will automatically install the iVend API on the same machine.
o Custom Installation: Choose the Custom Installation, if you are looking to have a multi-machine installation and select the iVend API along with required components.
Note: To ensure if the APIs are setup correctly, it is recommended to perform an API health check. API health check ensures that the below checkpoints on the connected server:
IIS is installed.
iVend API Port (8642) is open.
iVend API is accessible.
Note: The SQL Server Port should be allowed in the Windows Firewall. For further Information on iVend Retail Installation, refer to iVend Retail Installation Manual.
Steps to install and setup iVend Handheld Module
Download and install the iVend Handheld application from the Google Play Store.
Launch the application and click on the Setup icon.
Supply the Server Address | API User ID | API Password. on the configuration screen.
Note: The API User ID | Password | IP Address | Service Name has to be obtained from the iVend Management Console Administrator. For the Server Address, you may use the below URL HTTPS://<tenant-name>.ivendcloud.com:8642/ivendapi/ivendapi.svc/webapi/
Save the configuration.
Log in to the application with the API User ID and API Password.
Pick a warehouse for the Store for which the stock is to be managed.
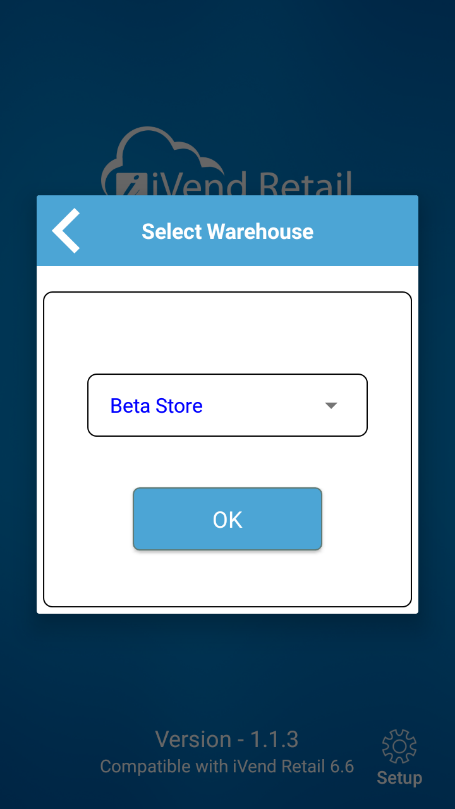
Note: When you connect iVend Handheld device to a store server, only the store warehouse appears in Select Warehouse window.
Once you have made the warehouse selection, you will be presented with iVend Handheld application’s main menu screen. You are now ready to perform transactions using iVend Handheld.
Now let us perform the transactions on the Handheld device and then see the replication of them in iVend at the Management Console.
Performing Transactions using iVend Handheld – Purchase Order
Purchase Order is nothing, but a request made to procure stock. Follow these procedures to perform a Purchase Order transactions using iVend Handheld:
Launch the iVend Handheld application.
Supply the API User ID and API Password.
Select the relevant warehouse.
Purchase Order
From the main menu, select Purchase Order to procure stock from the supplier. Fill in the data as per the table below. A sample of the Purchase Order screen filled in is pasted below.
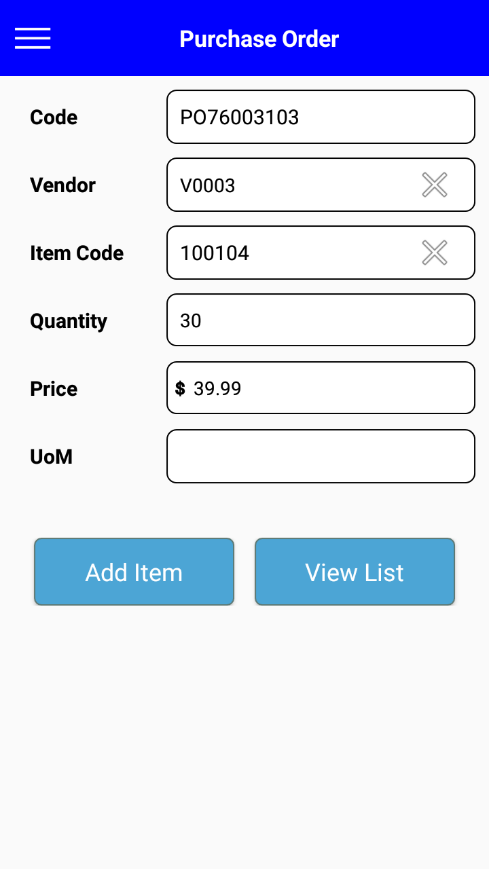
Once all the data has been entered, Tap the [Save PO] button. You should see a confirmation message.
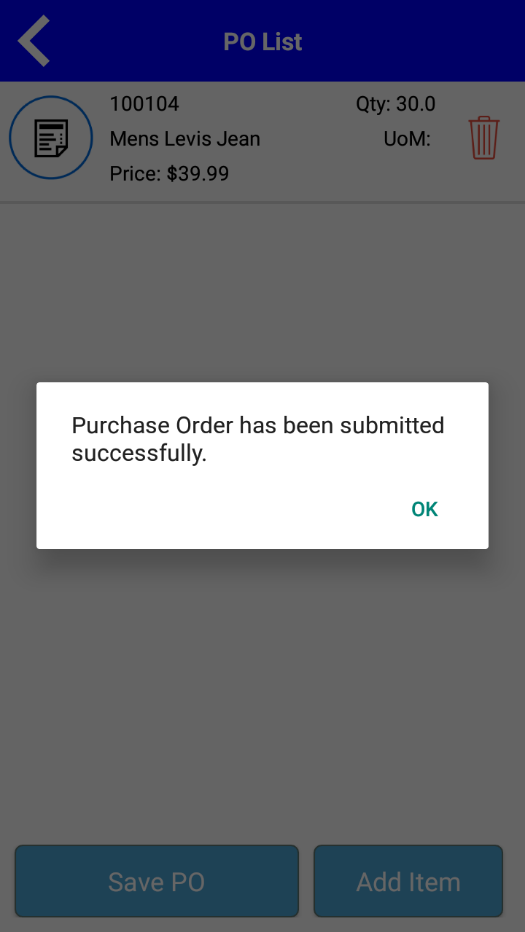
Note: The Purchase order created using handheld is reflected in Purchase order section of the Management console.
Performing Transactions using iVend Handheld – Goods Receipt PO
Goods Receipt PO is created when goods are received against a purchase order. Follow these procedures to perform a Goods Receipt transaction using iVend Handheld:
Launch the iVend Handheld application.
Supply the API User ID and API Password.
Select the relevant warehouse.
Goods Receipt PO
From the main menu, select Goods Receipt PO to receive stock from a Purchase Order. Fill in the data as per the table below. A sample of the Goods Receipt PO screen filled in is pasted below.
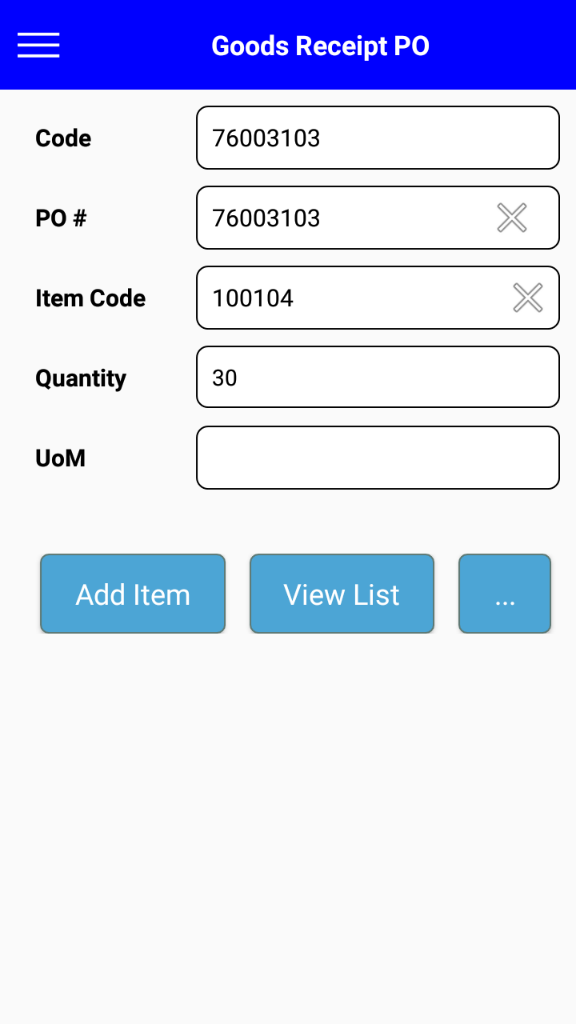
Once all the data has been entered, Choose the [Save GRPO] button. You should see a confirmation message.
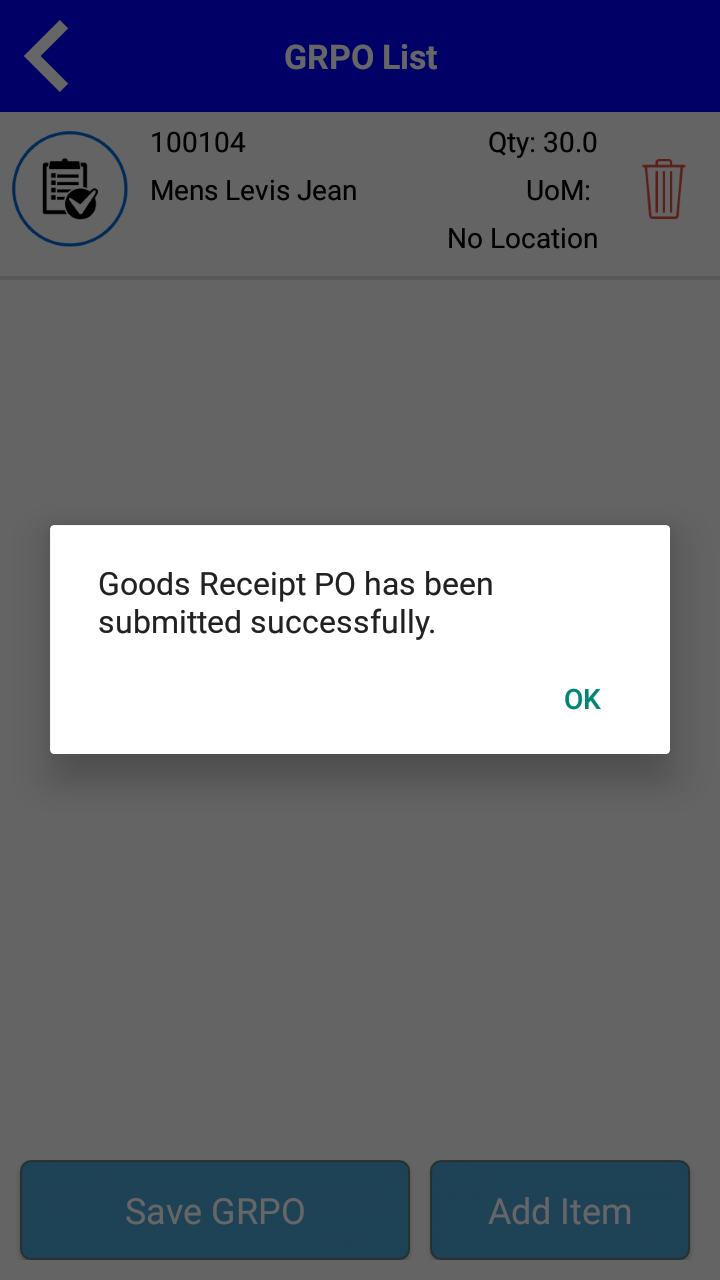
Note: The Goods Receipt PO created using handheld is reflected in Goods Receipt section of the Management console.
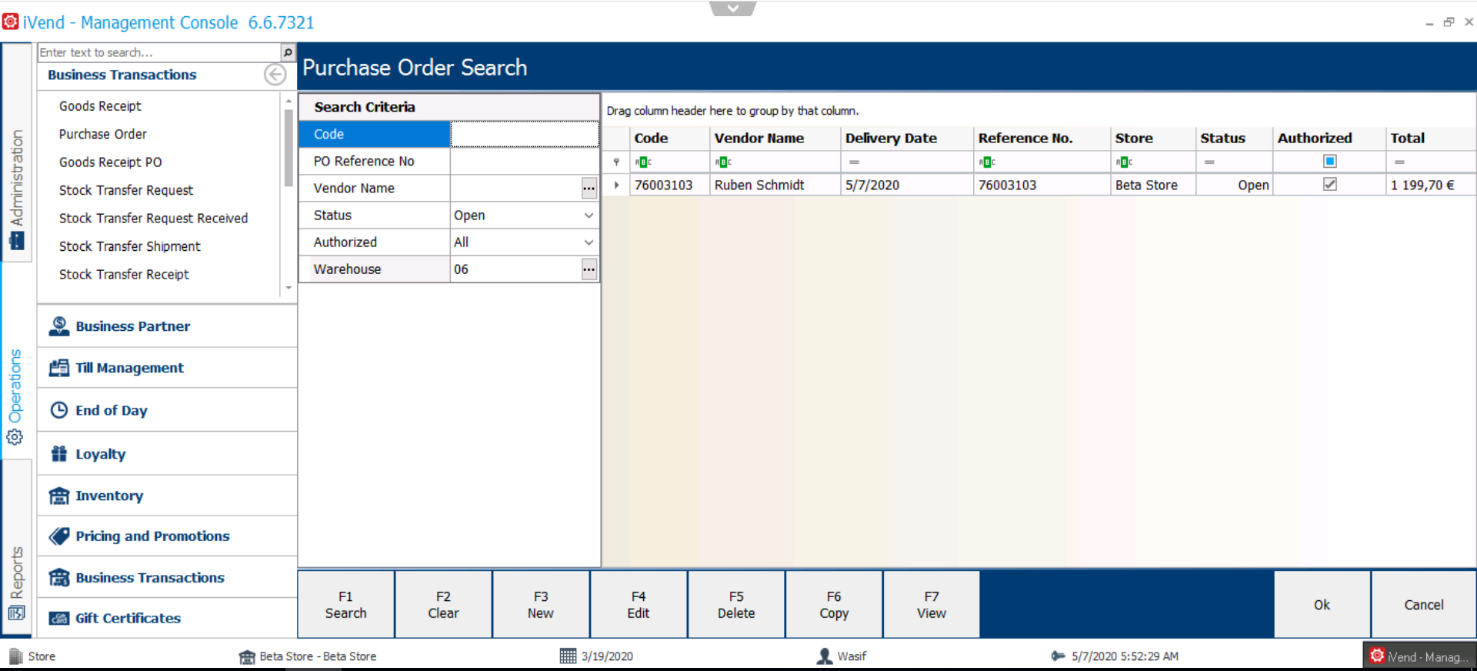
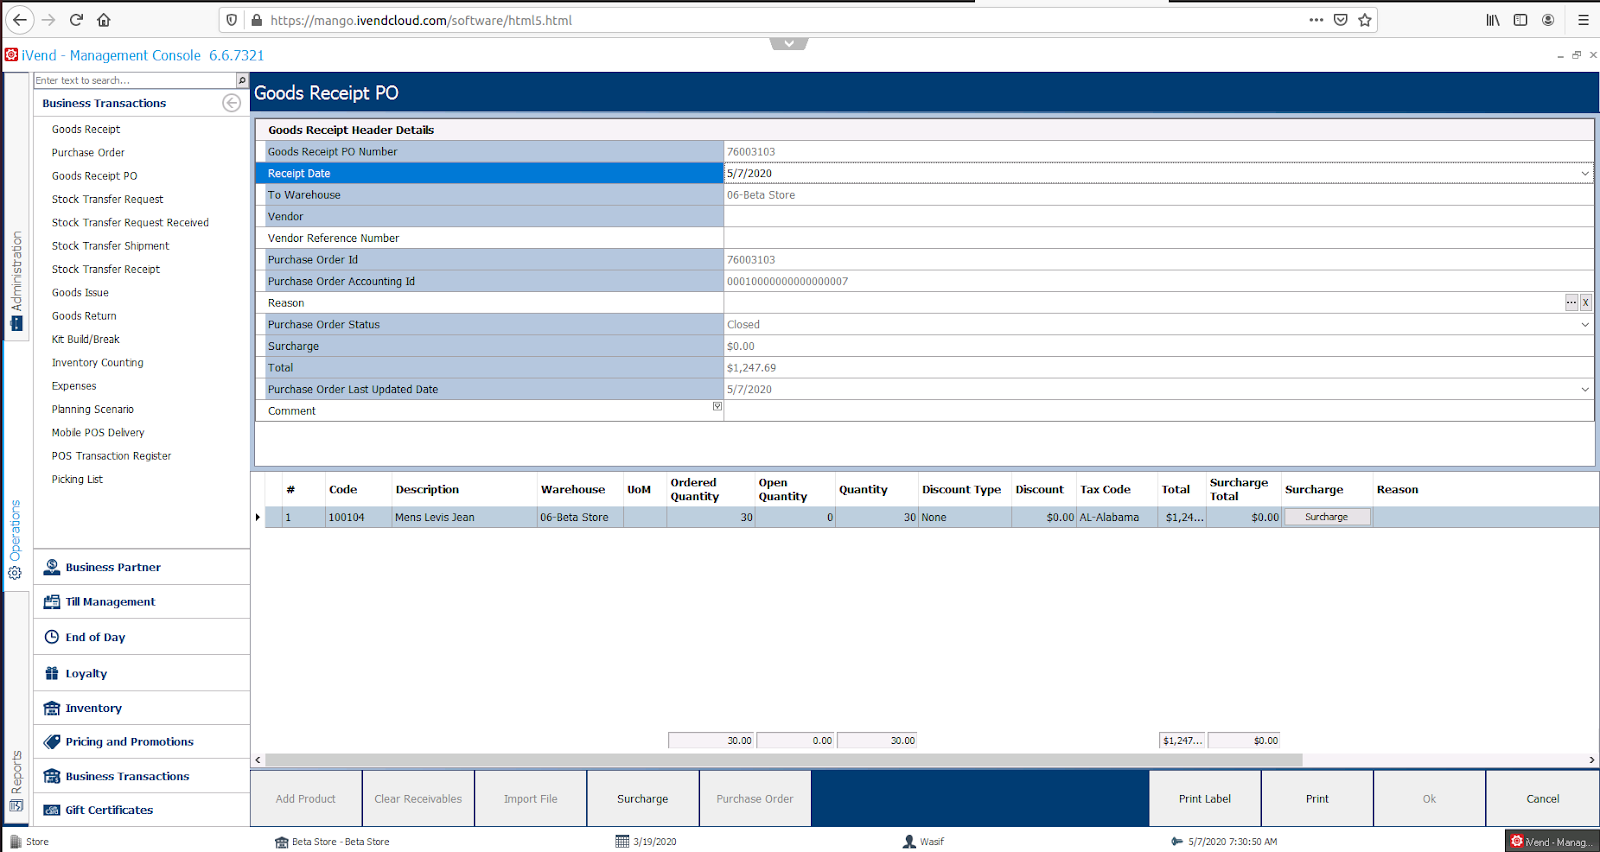
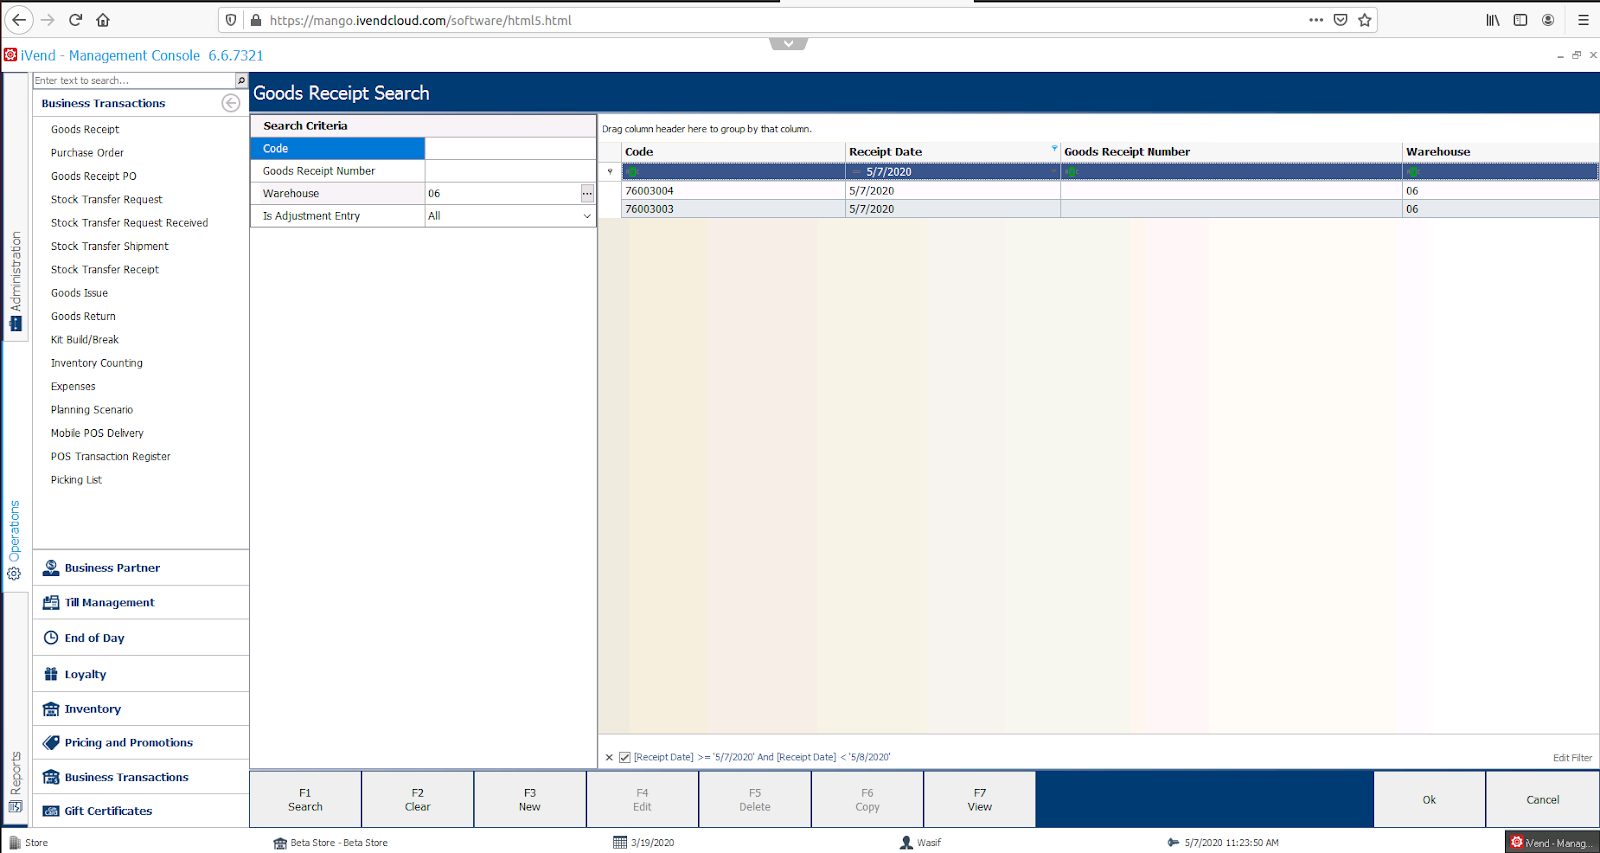
Now go to the iVend Management Console to check the Good Receipt PO document. Go to: Operations > Business Transactions > Goods Receipt PO.
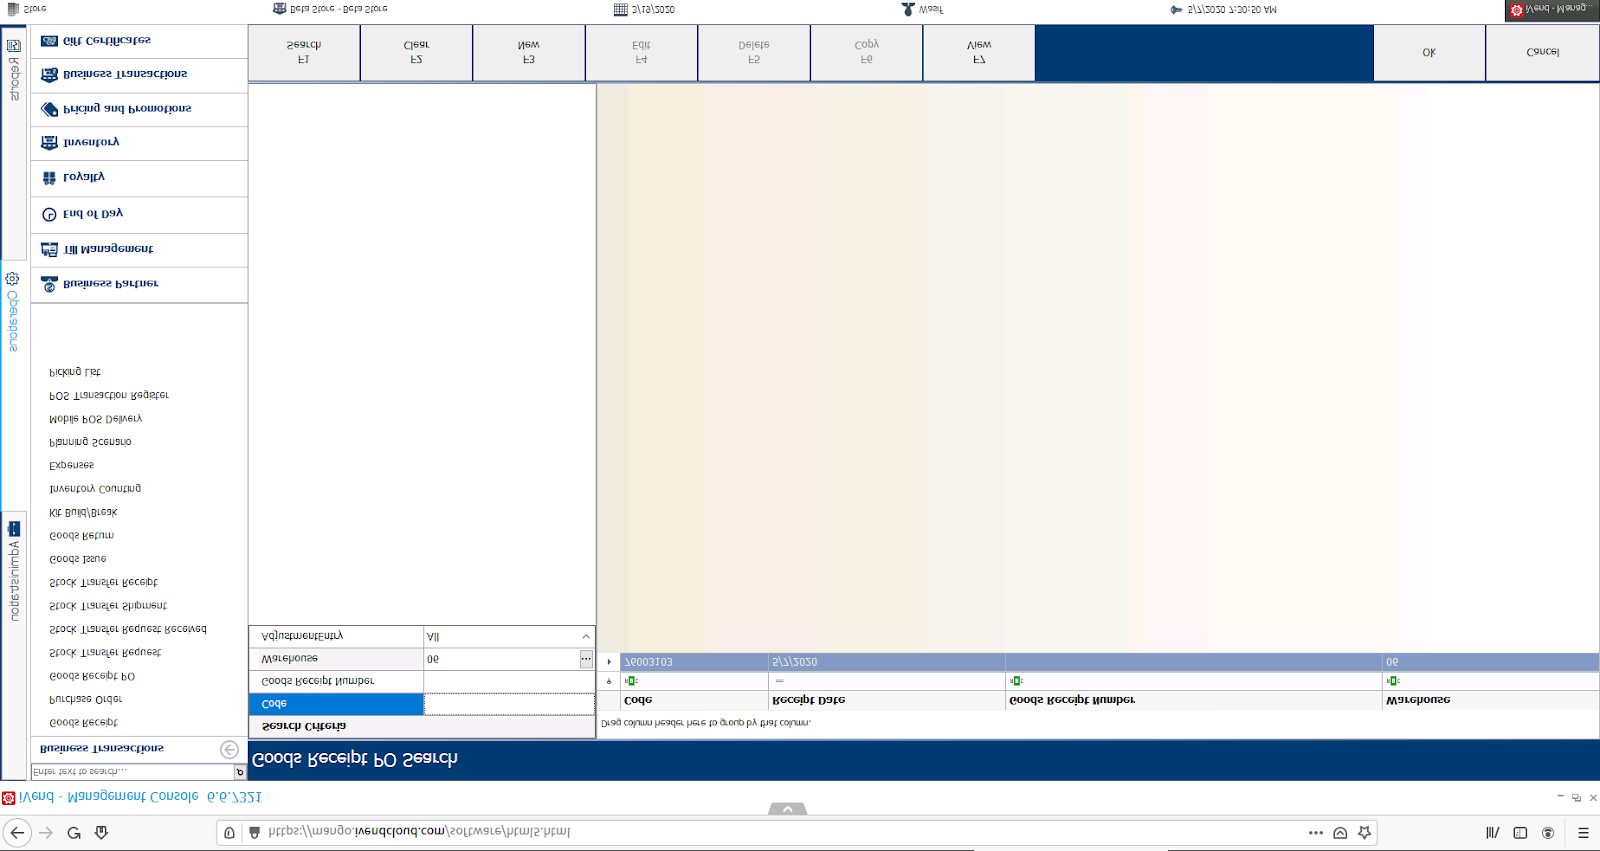
Select the Good Receipt PO, and Press [F7 View] – See the Purchase Order Accounting Id reference that has come from the processing the Goods Receipt PO on the Handheld device.
Performing Transactions using iVend Handheld – Stock Transfer
You can not only request goods from another warehouse but also transfer goods to another warehouse using the Handheld scanning device.
Follow these procedures to perform transactions using iVend Handheld:
Launch the iVend Handheld application.
Supply the API User ID and API Password.
Select the relevant warehouse.
Note: The warehouse from where the goods are being shipped creates the Stock Transfer Shipment transaction and the receiving warehouse uses the Stock Transfer Receipt option to receive the goods in their warehouse.
Stock Transfer - Request
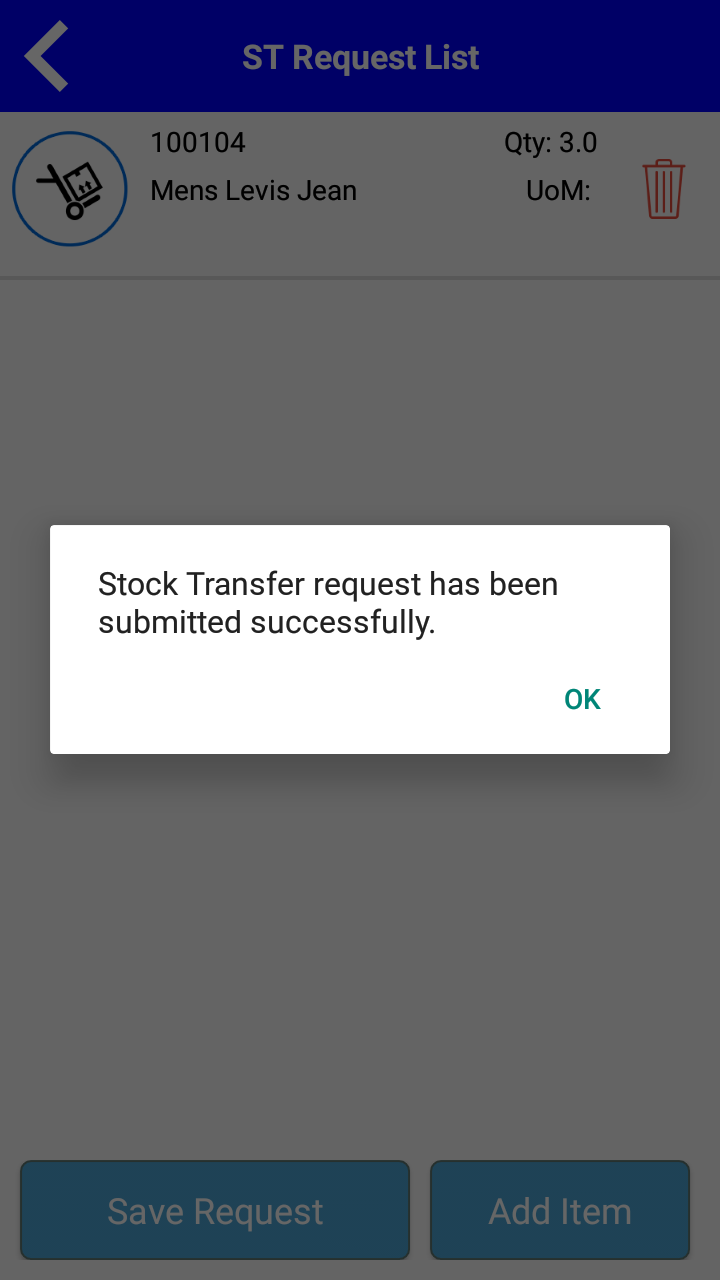
To generate a Stock Transfer Request, from the main menu, select Stock Transfer and tap on the Request sub-menu. The Stock Transfer Request window appears. Fill in the data as per the table below. A sample of the Stock Transfer Request screen filled in is pasted below.
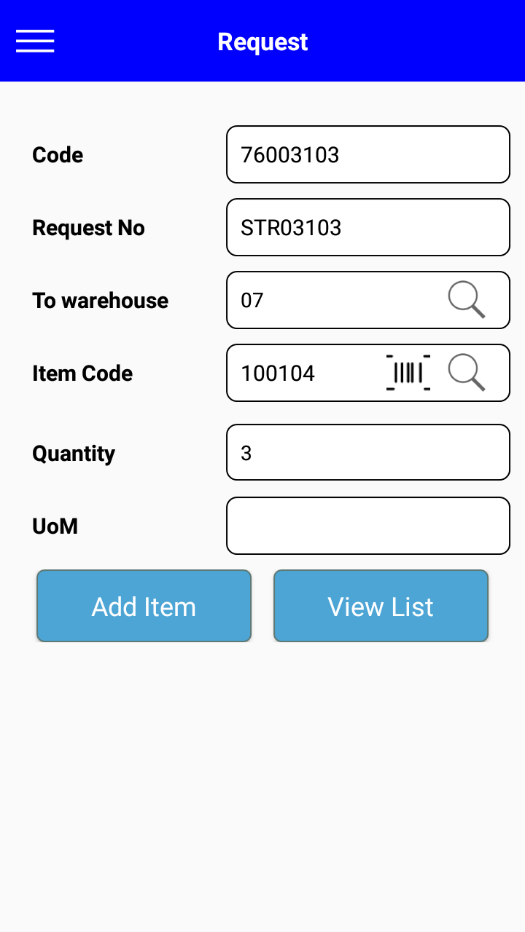
Once all data is entered, choose the [Save] button to confirm the Stock Transfer Request
Note: The stock transfer request generated via iVend handheld is populated on the Stock Transfer Request Search Screen of the warehouse from where the stock transfer request is generated.
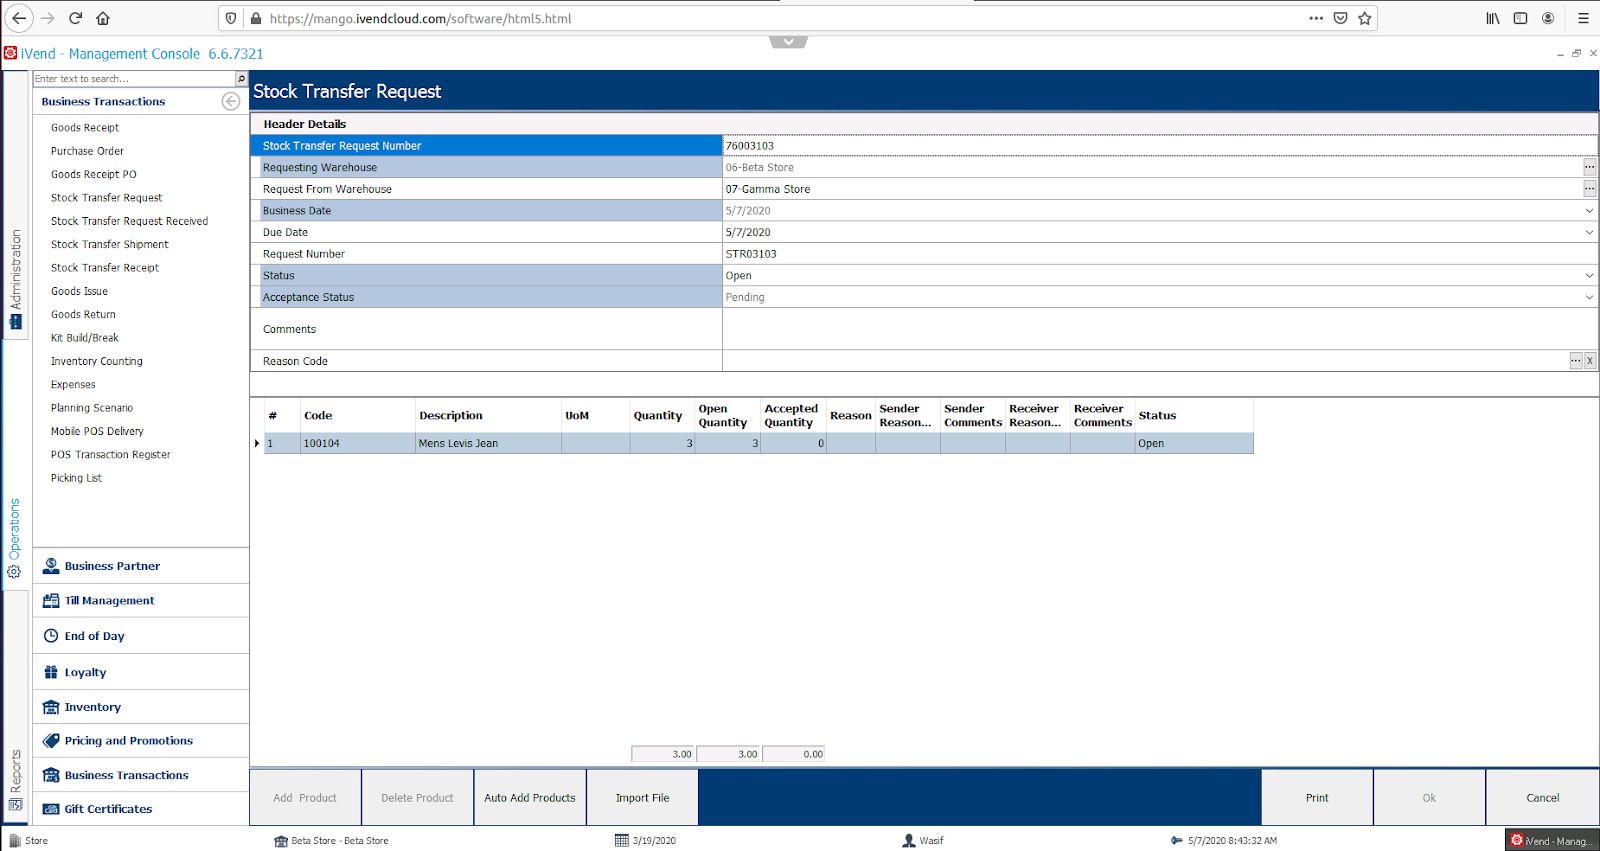
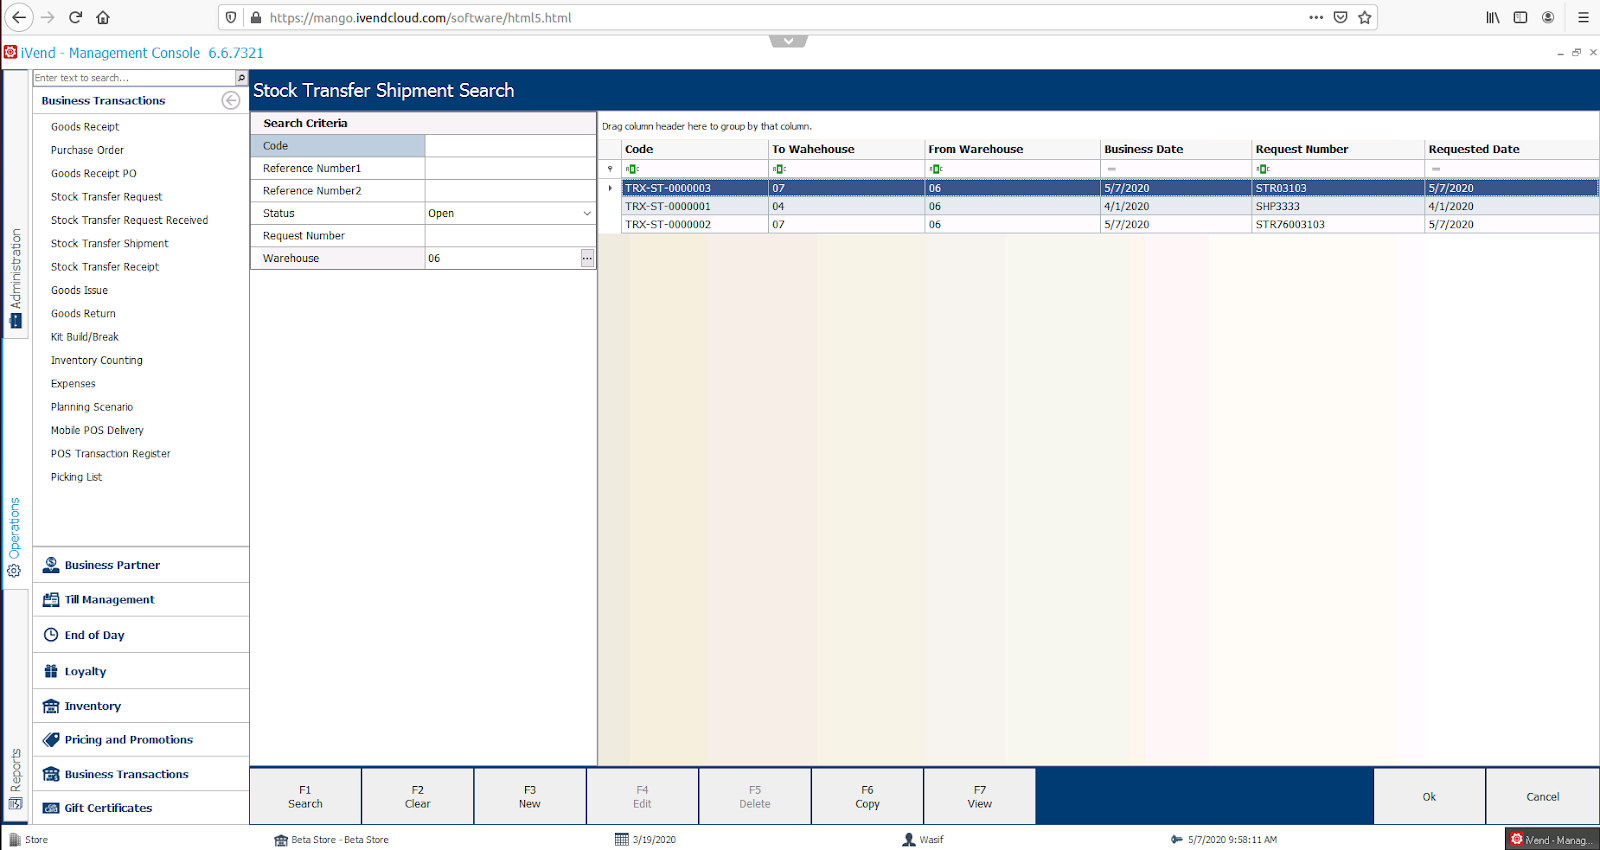
Now go to the iVend Management Console to check the Stock Transfer Request document. Go to: Operations > Business Transactions > Stock Transfer Request.
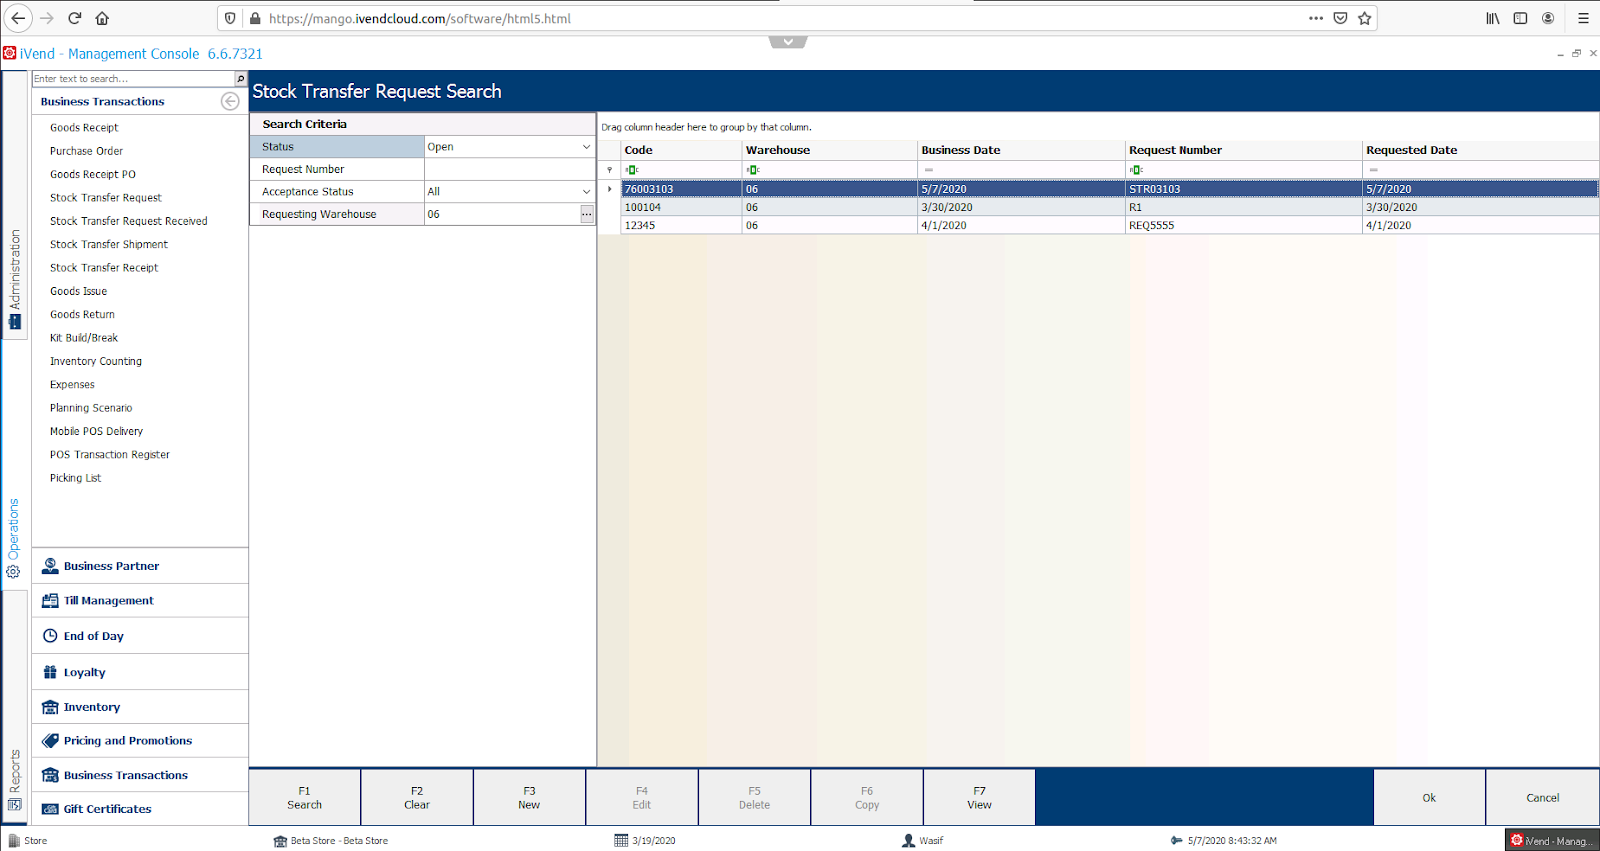
Select the Stock Transfer Request and Press [F7 View] - See the Stock Transfer Request reference that has come from the processing the Request on the Handheld device.
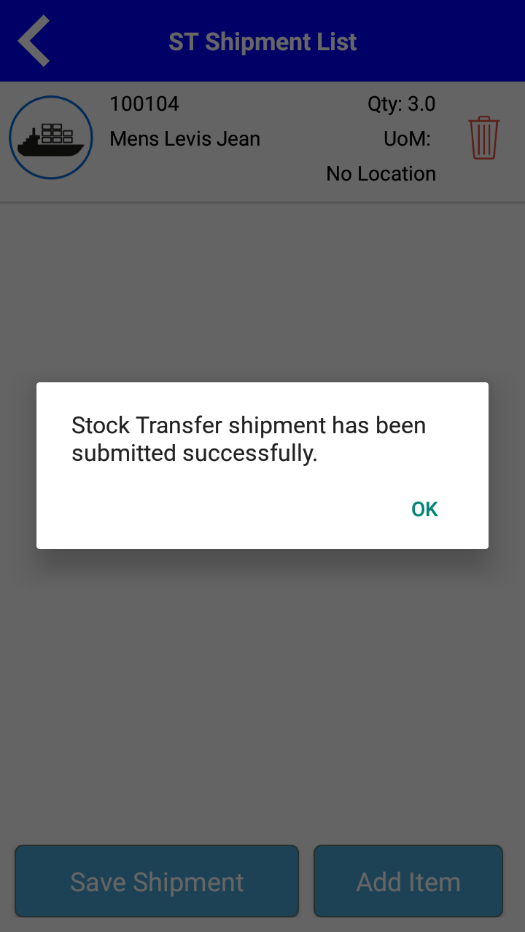
Stock Transfer - Shipment
To generate a Stock Transfer Shipment, from the main menu, select Stock Transfer and tap on the Shipment sub-menu. The Stock Transfer Shipment window appears. Fill in the data as per the table below:
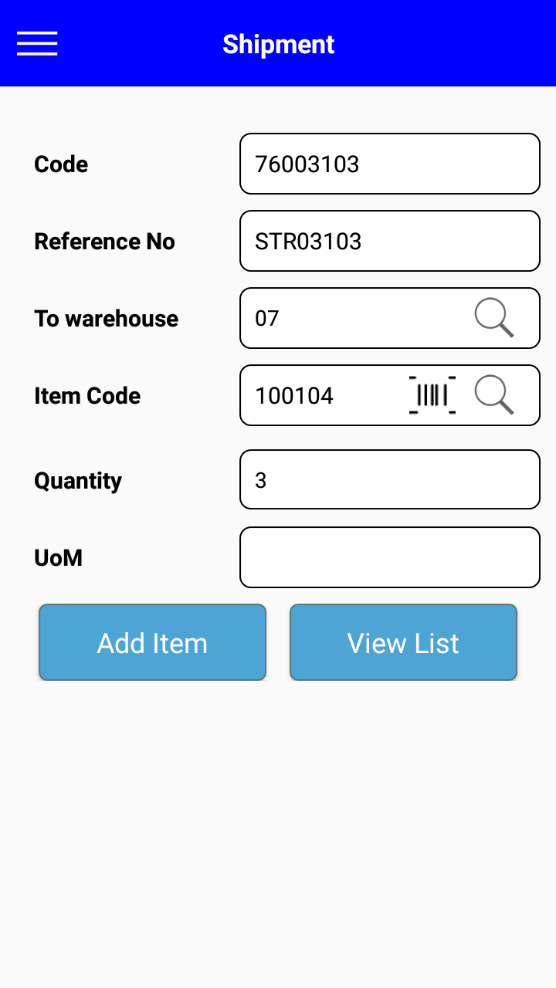
Once all data is entered, choose the [Save Shipment] button to confirm the Stock Transfer Shipment Request.
Note: The stock transfer request created using iVend handheld is reflected under the Stock Transfer Shipment section of the Management Console.
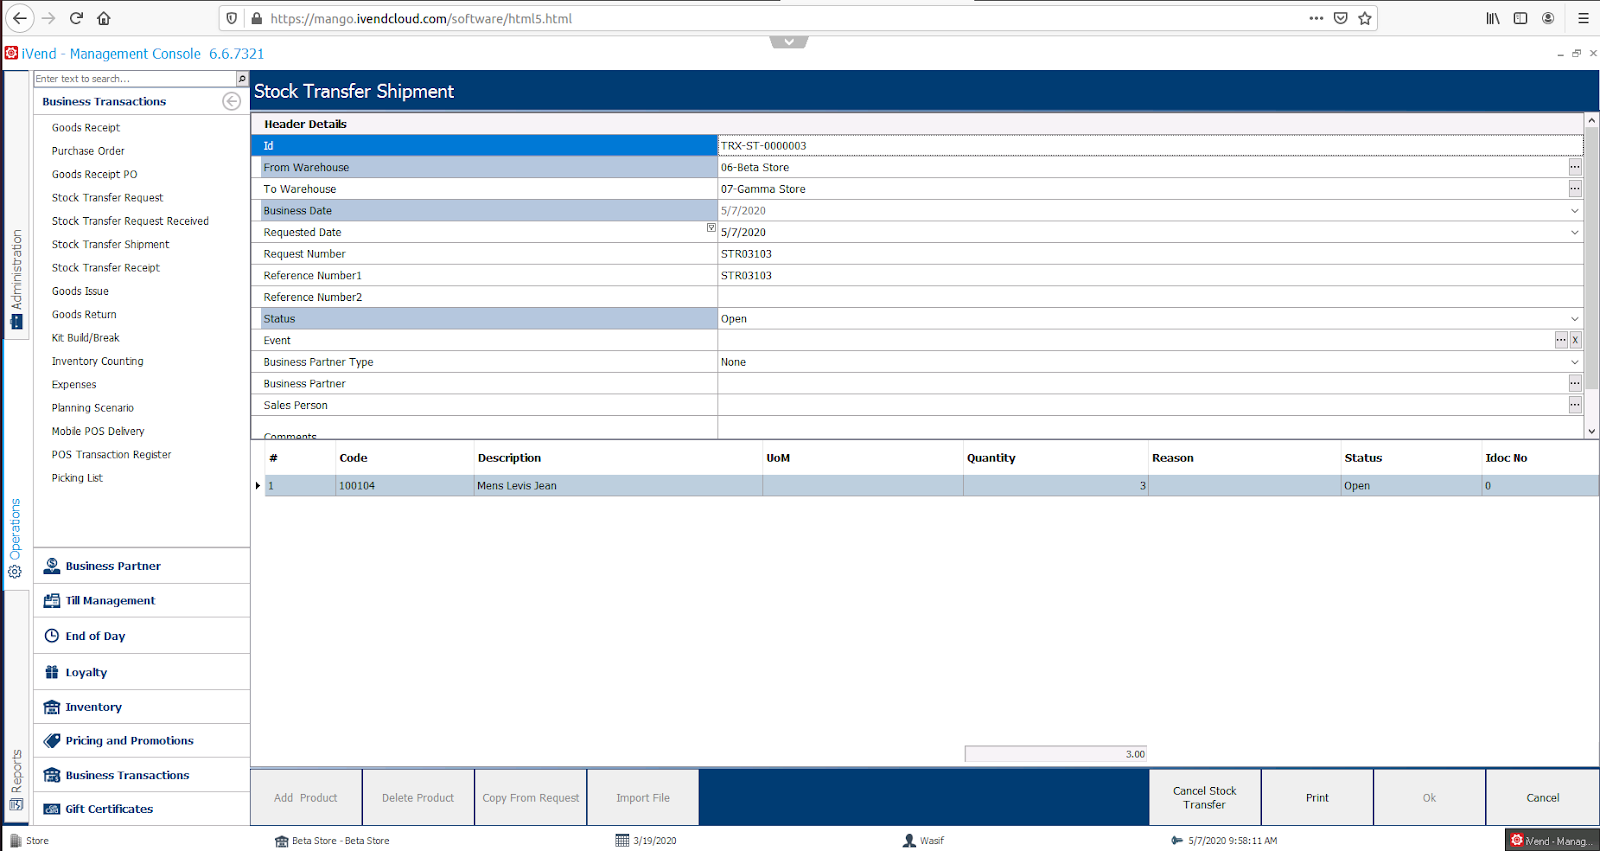
Now go to the iVend Management Console to check the Stock Transfer Shipment document. Go to: Operations > Business Transactions > Stock Transfer Shipment.
Select the Stock Transfer Shipment and Press [F7 View] - See the Stock Transfer Shipment reference that has come from the processing the Shipment on the Handheld device.
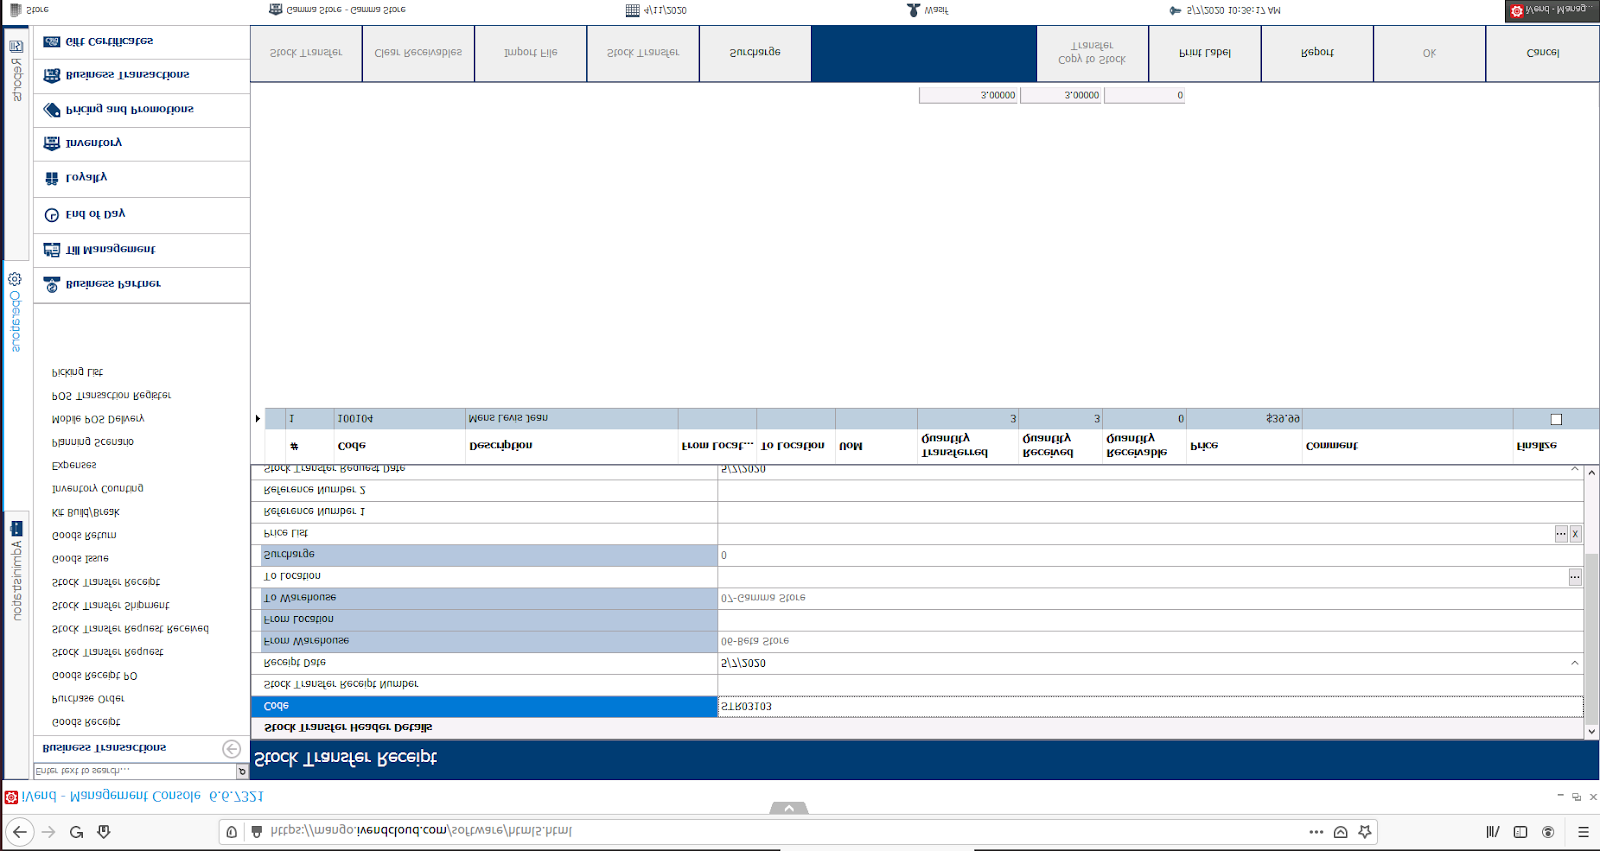
Stock Transfer – Receipt
To generate a Stock Transfer Receipt, from the main menu, select Stock Transfer and tap on the Receipt sub-menu. The Stock Transfer Receipt window appears. Fill in the data as per the table below:

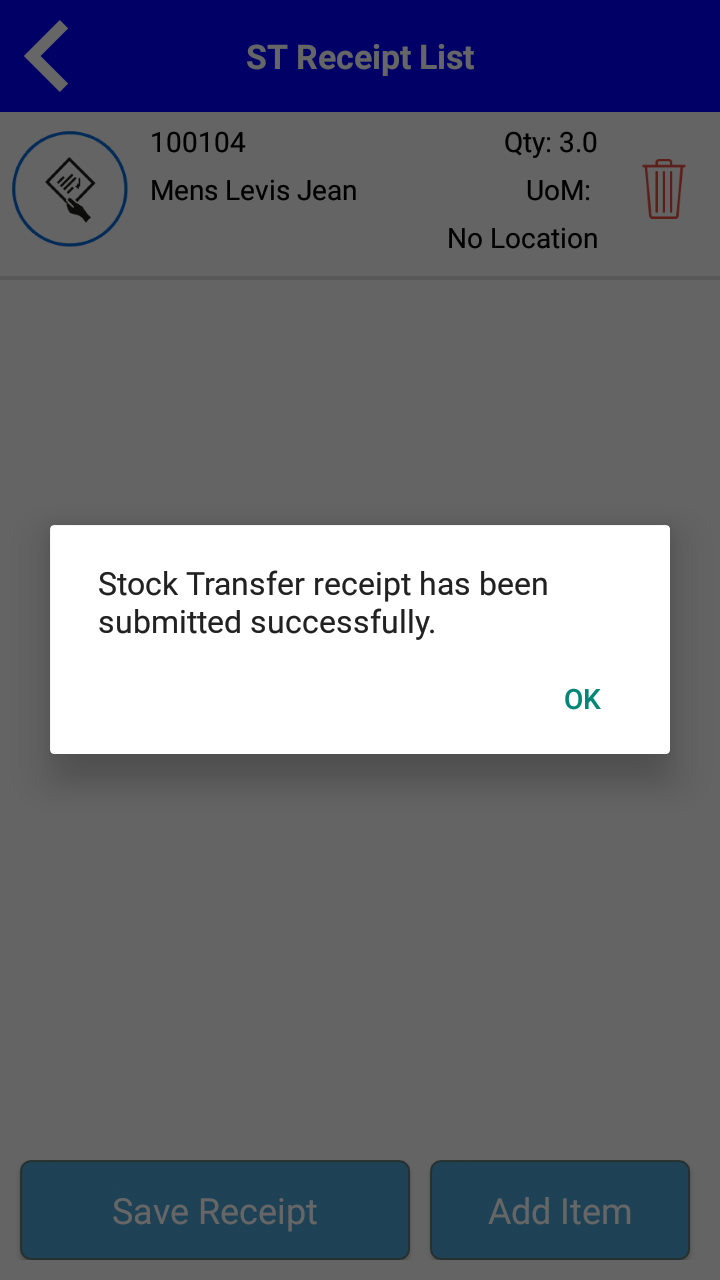
Once all data is entered, choose the [Save] Button to confirm the Stock Transfer Receipt.
Note: The Stock Transfer Receipt created using iVend handheld is reflected under the Stock Transfer Receipt section of the Management Console.
Now go to the iVend Management Console to check the Stock Transfer Receipt document. Go to: Operations > Business Transactions > Stock Transfer Receipt.
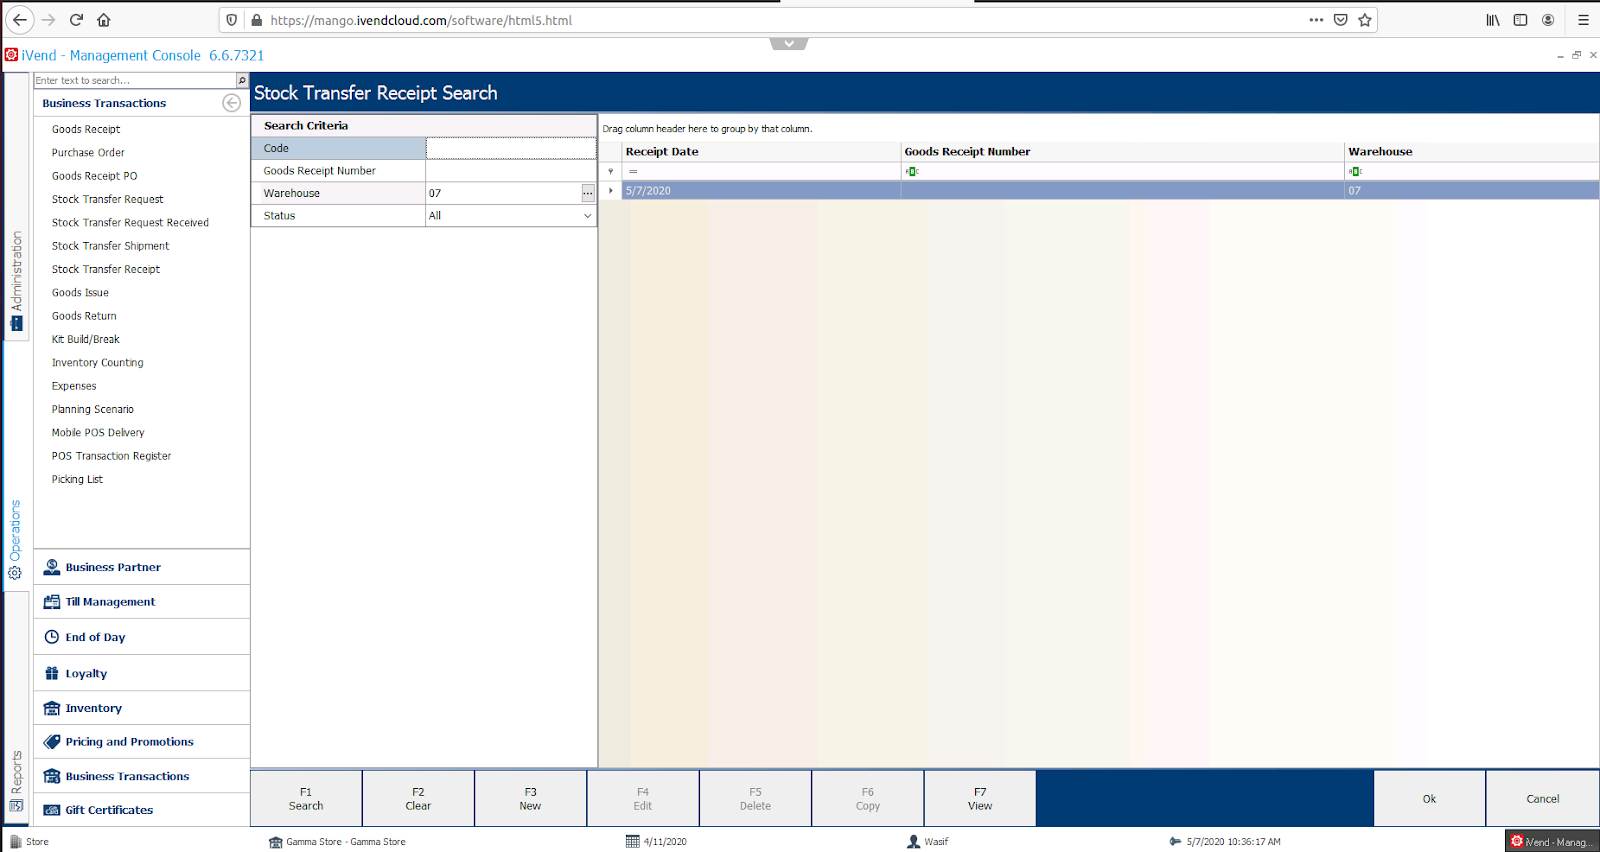
Select the Stock Transfer Receipt and Press [F7 View]. See the items that were received in on the Handheld from the Shipment processed earlier.
Performing Transactions using iVend Handheld – Stock Management
Follow these procedures to perform transactions using iVend Handheld:
Launch the iVend Handheld application.
Supply the API User ID and API Password.
Select the relevant warehouse.
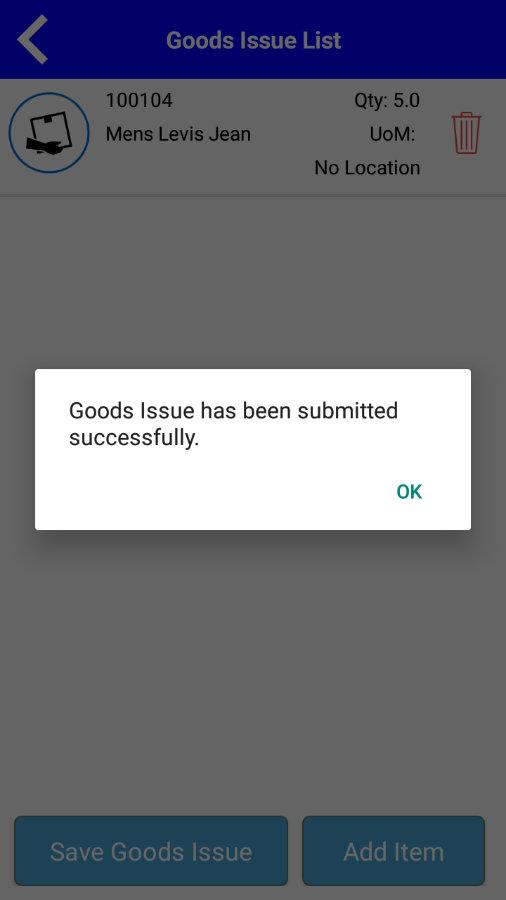
Stock Management - Goods Issue
From the main menu, select Stock Management and tap on the Goods Issue sub-menu. The Goods Issue window appears. Fill in the data as per the table below. A sample of the Goods Issue screen filled in is pasted below.

Once all data is entered, choose the [Save Goods Issue] button, to confirm the Goods Issue
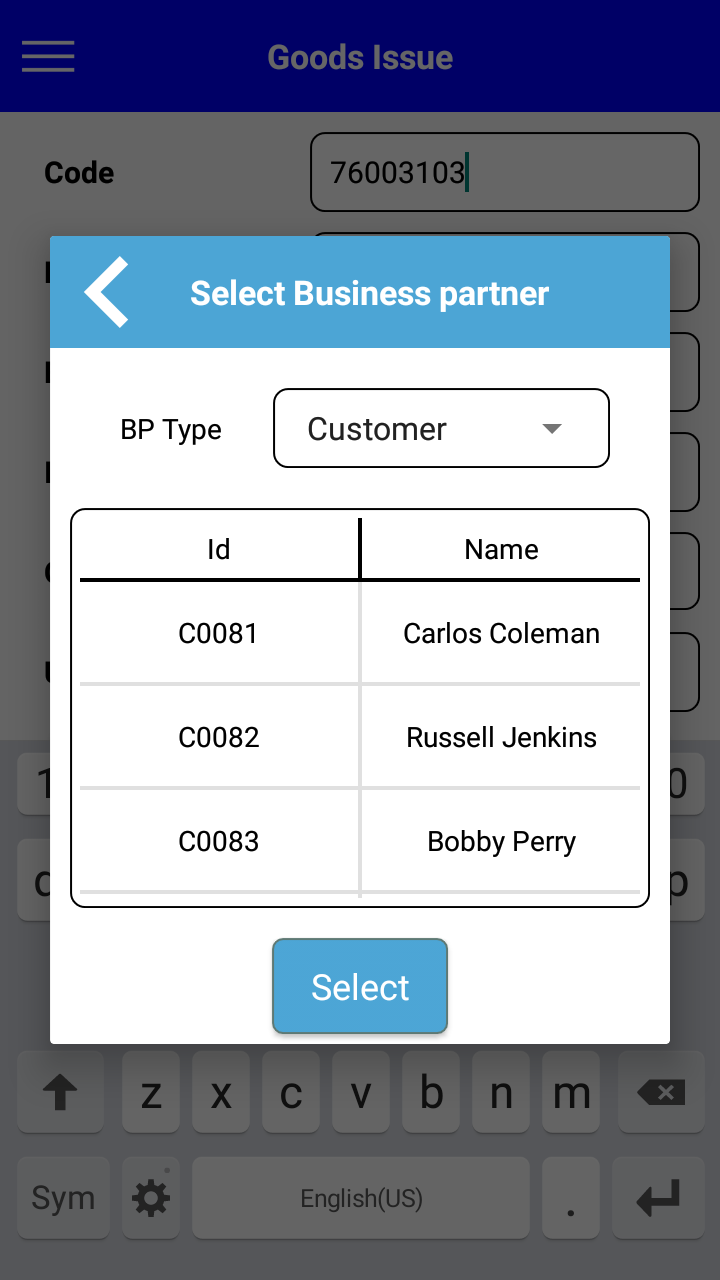
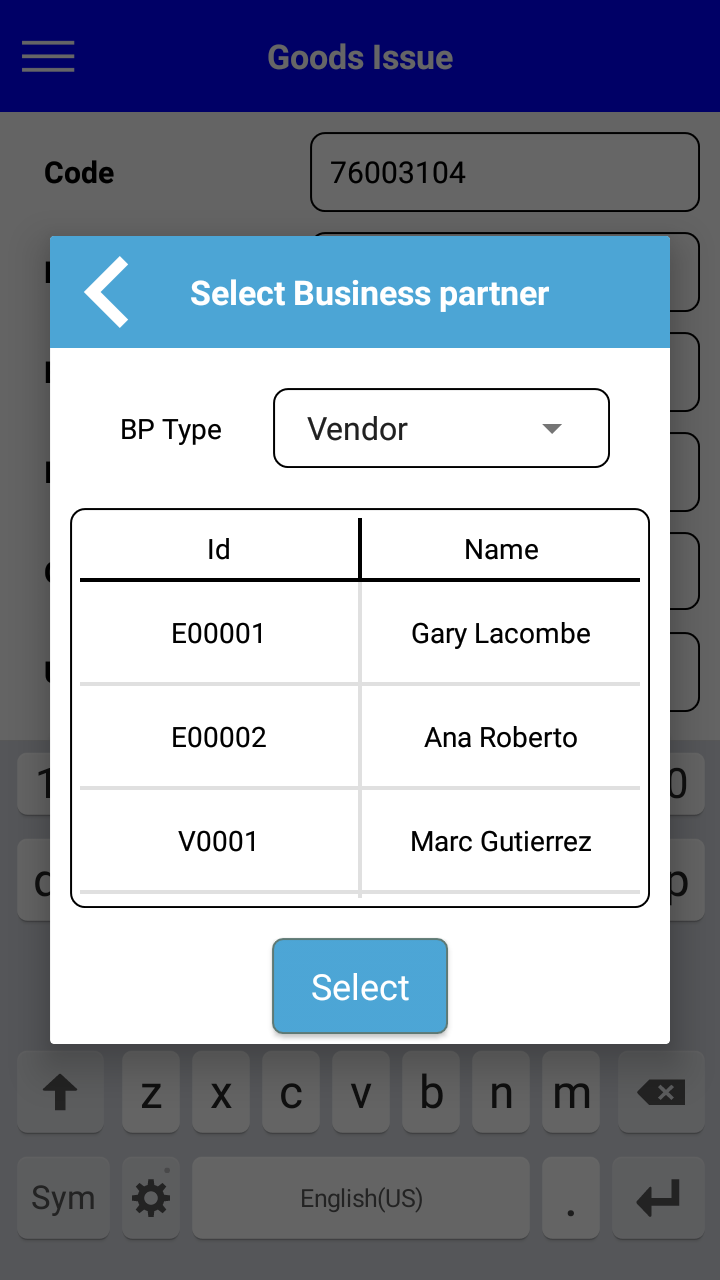
Note: Goods can be issued to either Customer or Vendor.
Note: The Goods Issue transaction created using iVend handheld is reflected under the Goods Issue section of the Management Console.
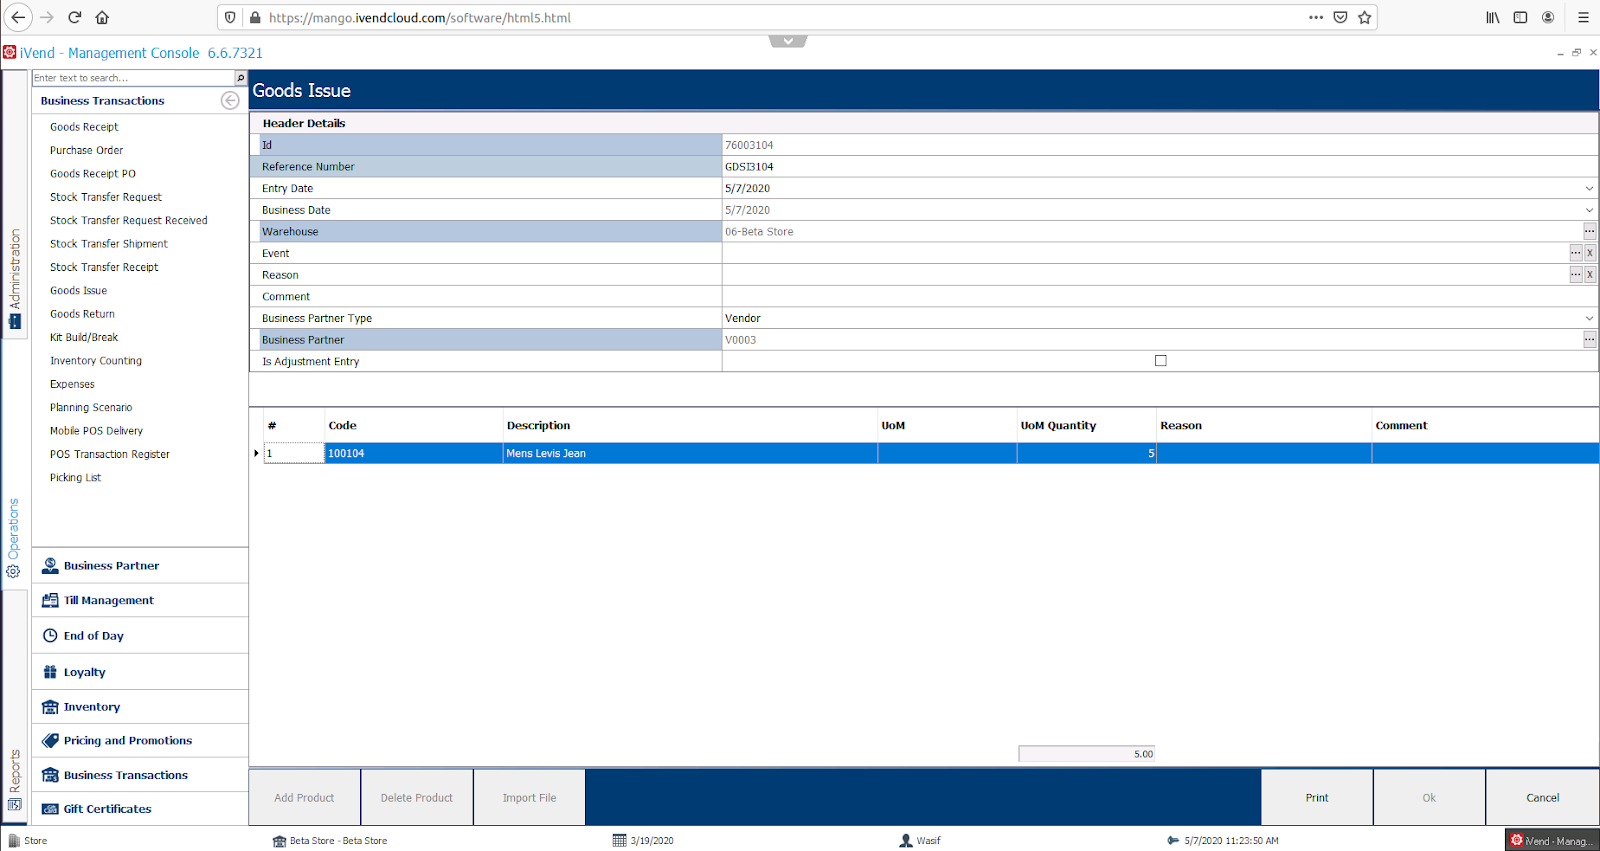
Now go to the iVend Management Console to check the Goods Issue document. Go to: Operations > Business Transactions > Goods Issue.
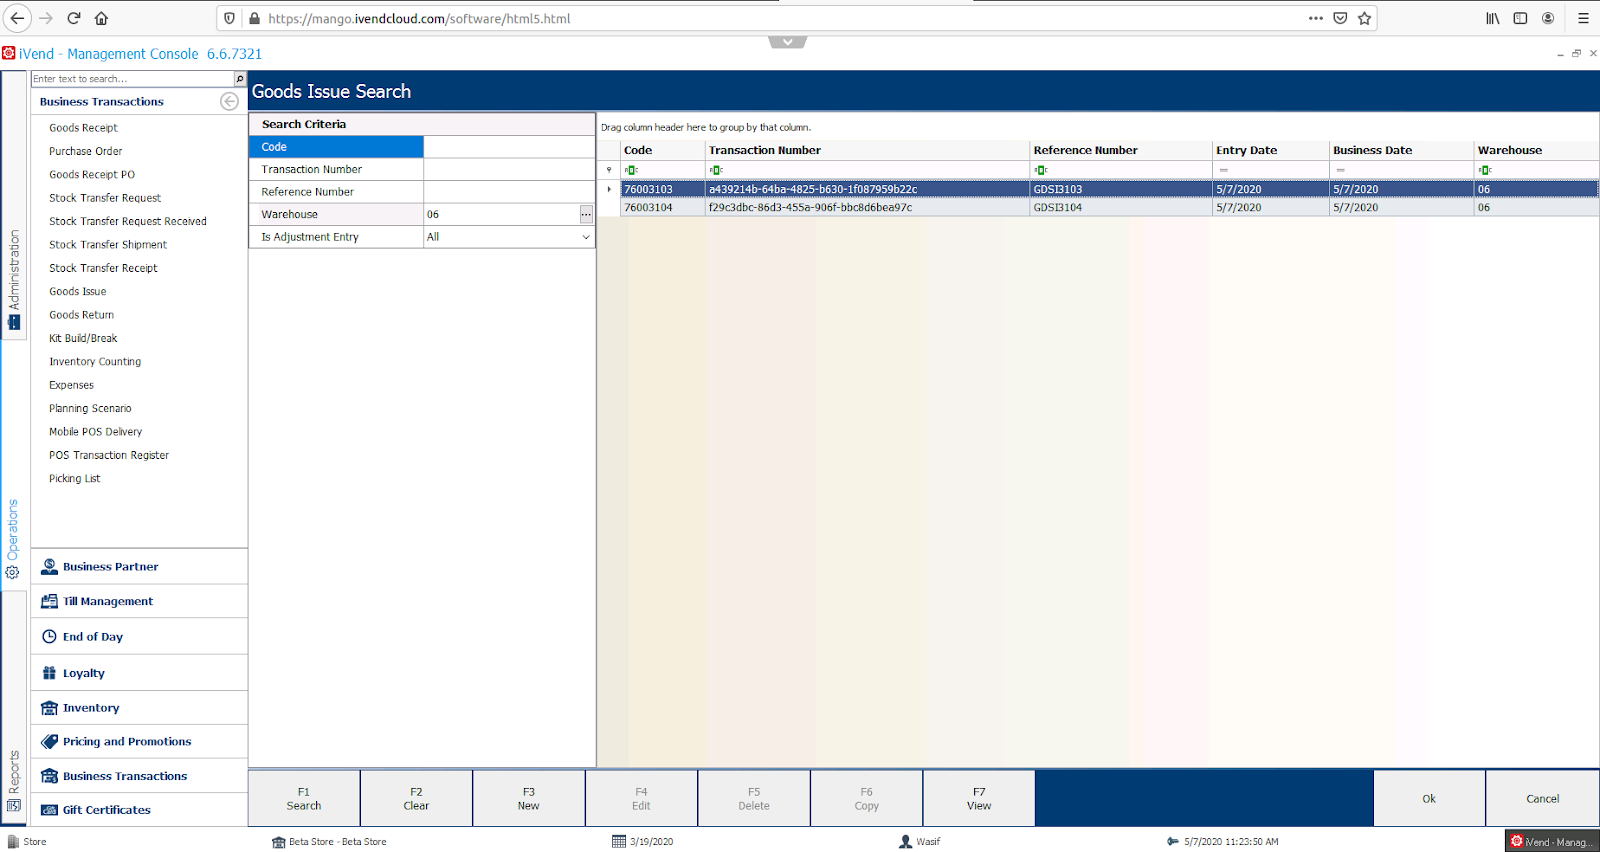
Select the Goods Issue and Press [F7 View]. See the Goods Issue Reference Number and items that were issued out in the Goods Issue processed on the Handheld.

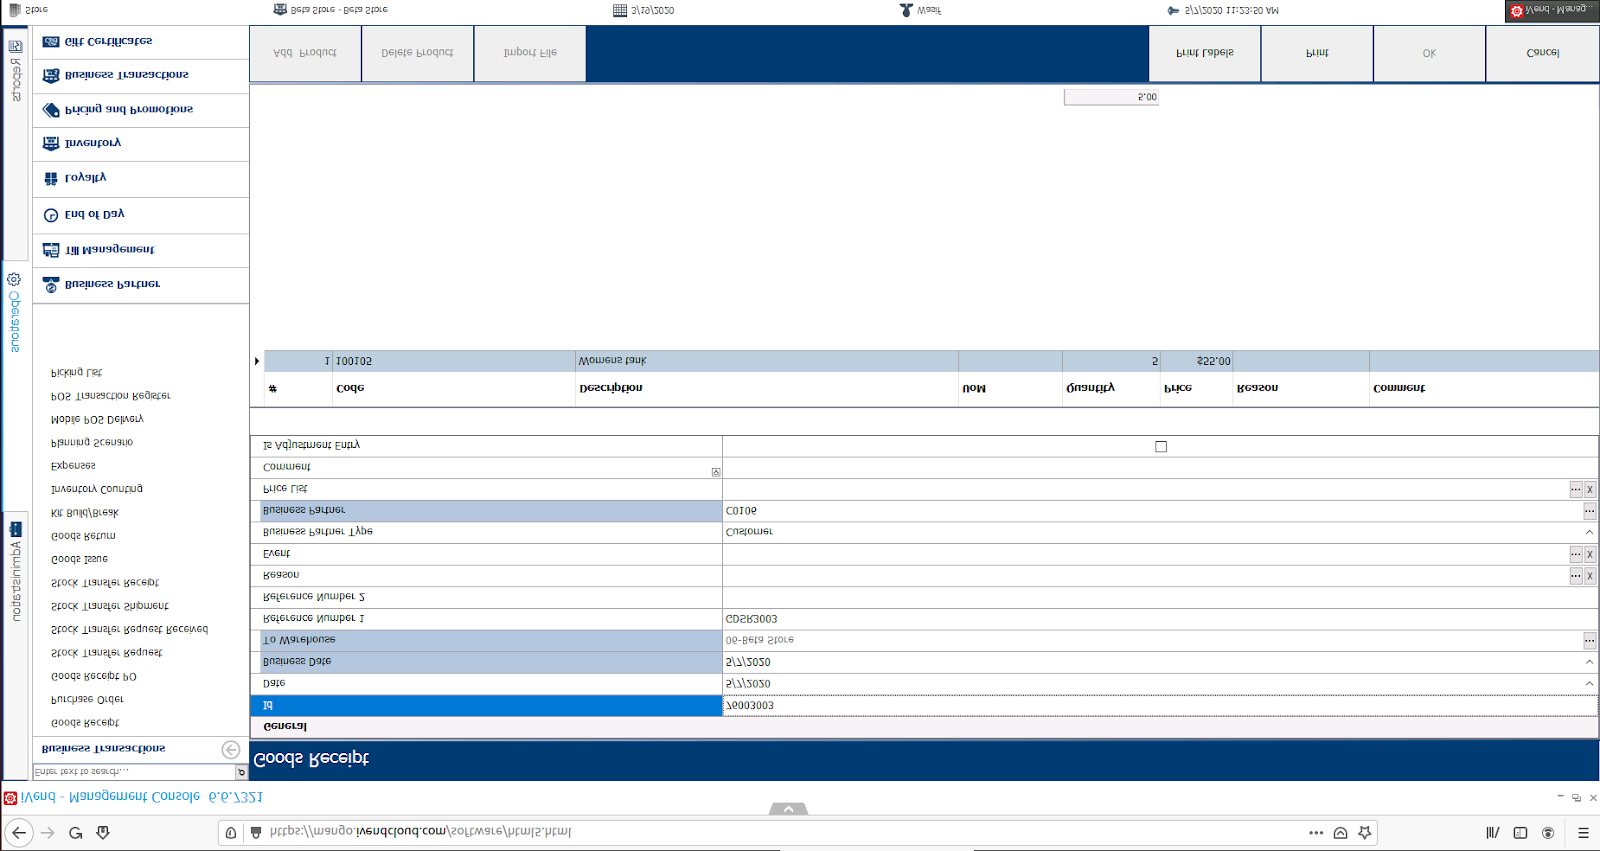
Stock Management - Goods Receipt
From the main menu, select Stock Management and tap on the Goods Receipt sub-menu. The Goods Receipt window appears. Fill in the data as per the table below:
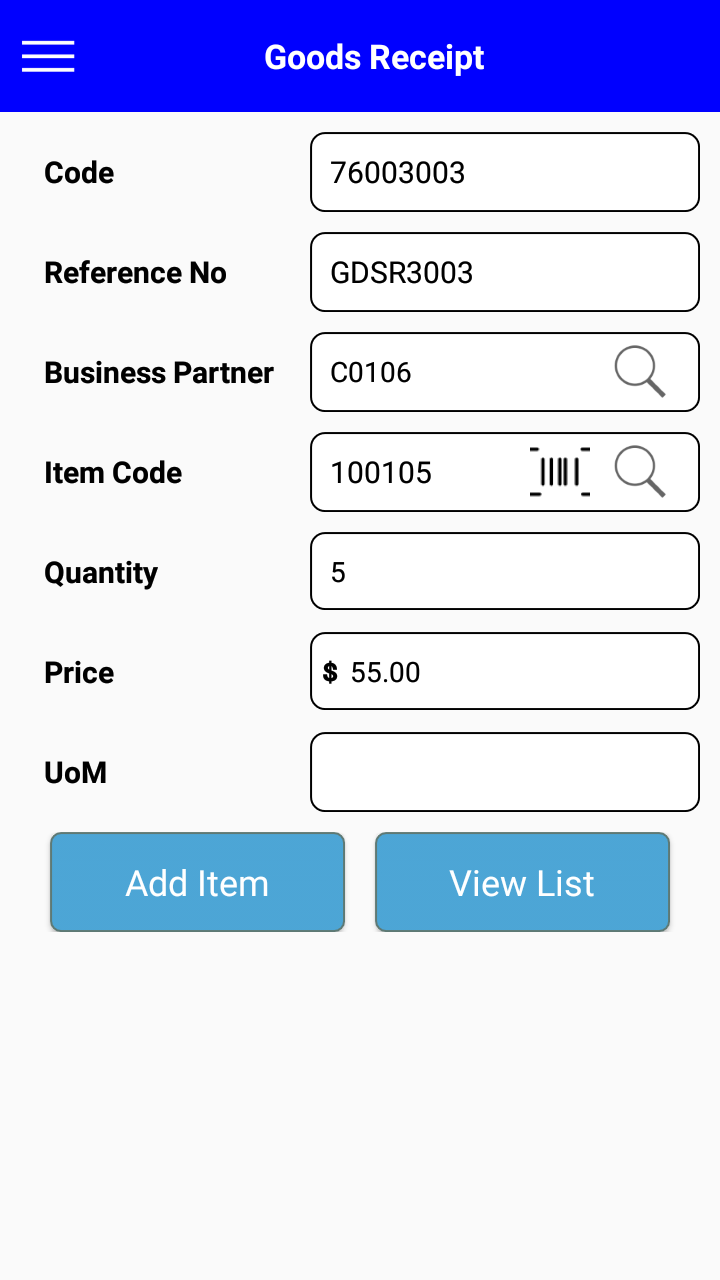
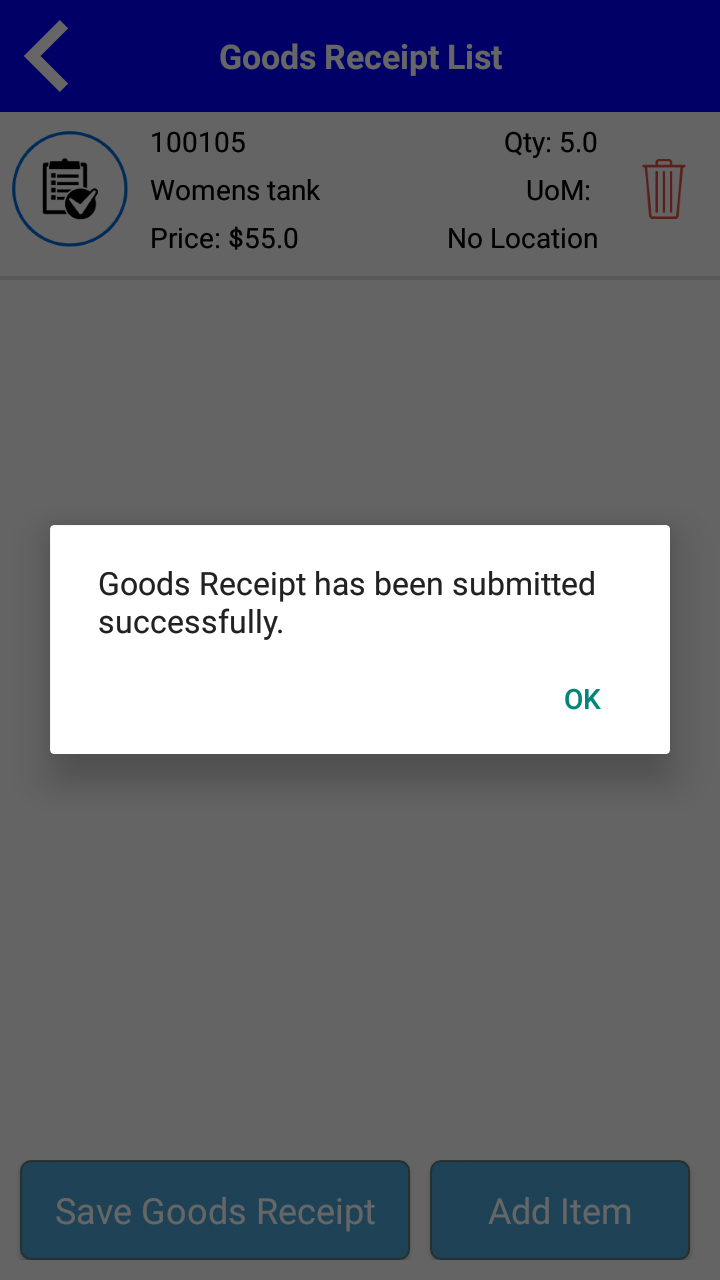
Once all data is entered, choose the [Save] button to confirm the Goods Receipt.
Note: Goods can be received from either Customer or Vendor.
Note: The Goods Receipt transaction created using iVend handheld is reflected under the Goods Receipt section of the Management Console.
Now go to the iVend Management Console to check the Goods Receipt document. Go to: Operations > Business Transactions > Goods Receipt.
Select the Goods Receipt and Press [F7 View]. See the Goods Receipt Reference Number and the items that were receipted into stock as an adjustment in the Goods Receipt processed on the Handheld.

Performing Transactions using iVend Handheld – Goods Return to Vendor
Follow these procedures to perform transactions using iVend Handheld:
Launch the iVend Handheld application.
Supply the API User ID and API Password.
Select the relevant warehouse.
Goods Return to Vendor
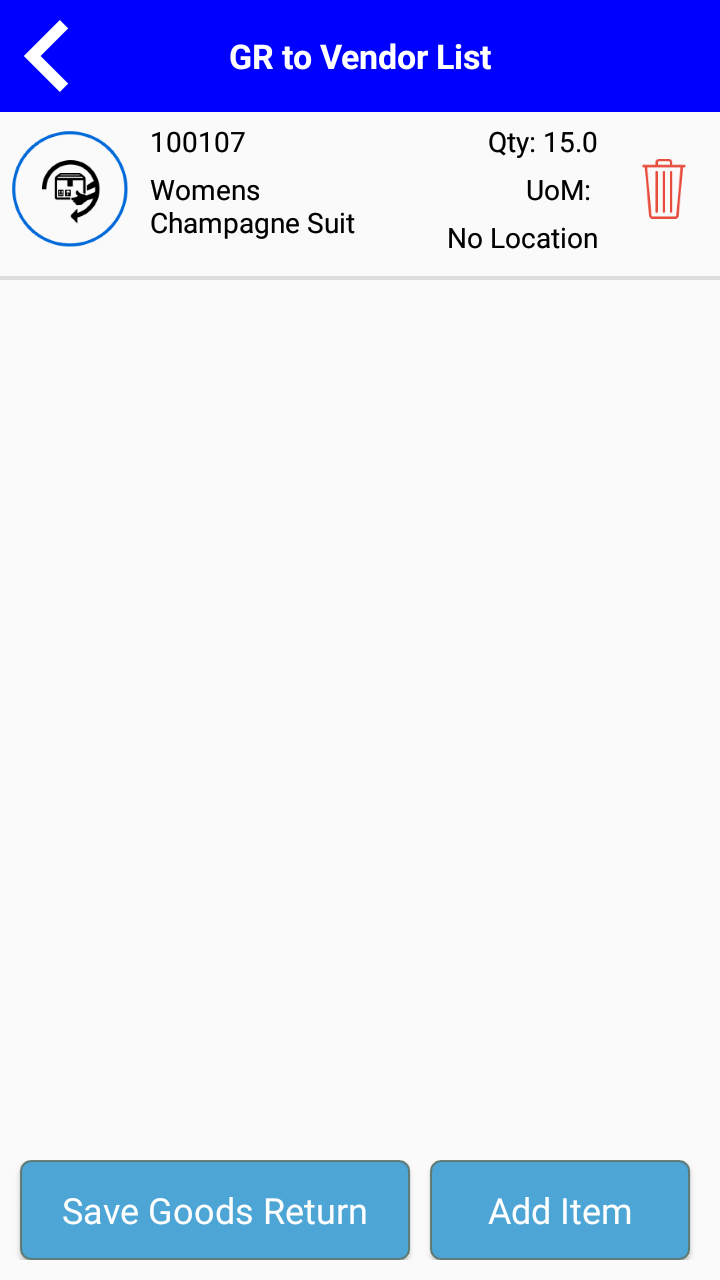
From the main menu, select Goods Return to Vendor. The Goods Return window appears. Fill in the data as per the table below:
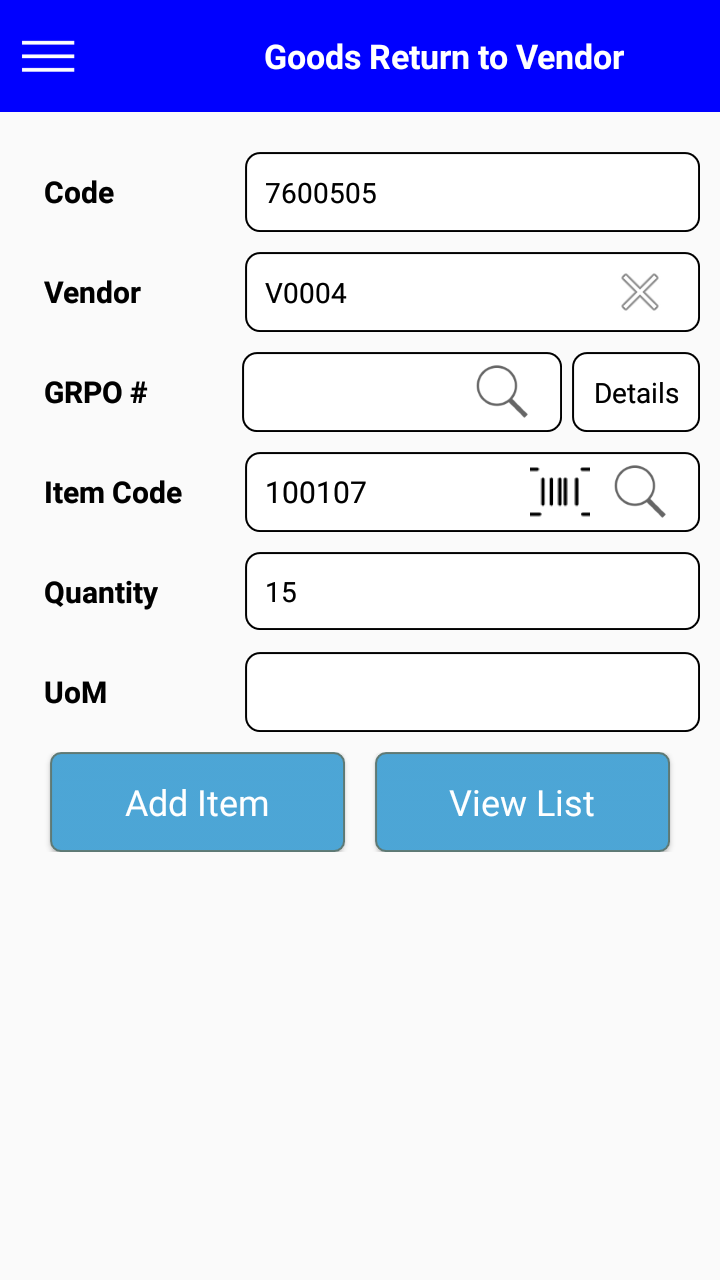
Once all data is entered, choose the [Save Goods Return] button to confirm the Goods Return
Note: The Goods Return To Vendor transaction created using iVend handheld is reflected under the Goods Return section of the Management Console.
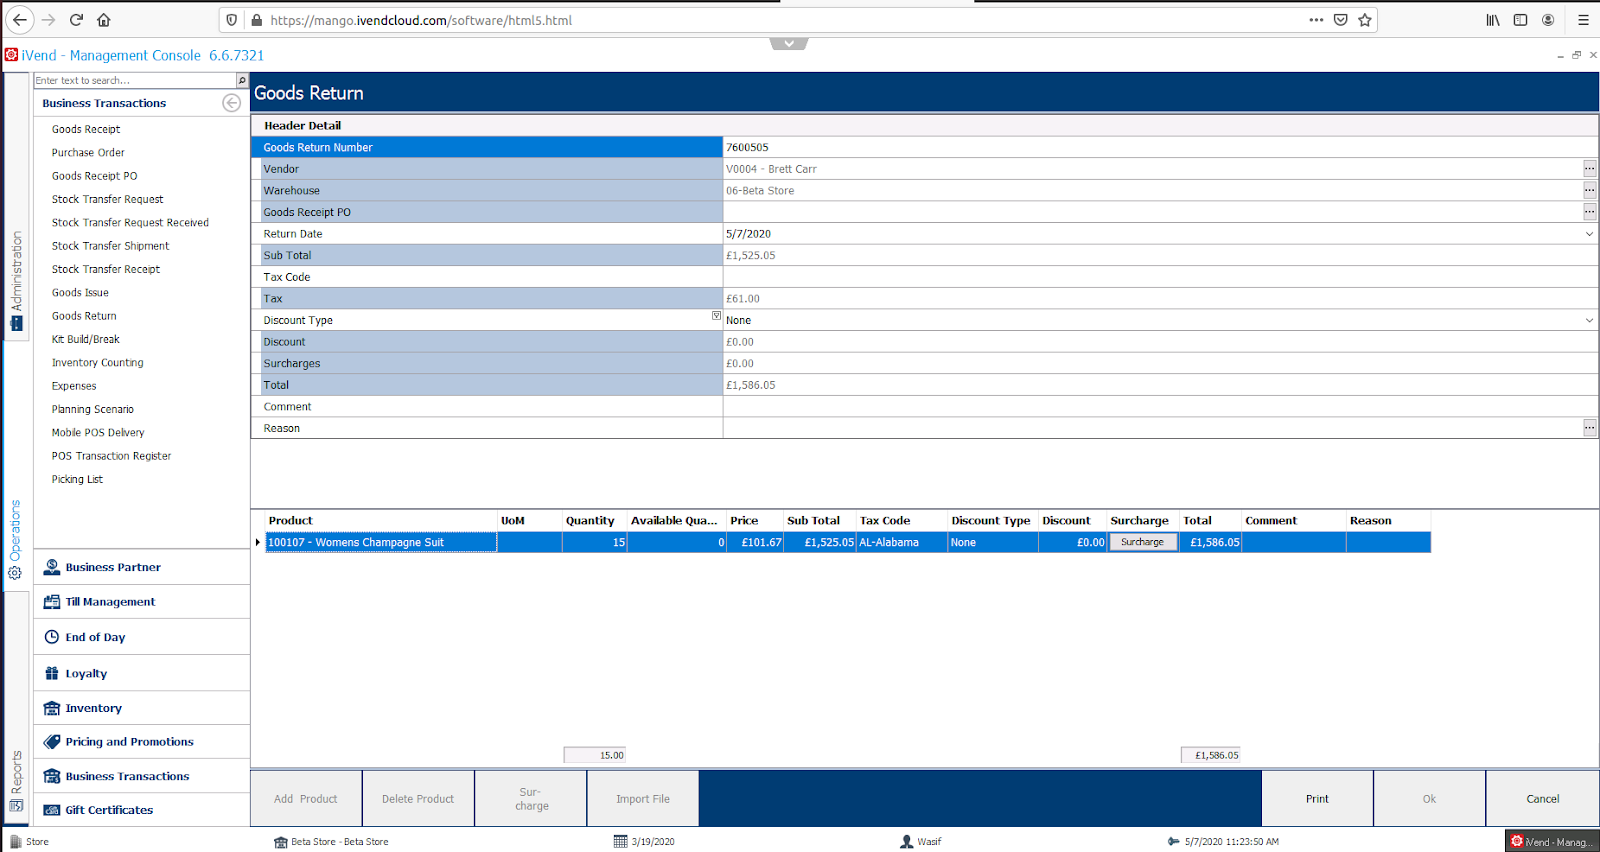
Now go to the iVend Management Console to check the Goods Return document. Go to: Operations > Business Transactions > Goods Return.
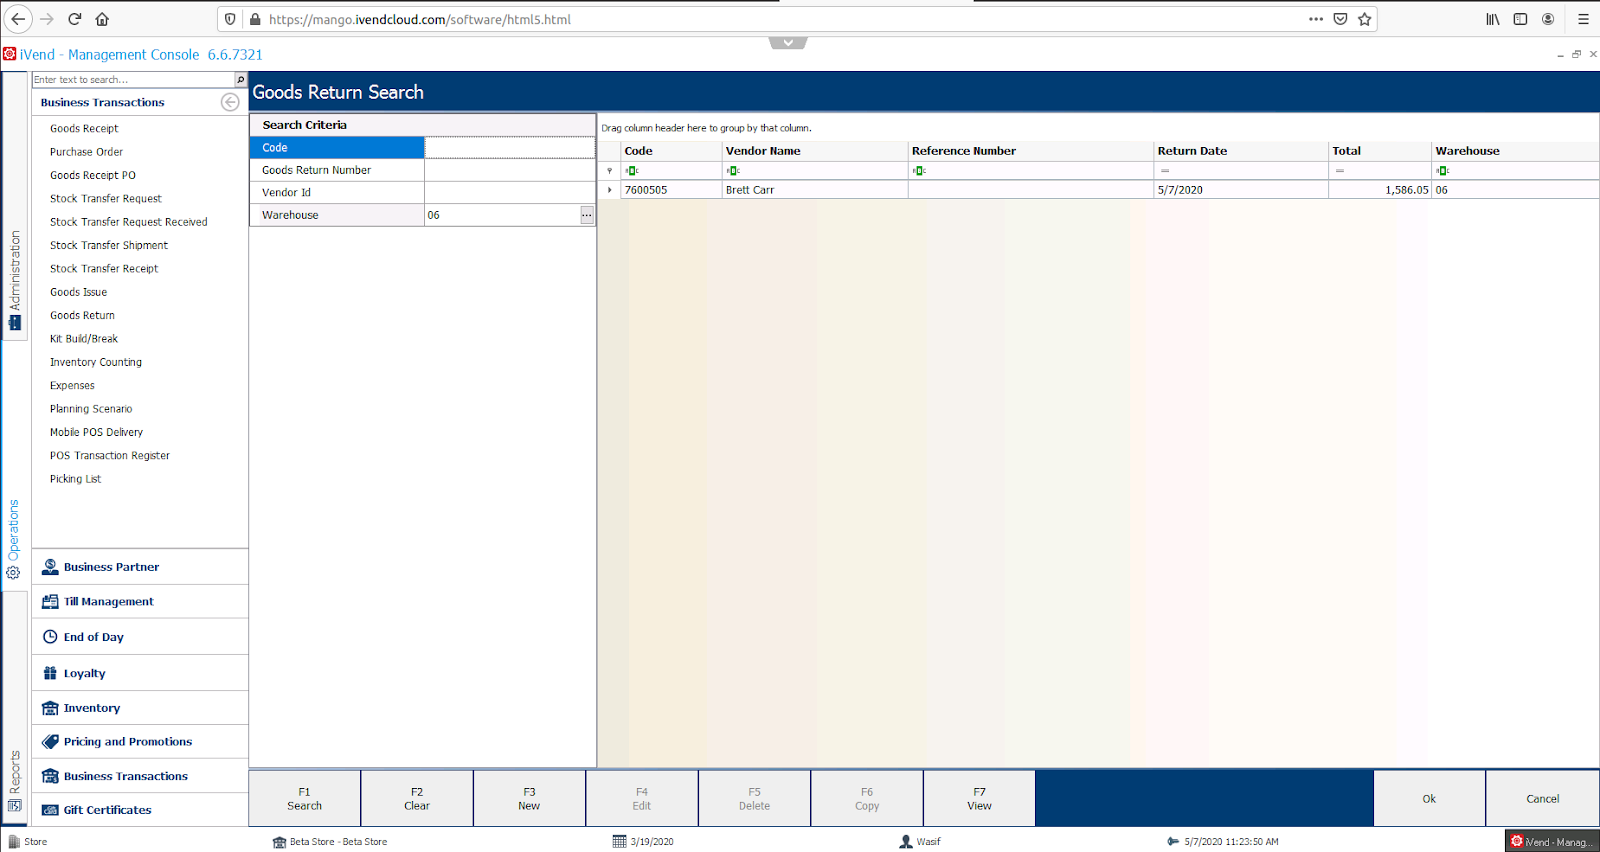
Select the Goods Return and Press [F7 View]. See the Vendor, the Accounting Id referencing the GRPO and original Purchase Order and the items that were selected to be returned in the Goods Return processed on the Handheld.
Performing Transactions using iVend Handheld – Item Lookup
The Item Lookup feature allows the user to view the Inventory status of an item via the Handheld Device. Follow these procedures to perform transactions using iVend Handheld:
Launch the iVend Handheld application.
Supply the API User ID and API Password.
Select the relevant warehouse.
Item Lookup
From the main menu, select Item Lookup – The Item Lookup window appears. Fill in the data as per the table below:
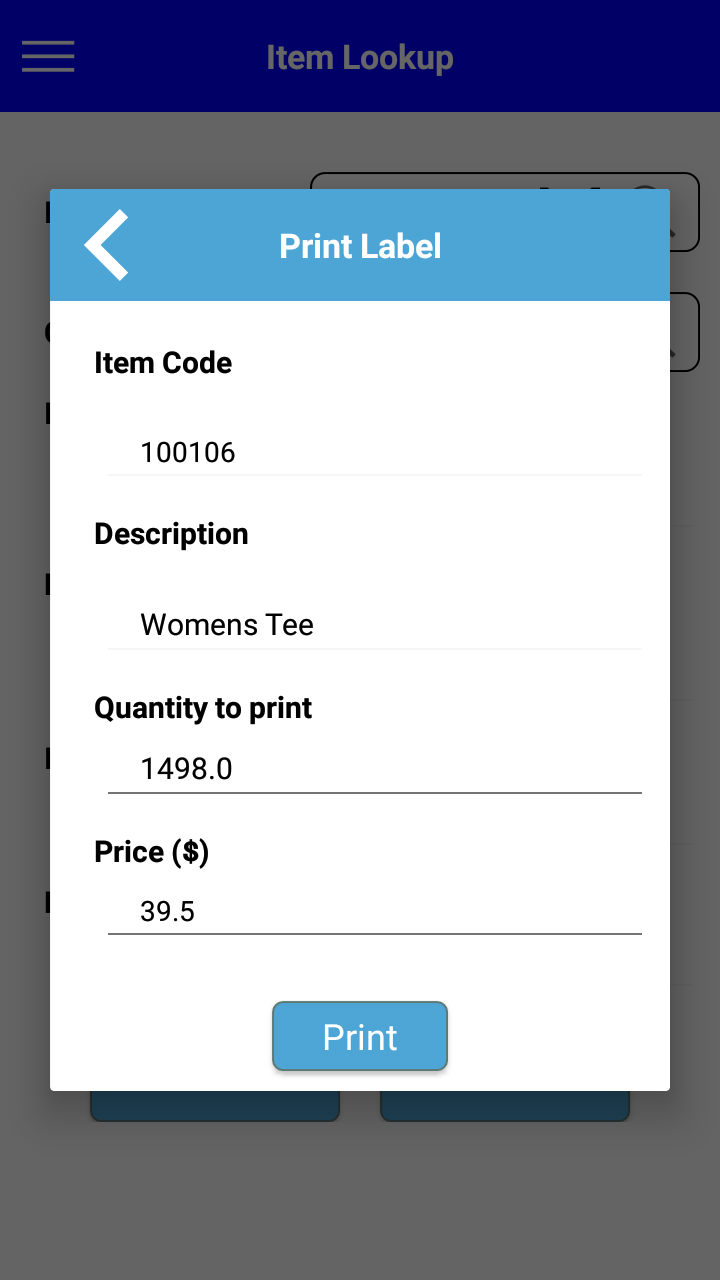
Select an item from the list. The Quantity and Price information appears on the screen.
Performing Transactions using iVend Handheld – Stock Take
Follow these procedures to perform transactions using iVend Handheld:
Launch the iVend Handheld application.
Supply the API User ID and API Password.
Select the relevant warehouse.
Stock Take
The Stock Take function allows the user to perform the stock counts required as part of the stock taking procedure via the Handheld device.
From the main menu, select Stock Take. The Stock Take window appears. Fill in the data as per the table below:
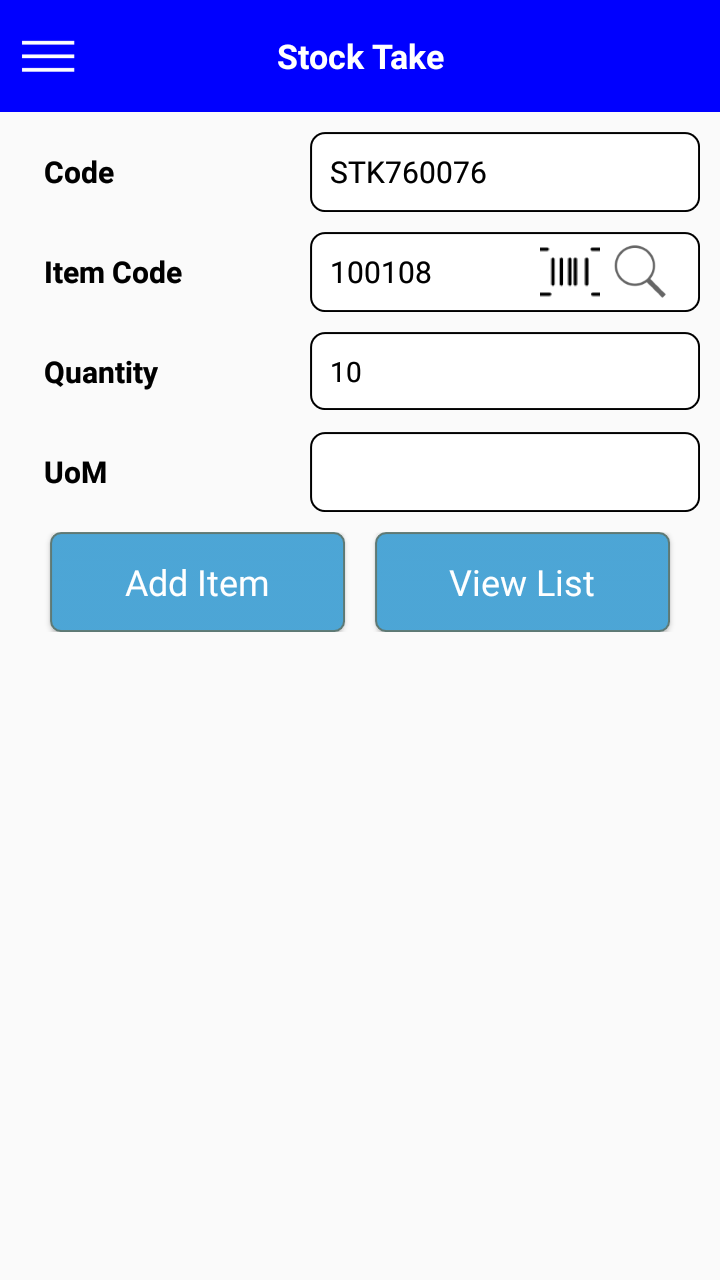
Once all data is entered, choose the [Save Stock Take] button to confirm the Stock Take.
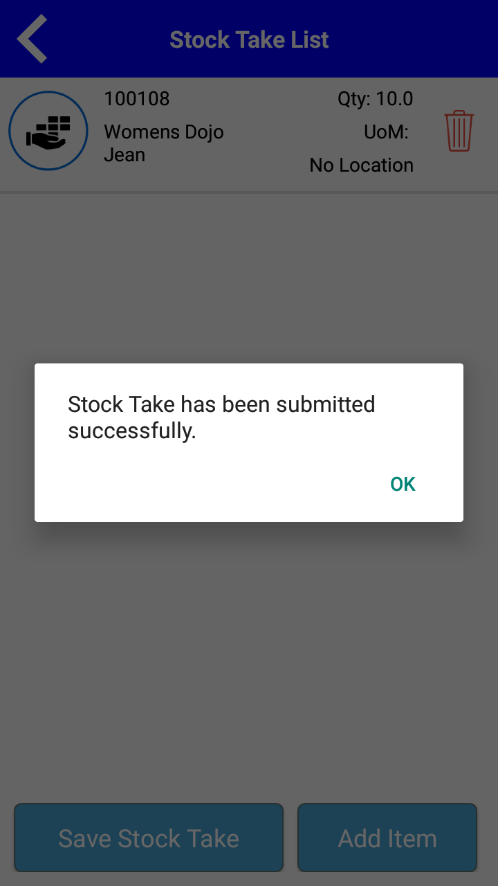
Note: The Stock Take transaction created using iVend handheld is reflected under the Goods Return section of the Management Console.
Now go to the iVend Management Console to check the Stock Take document. Go to: Operations > Business Transactions > Inventory Counting.
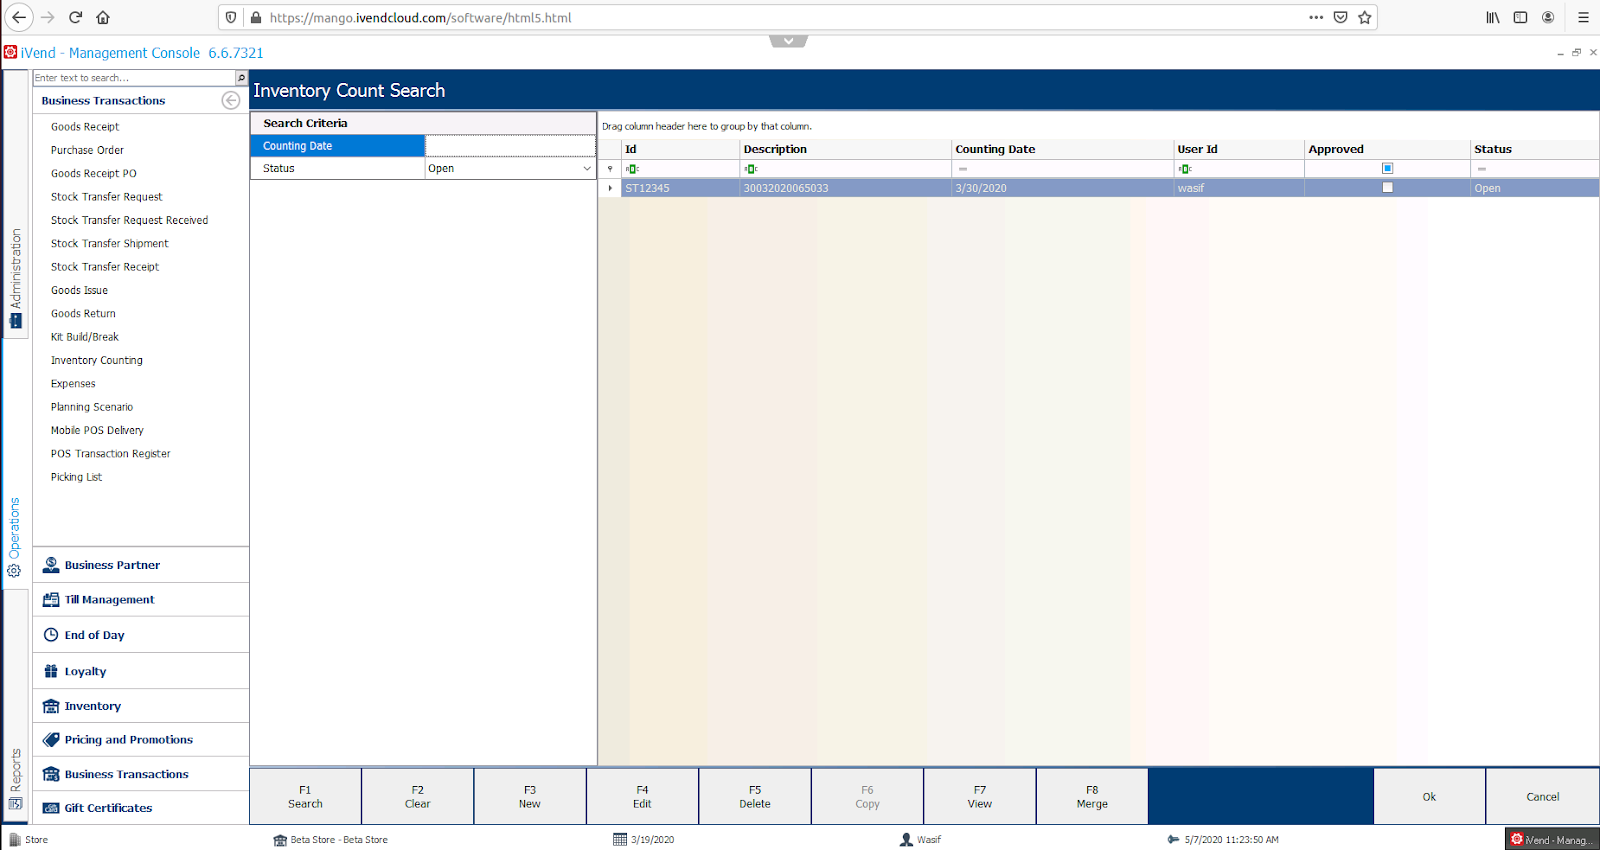
Select the Inventory Count from the Search screen and Press [F4 Edit]. Select the Reconcile checkbox and click the [Reconcile Inventory] button to reconcile these quantities.

Note: In the Handheld, if you want to continue the stock take after a break then enter the same reference number in the Count Ref. Text field and scan the remaining Items. When you add this Stock Take, the Inventory Count document will be updated with the new items and their quantities in the Management Console Inventory Count document.
Performing Transactions using iVend Handheld – Store Pick
Follow these procedures to perform transactions using iVend Handheld:
Launch the iVend Handheld application.
Supply the API User ID and API Password.
Select the relevant warehouse.
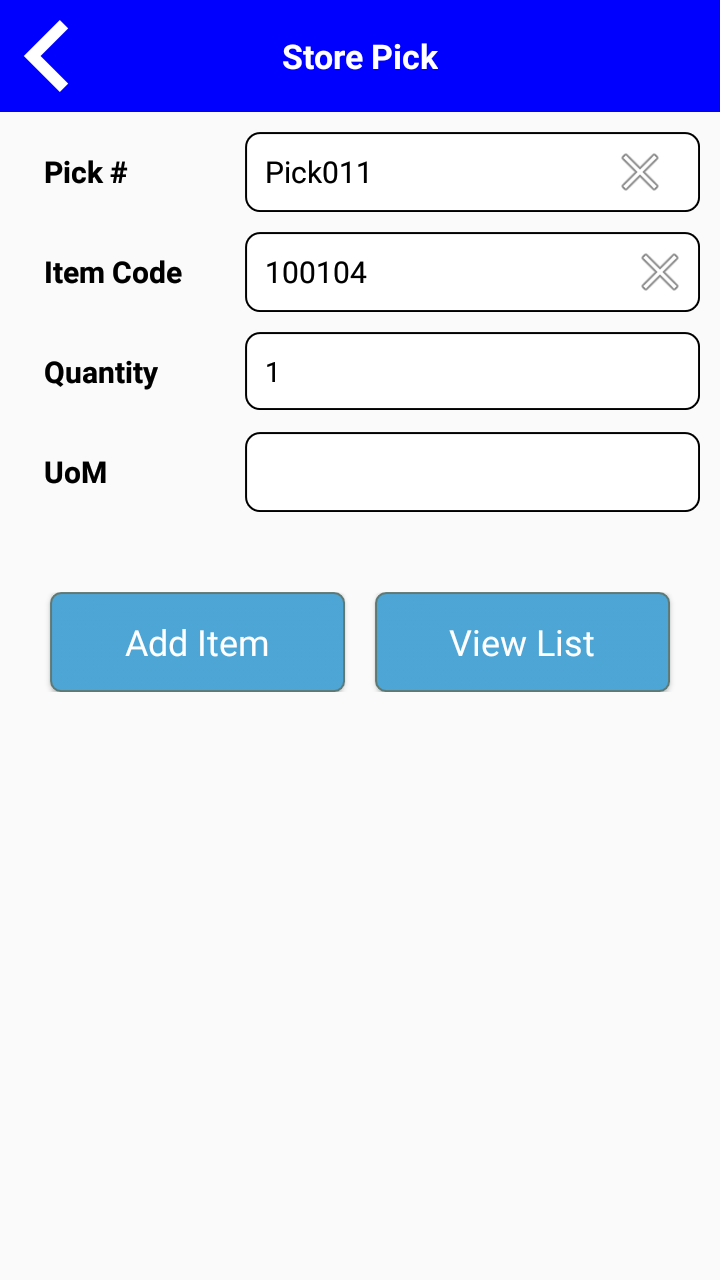
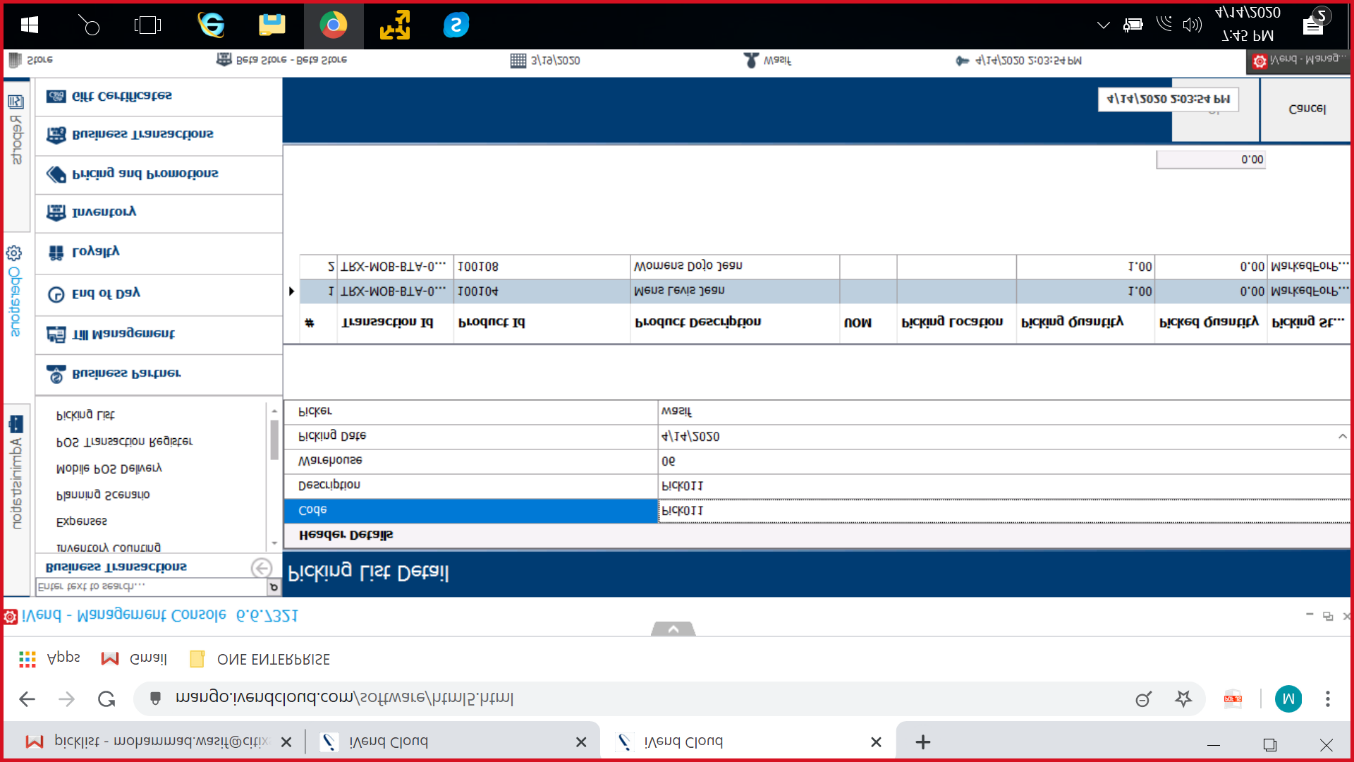
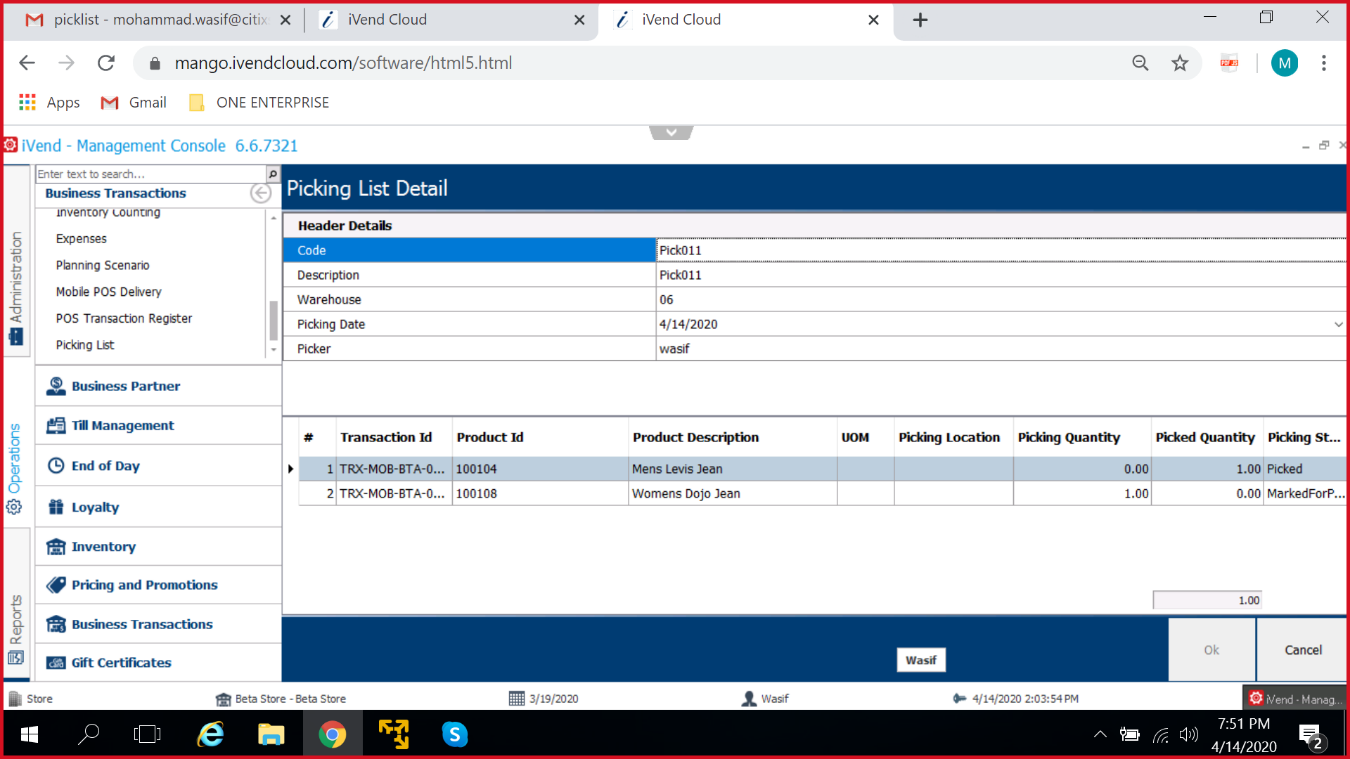
From the main menu, select Store Pick. The Store Pick window appears. Fill in the data as per the table below.
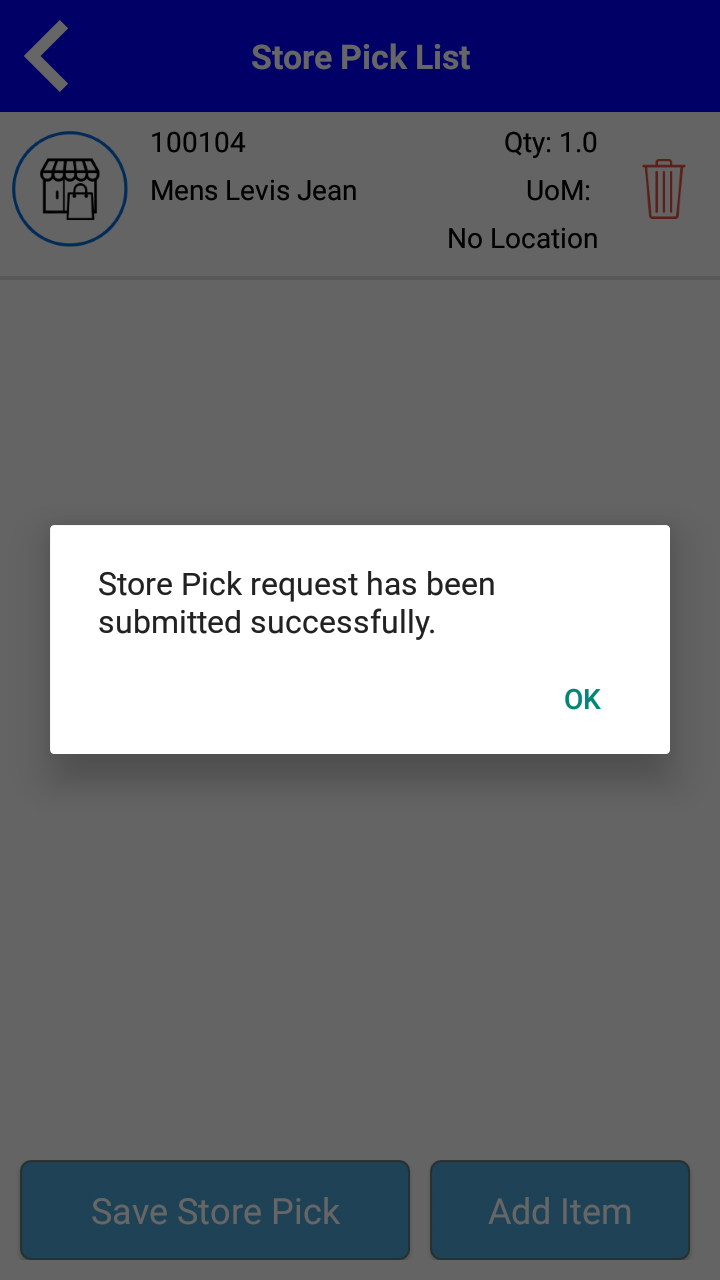
Note: The Store Pick transaction created using iVend handheld is reflected under the Picking List section of the Management Console.
Now go to the iVend Management Console to check the Store Pick document. Go to: Operations > Business Transactions > Picking List.
Logout
The Logout menu exits the main menu and takes you back to the login page.
Related Articles
Configuring iVend handheld on an Android phones.
Follow the below-detailed steps of configuring iVend handheld on an Android device. Step 1. Download and install the iVend handheld from Android Play Store. Step 2. Once the application is installed tap on Open button to open the iVend handheld ...Stock Takes in iVend Retail
Stock Take Stock-taking or Inventory Counting is the physical verification of the quantities and condition of items held in inventory within a location or warehouse. This may be done to provide an audit of existing stock. It is also a source for ...Consolidating Stock Take Counts
Consolidating Stock Take Counts (Done by multiple users happening at different Locations) iVend 6.5 introduced a new feature where the stock take count can be done with multiple users for the same or different locations at a time and thereafter all ...Not able to receive stock at Stock Transfer Receipt Page
Query: Not finding any record to receive in the Stock transfer Receipt screen Response: The stock transfer receipt screen is used to receive any pending stock transfer sent to this store. As soon as the Stock Transfer receipt screen is opened, it ...iVend POS - Stock Transfer Cancellation
Introduction iVend Retail POS versions 6.2 and above, the user is now allowed to cancel the Stock Transfer Shipment created from the store where the goods are being shipped from. The warehouse from where the goods are being shipped creates the Stock ...