iVend POS - Label Report
iVend POS - Label Report
This article provides the basic steps for creating a Label Report in iVend Retail.
In iVend, the user can design their own label(s) using the following two options:
· Thermal Label Setup
· Report Designer Label Report
Thermal Label Setup
This feature enables the user to design labels for printing on EPL, ZPL based printers. This label appears in the format list with other formats in the Item Label Printing feature. Figure 1 below, shows the Thermal Label Setup screen:
1. Specify the following:
· Code – Define the code of the label report
· Description – Define the report description
· Width – Enter the width of the label in units.
· Height – Enter the length of the label you are using.
Note: For ZPL Printers Non-Continuous Media (Gap, Notch, Hole or Black Mark), the length is internally set when the printer is calibrated. Use of Continuous Media may use this value but the label length is often included in the format.
· Labels Per Row – Enter the number of labels in each row
1. Insert two text fields “Text”, “Text1” and one barcode field as showed in the image below.
2. Select the text fields and assign a data field value as “Product Id” and “Product Description” from Misc panel section.
3. Click [Ok] to save the label report.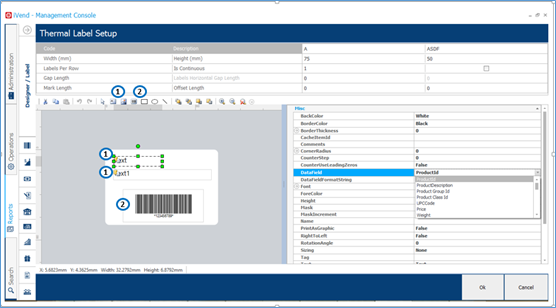
Figure 1 – Thermal Label Setup
Report Designer Label Report
This allows the user to design a label report and print on a desired paper size.
A Label Report is created in two steps:
· The Data Source is defined in the first step
· The Label Settings are defined in the second step.
The picture below shows the Selection Parameters Panel in the Second step of the Label Settings.
1. The Type Panel is used to select the Label Type and units.
2. The Size Label Panel is used to change the label size.
3. The Size Pages Panel is used to select the page size or manually set the width, height and margins of a page.
4. The Configuration Label Panel is used to set the number of rows, columns and direction of labels.
5. The Preview Panel is used to preview how labels are placed on the page.
6. Click the [Finish] button - Figure 2 below, shows the Label Report Template Layout
Figure 2 – Report Designer Label Report Template Layout
Related Articles
iVend Retail 6.5 Update 6 Patch 1
Recommendation(s) It is recommended that patch is applied in Test Environment first and then production environment. Preferable if replication and integration queue is all clear. Apply iVend Patch during business downtime Pre-Requisite(s) Back-up ERP ...iVend POS - Graphical Report
iVend Retail POS - Graphical Report This article explains the basic steps for creating a Graphical Report. 1.On the Report designer click on components and then charts. Figure 1 Report Designer Put the Chart component on a page as seen in the picture ...iVend POS - Standard Report
iVend Retail POS – Creating a Standard Report using the Wizard This article provides the basic steps for creating a Standard Report through the use of the Report Wizard. When creating a report using the Standard Report Wizard, the report will contain ...iVend POS Drill-Down Report
iVend Retail POS - Drill-Down Report This article explains the basic steps for creating a drill-down report. A Drill-Down report is an interactive report in which blocks can collapse and expand their contents by clicking on the block title. Follow ...iVend Patch not getting updated at POS
Environment: iVend 6.6 Patch 7915 Problem Description: Patches in HO and the POS indicates that it has already been updated but in POS it stays in a cycle asking for an update and does not allow it to be done. Scenario: None Solution: 1) At POS the ...