Consolidating Stock Take Counts
Consolidating Stock Take Counts (Done by multiple users happening at different Locations)
iVend 6.5 introduced a new feature where the stock take count can be done with multiple users for the same or different locations at a time and thereafter all counts will be merged into a single stock take count where selected cycle counted inventory will be displayed in a single view to make final reconciliation and inventory postings to the system. This feature provides the facility to retailers who are keeping the same inventory at different locations in the same store and where multiple users are involved in the stock take at the same time.
On top of this, the feature, stock count can also be done location-wise which will help the retailers to maintain stock in an efficient way for different areas of different stock types like saleable, freeze, quality check, etc.
To maintain stock location-wise, the location feature must be enabled under iVend. For more information on Location management in iVend, please refer to “Locations Overview” a separate article on Locations:
Note: When multiple stock counts need to be merged then individual stock count inventory should not be reconciled at the individual stock count level. Reconciliation will happen at the newly created stock counted document from the individual stock counts.
Business Benefits
1. Helps the retailers to scan the same inventory simultaneously from multiple locations.
2. With the introduction of this feature retailers will be able to perform stock counts in less time as comparative to historical standard stock taking processes.
3. Multiple users can be involved in the stock take activity.
4. Provides the facility for the Inventory Controller to obtain a single view of multiple stock take counts for the inventory reconciliation.
Stock take count
Let us see how the stock take count can be configured. For demonstration purposes, Locations is enabled to show the feature of the stock take along with multiple locations (different stock type).
Inventory view
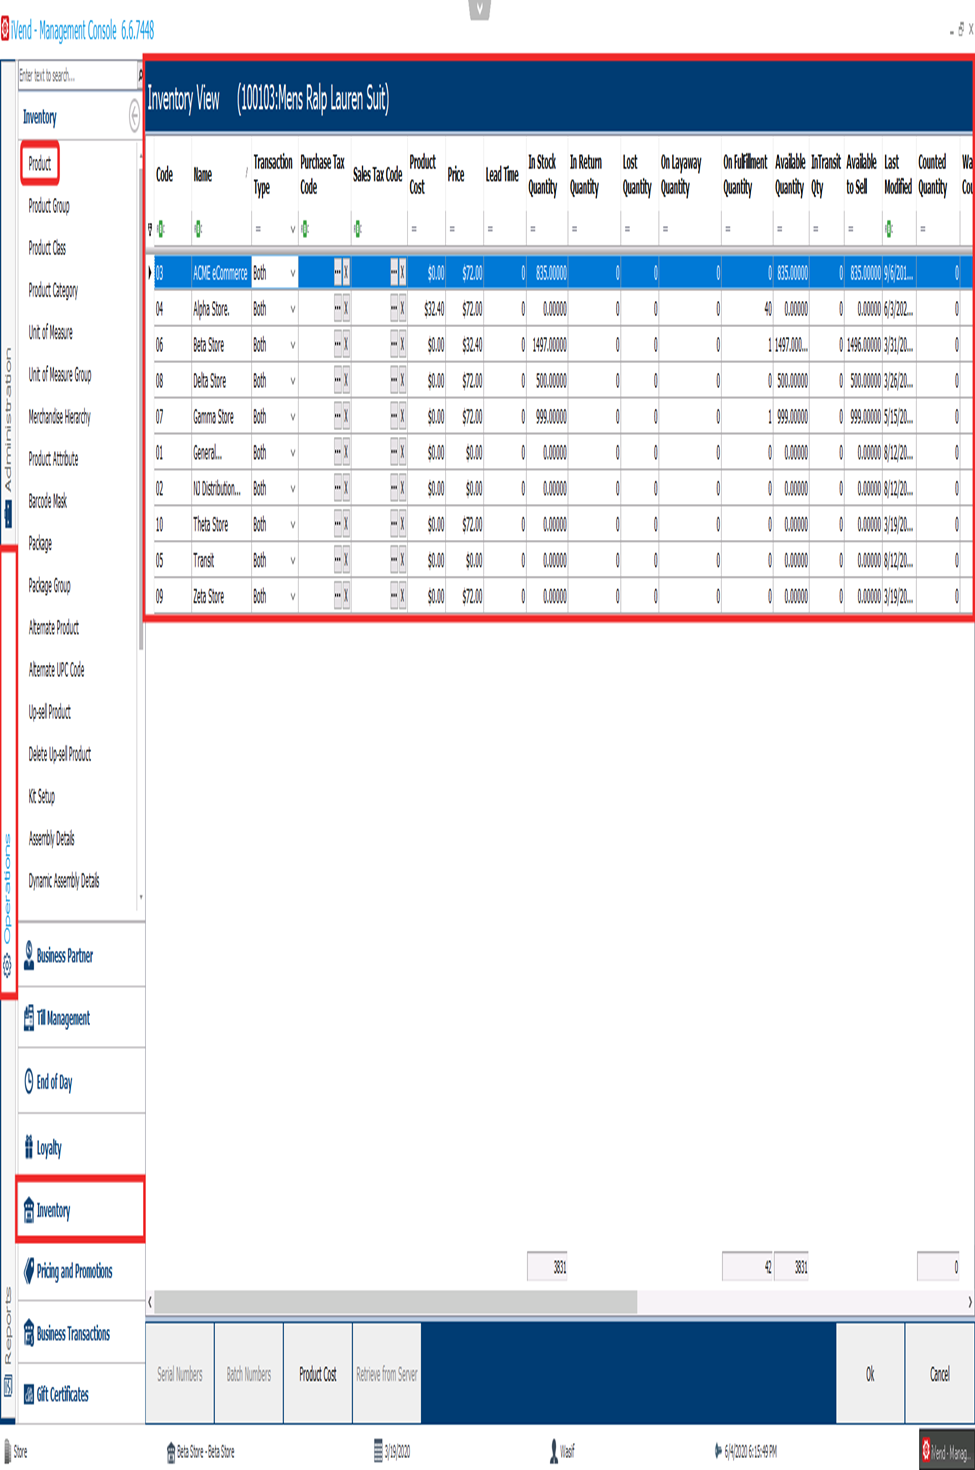
Just to make it easier to understand, let us view the inventory status first. The Inventory View screen provides a view of the physically available inventory at different locations.
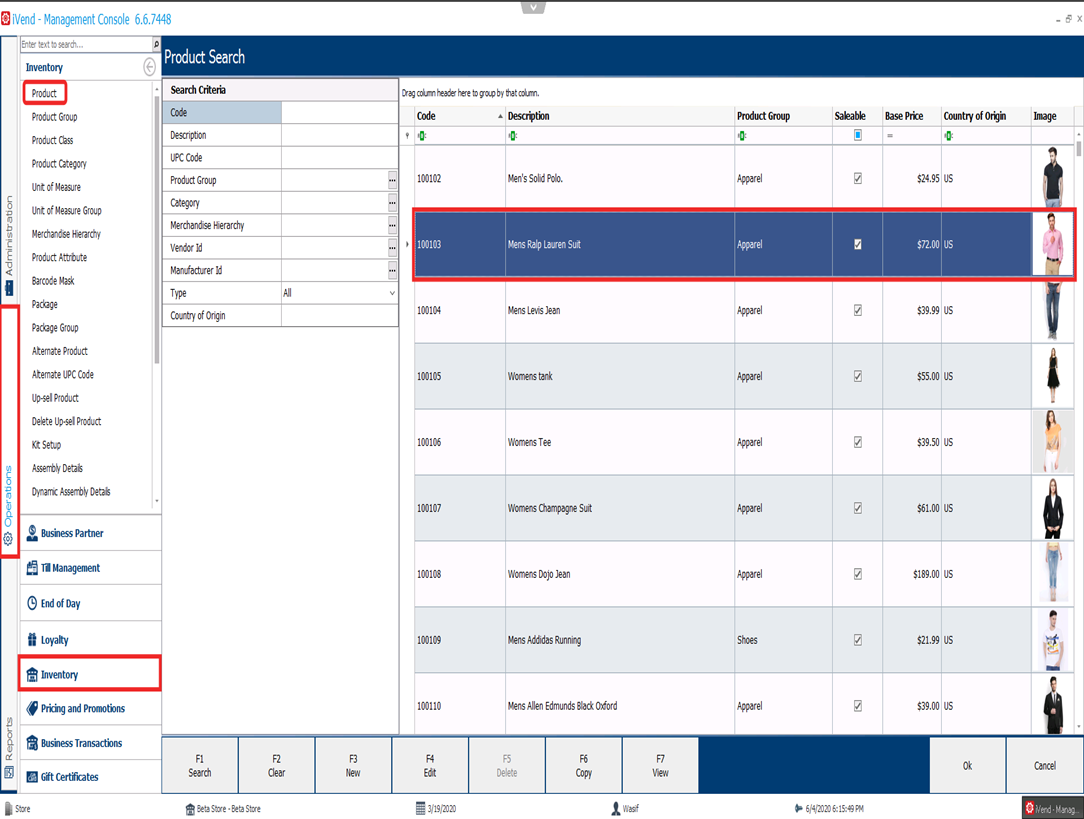
Log into the iVend Management Console and navigate to: Operations > Inventory > Product – the Product Search window comes up.
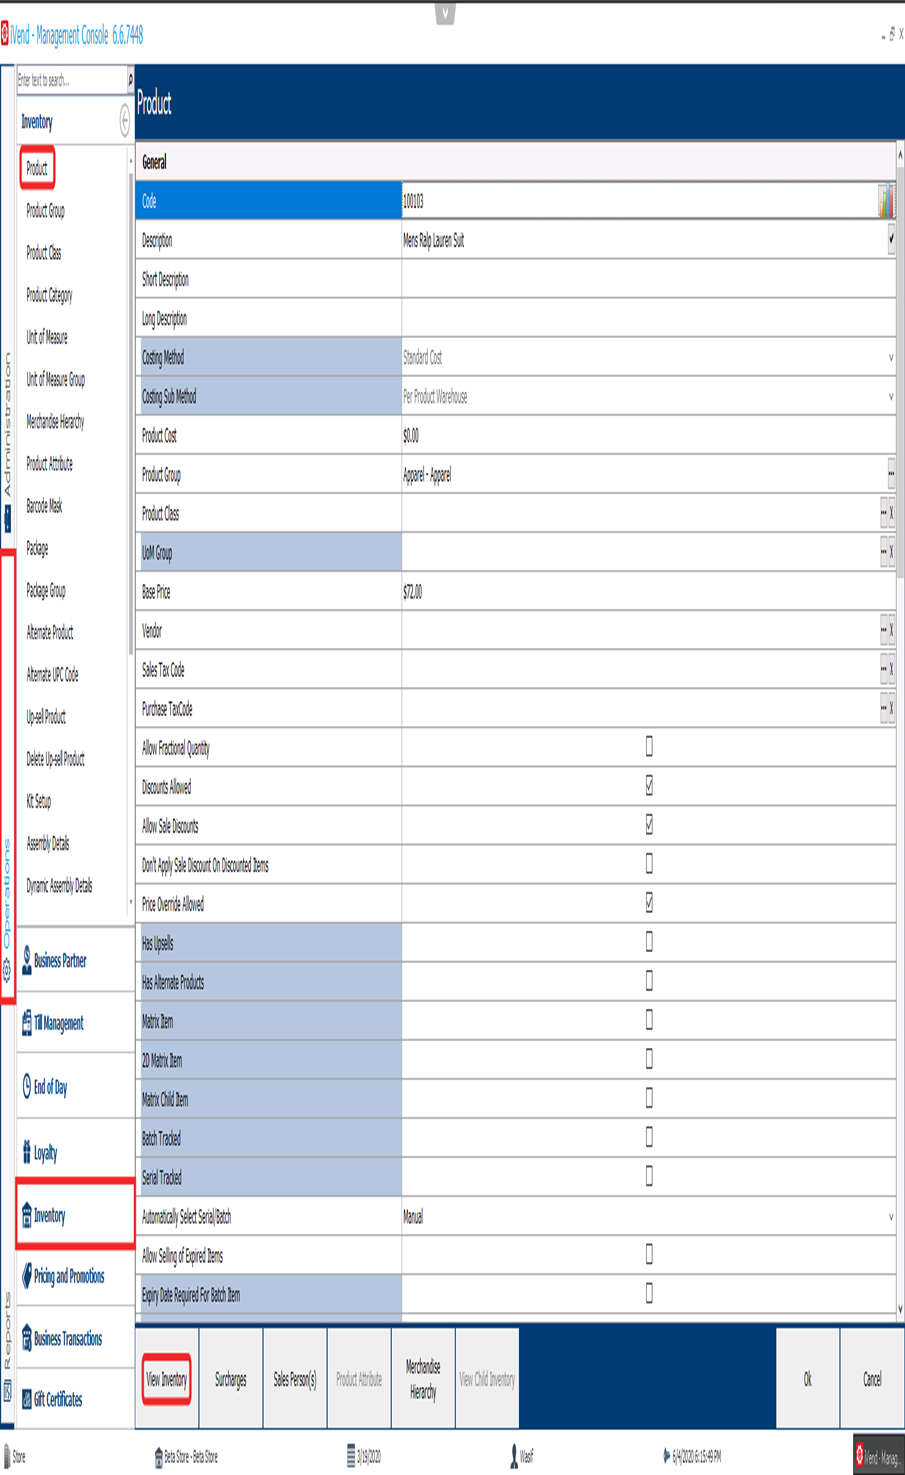
Choose a Product and click the [F4 Edit] button to edit or [F7 View] the record. The Product settings page will comeup.
3. Click on the [View Inventory] button – the Inventory View page comes up.
Note: The Inventory View page gives you a summary of the item’s availability at various stores along with the status.
Log into the iVend Management Console and navigate to: Operations > Inventory > Product – the Product Search window comes up.
Choose a Product and click the [F4 Edit] button to edit or [F7 View] the record. The Product settings page will comeup.
Inventory Counting Selection
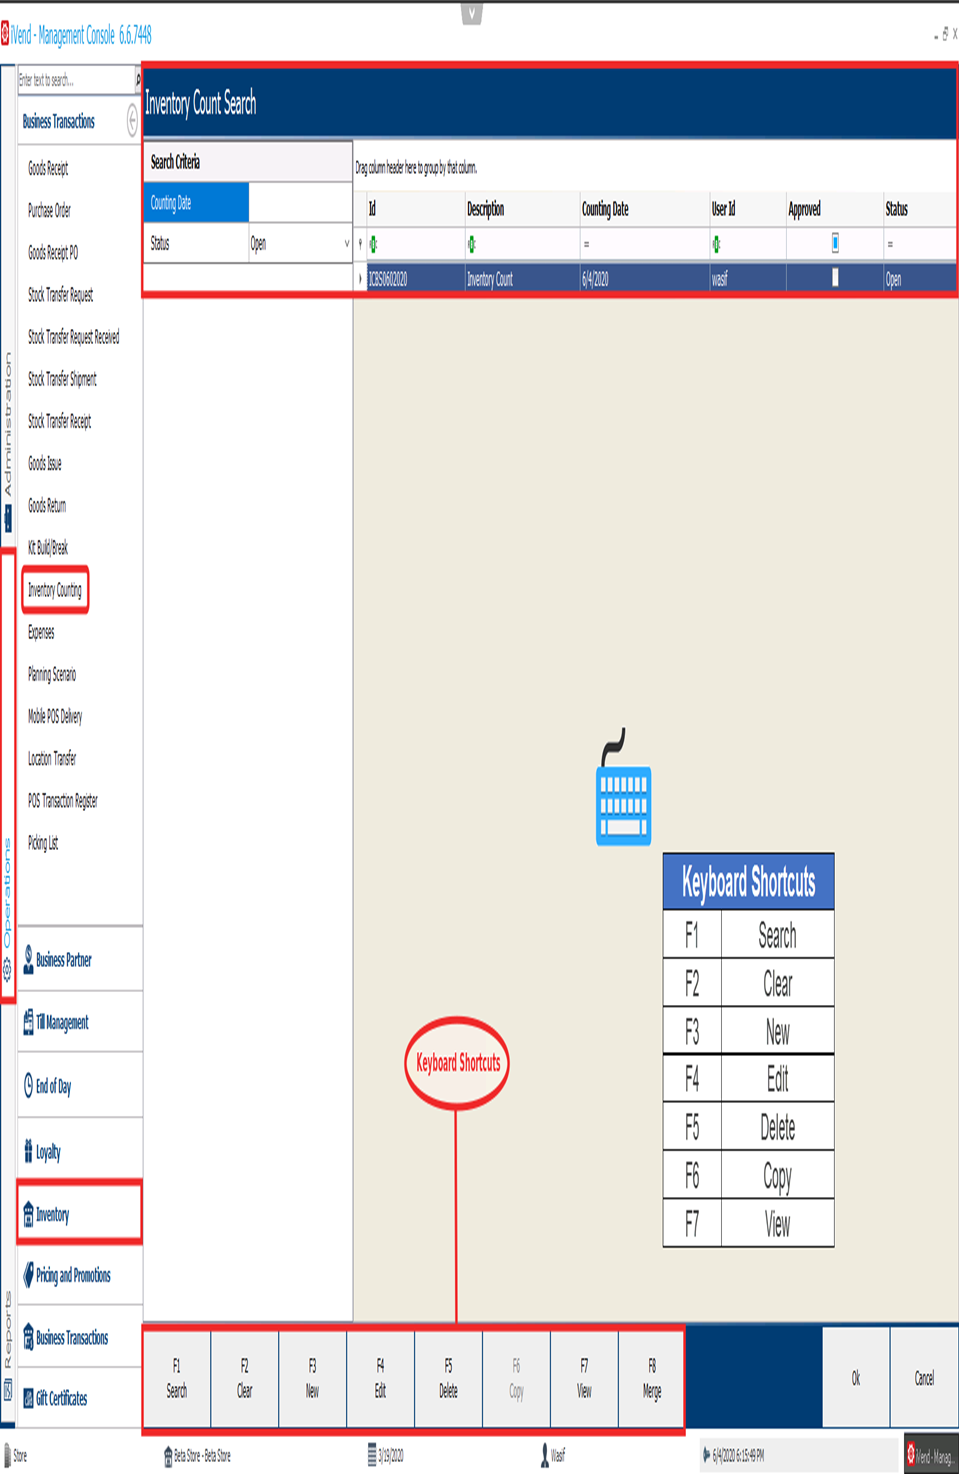
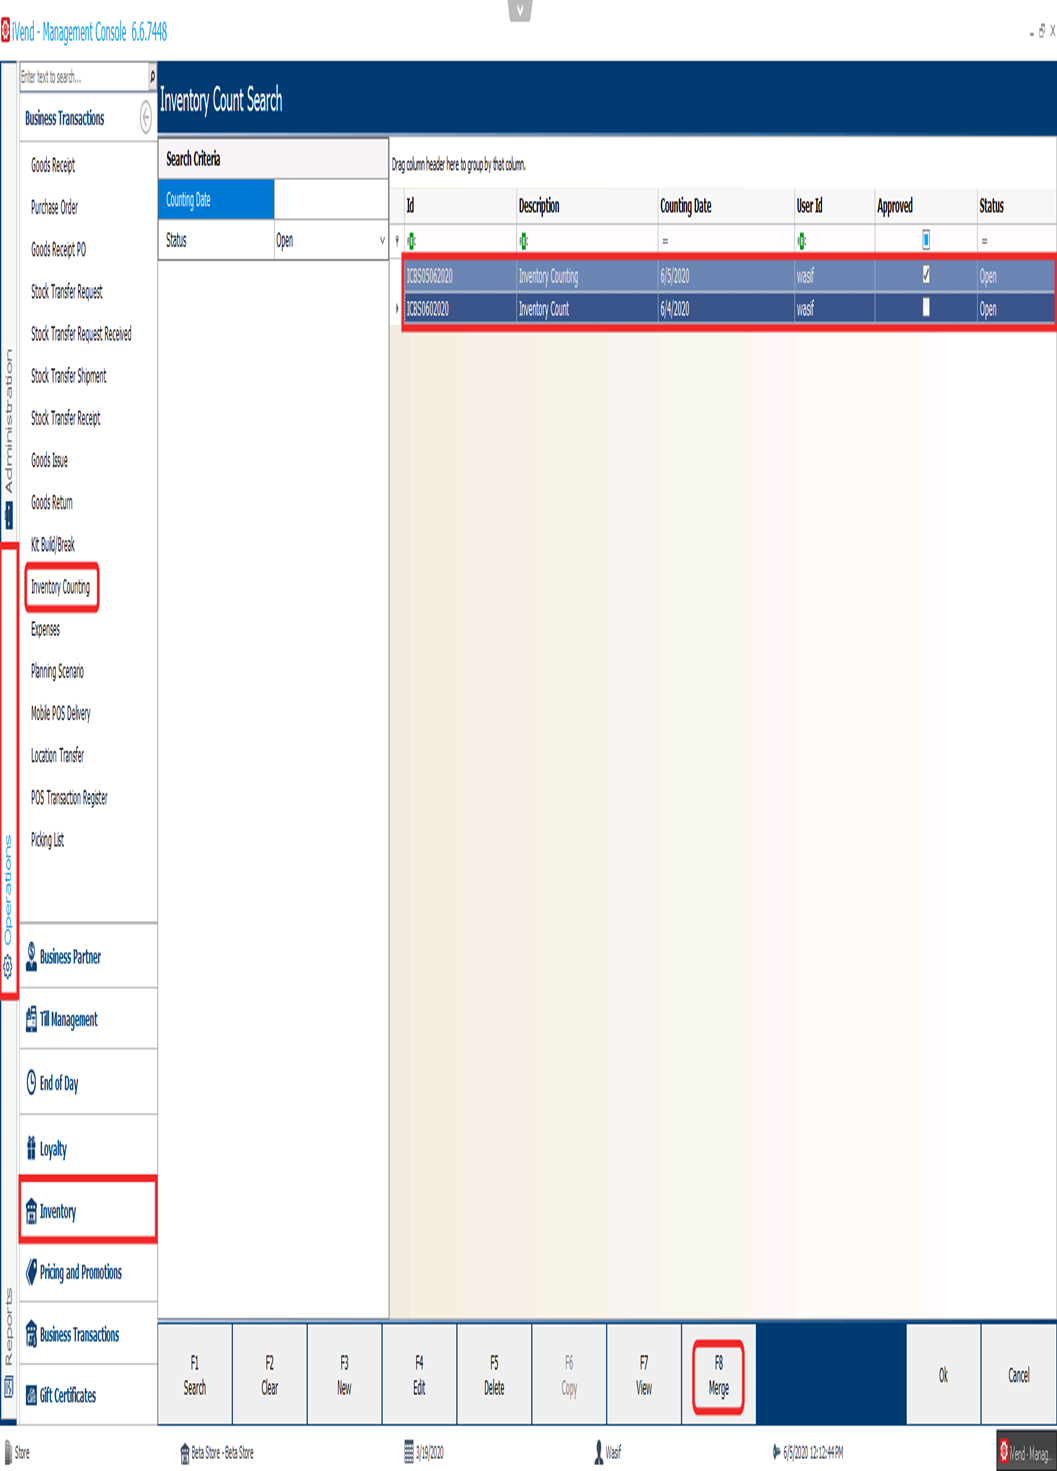
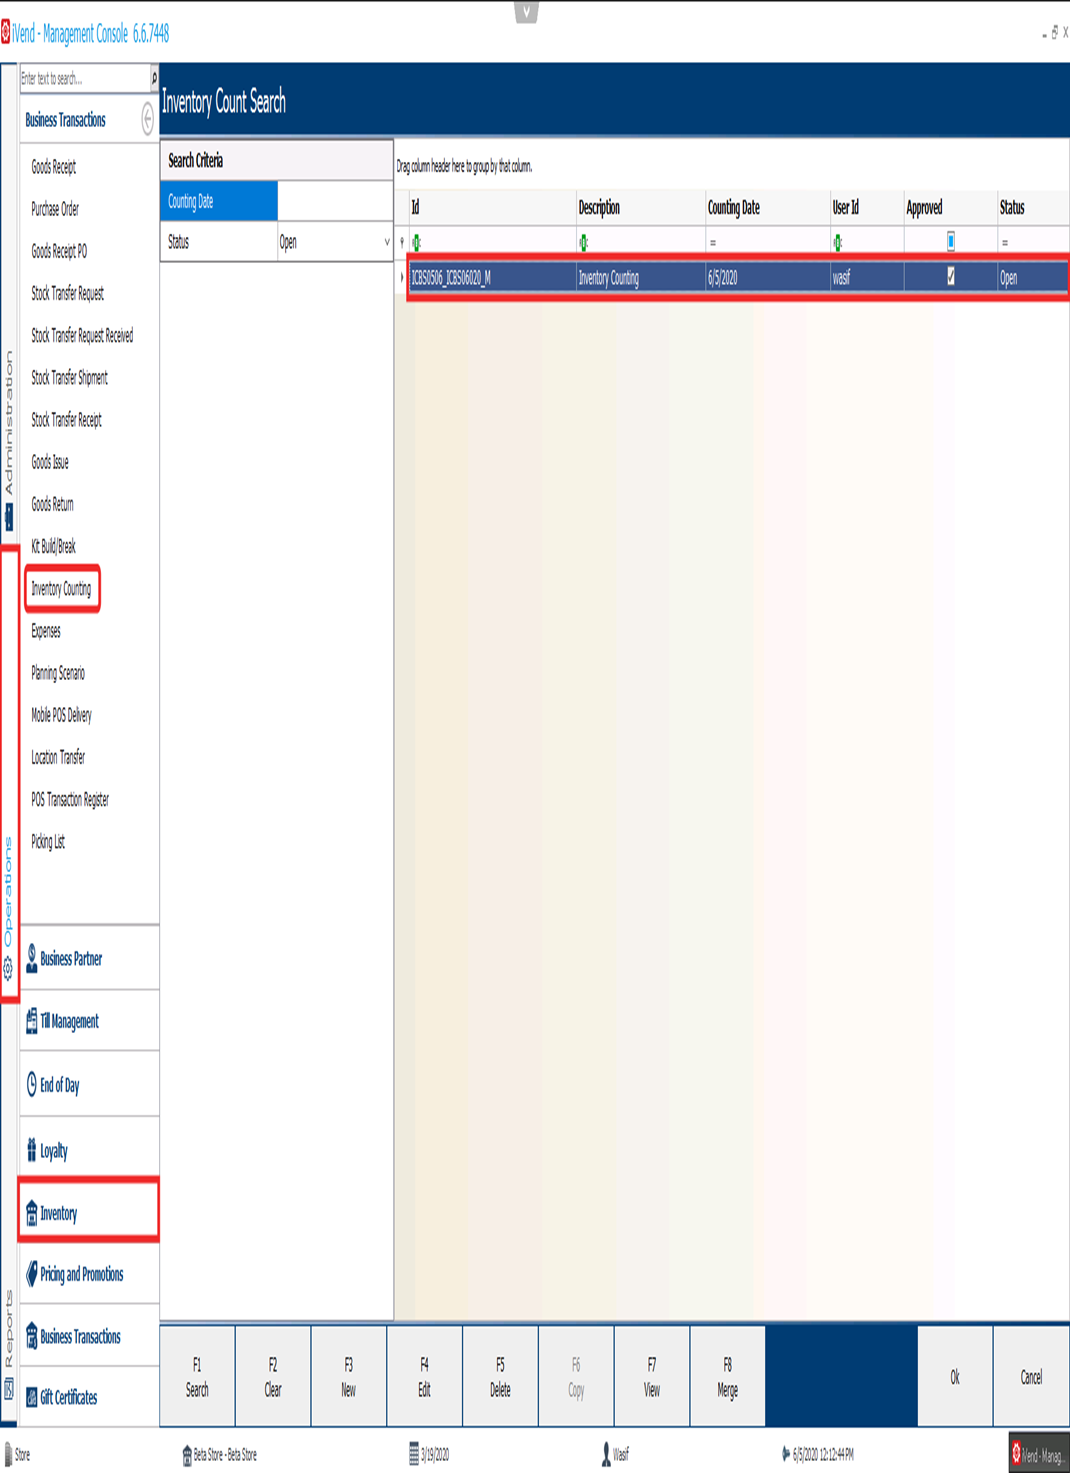
Inventory Counting can be found under the Management Console. Go to Operations > Business Transactions > Inventory Counting – the Inventory Count Search screen comes up.
On the Inventory Count Search screen, search for an existing count and press the [F4 Edit] button to edit or click on the [F3 New] button to create a new count.
This screen provides the facility to initiate inventory counting for the selected product(s), which can be one or a range of products. All defined storage locations under the system will appear for the inventory count, out of which the required storage location will need to be selected for which the stock take will be performed. In the subsequent screen of Inventory Counting only the selected storage location will appear, which are selected in this screen.
Note: Location only appears in the Inventory Count search screen if Locations is enabled in the system. To enable the Locations option, log into the iVend Management Console and navigate to: Administration > System Initialization > Enterprise, and put a tick [ ] against the check box that says “Enable Locations”.
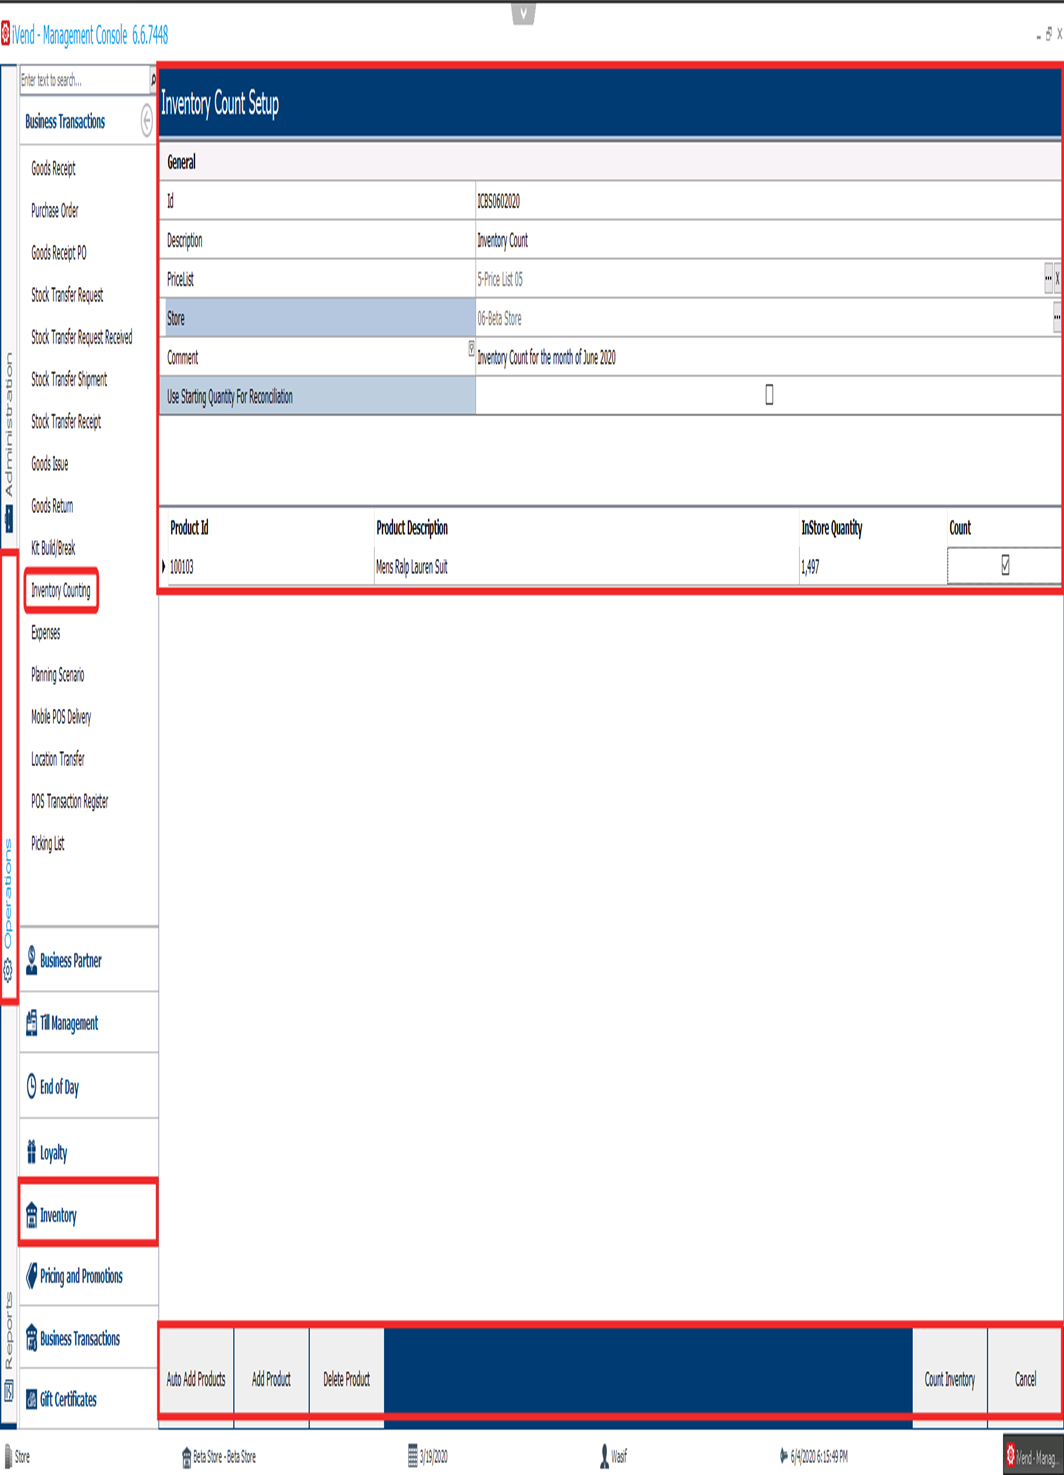
Inventory Count Setup
Inventory Count Setup helps the user to add the items in by auto or manual selection from the range of selected items in the Inventory Count selection.

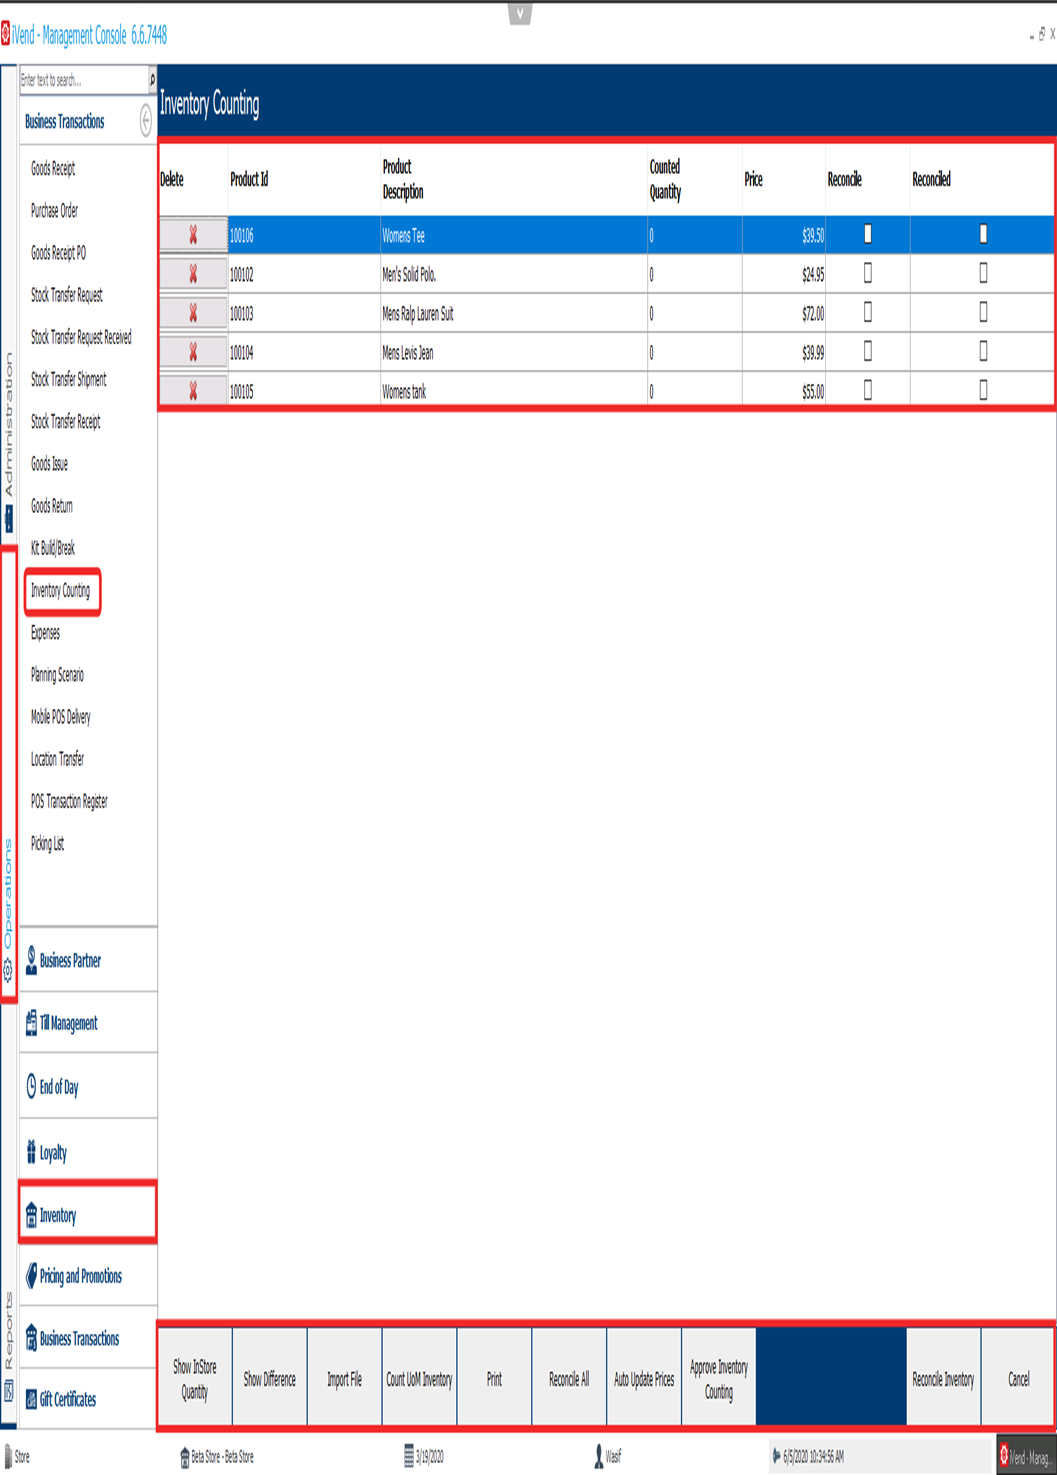
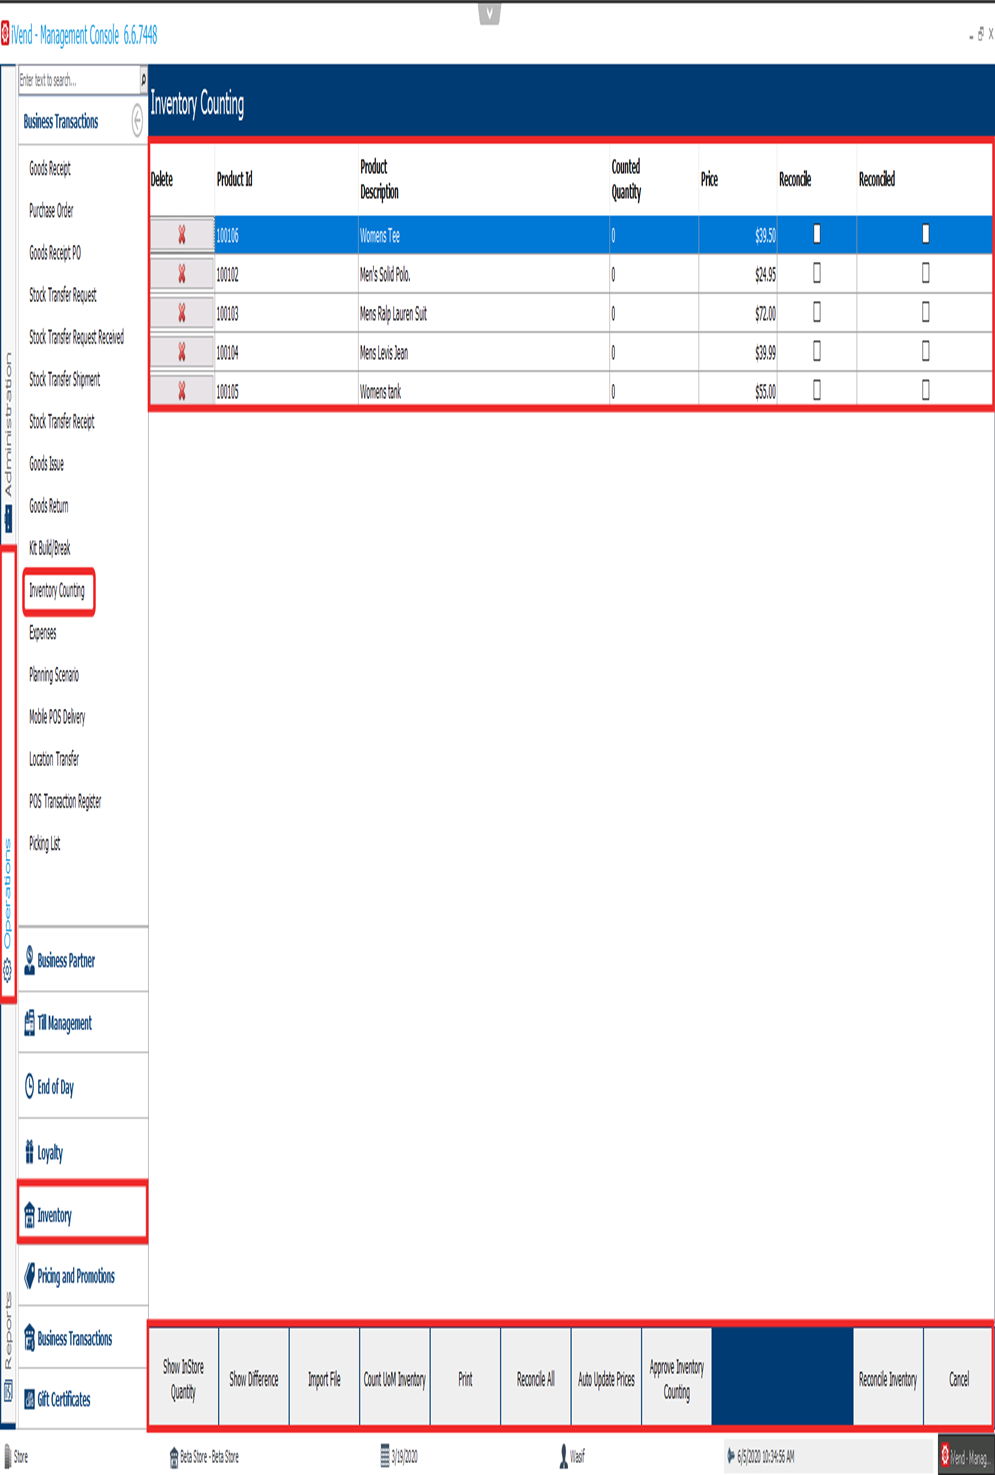
Inventory Counting
The Inventory Counting screen provides the facility to count the actual physical quantity available at the physical scanning area for different storage locations (Stock types).
Note: If multiple inventory counting needs to be done then reconcile checkbox of line products should be unchecked, otherwise inventory counting will not be available for merging with any other inventory count.
Inventory Count Merging
In the case of multiple stock counts, upon finishing of the initial count it will appear on the Inventory Count search screen with an Open mode. Select the inventory counts which need to be merged and click on merge button to internally create a new inventory count by clubbing all the quantity of products for which multiple inventory counts were performed.
Once the new merged Inventory Count is created by iVend Retail, all the individual stock counts which were selected to be merged will move to the Closed status and no further inventory changes can be done on those individual stock counts.
The Delete option can be used to delete the inventory counts which are not required but this can only be done for those counts with the Open status. There will be no impact on inventory when deleting Open inventory counts.
Note: Multiple stock counts can be selected but the minimum must be two (2).
After merging two or more inventory counts, a new inventory count will get generated by the system.
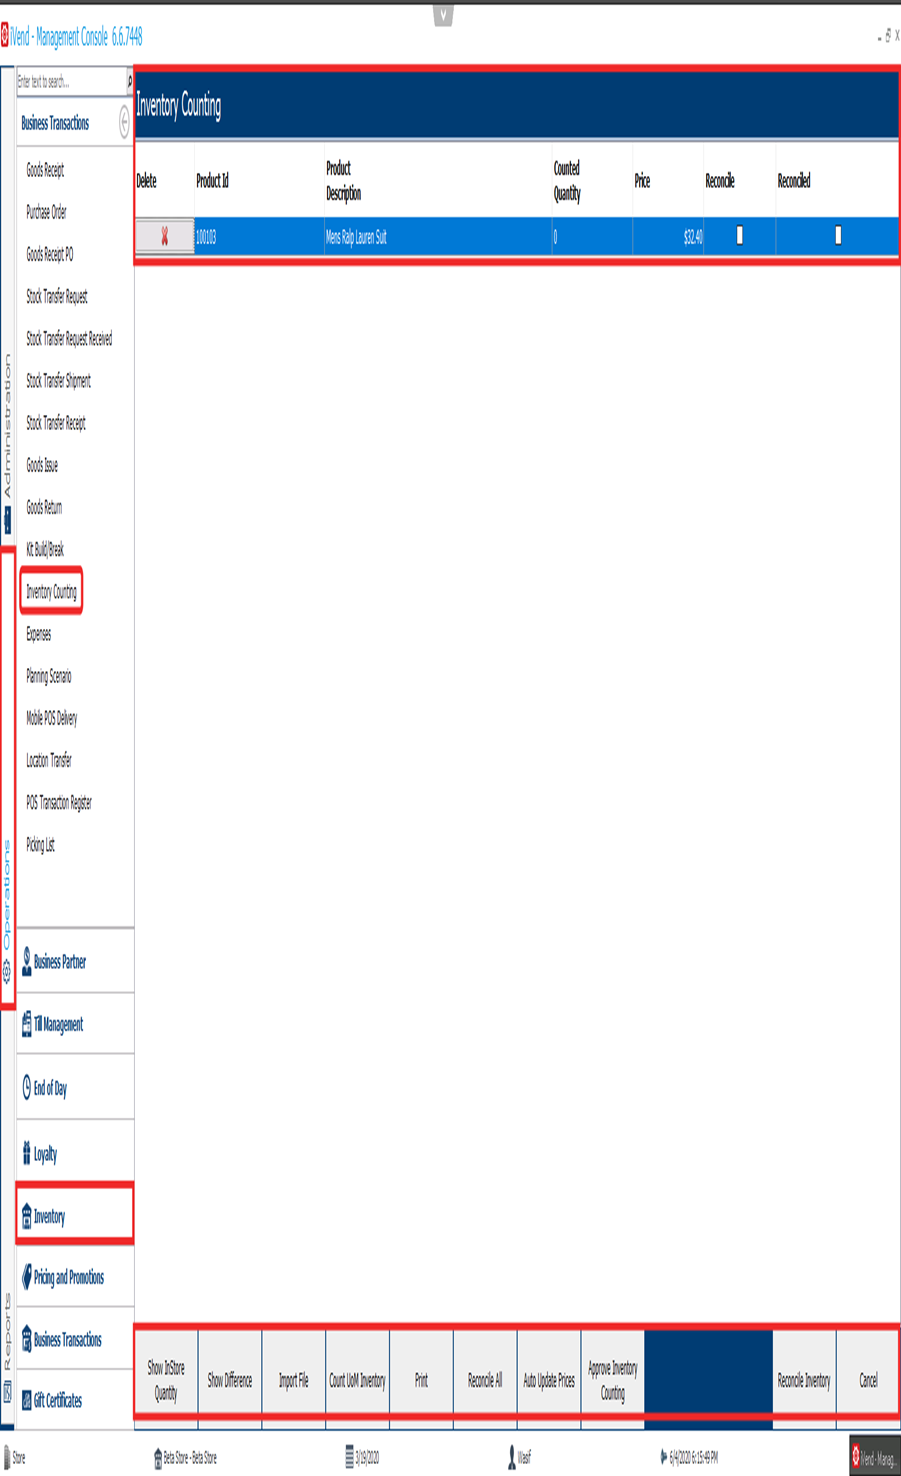
Inventory Counting
The Inventory Counting is the final screen to view of all merged quantities for the stock in a single view, which also helps retailers to reconcile the inventory counted so far for the selected products from the different storage locations (e.g. Stock types: saleable, quality check, etc.).
Note: Storage Locations will appear here, only if Locations have been enabled in the system otherwise the products will be visible without locations.
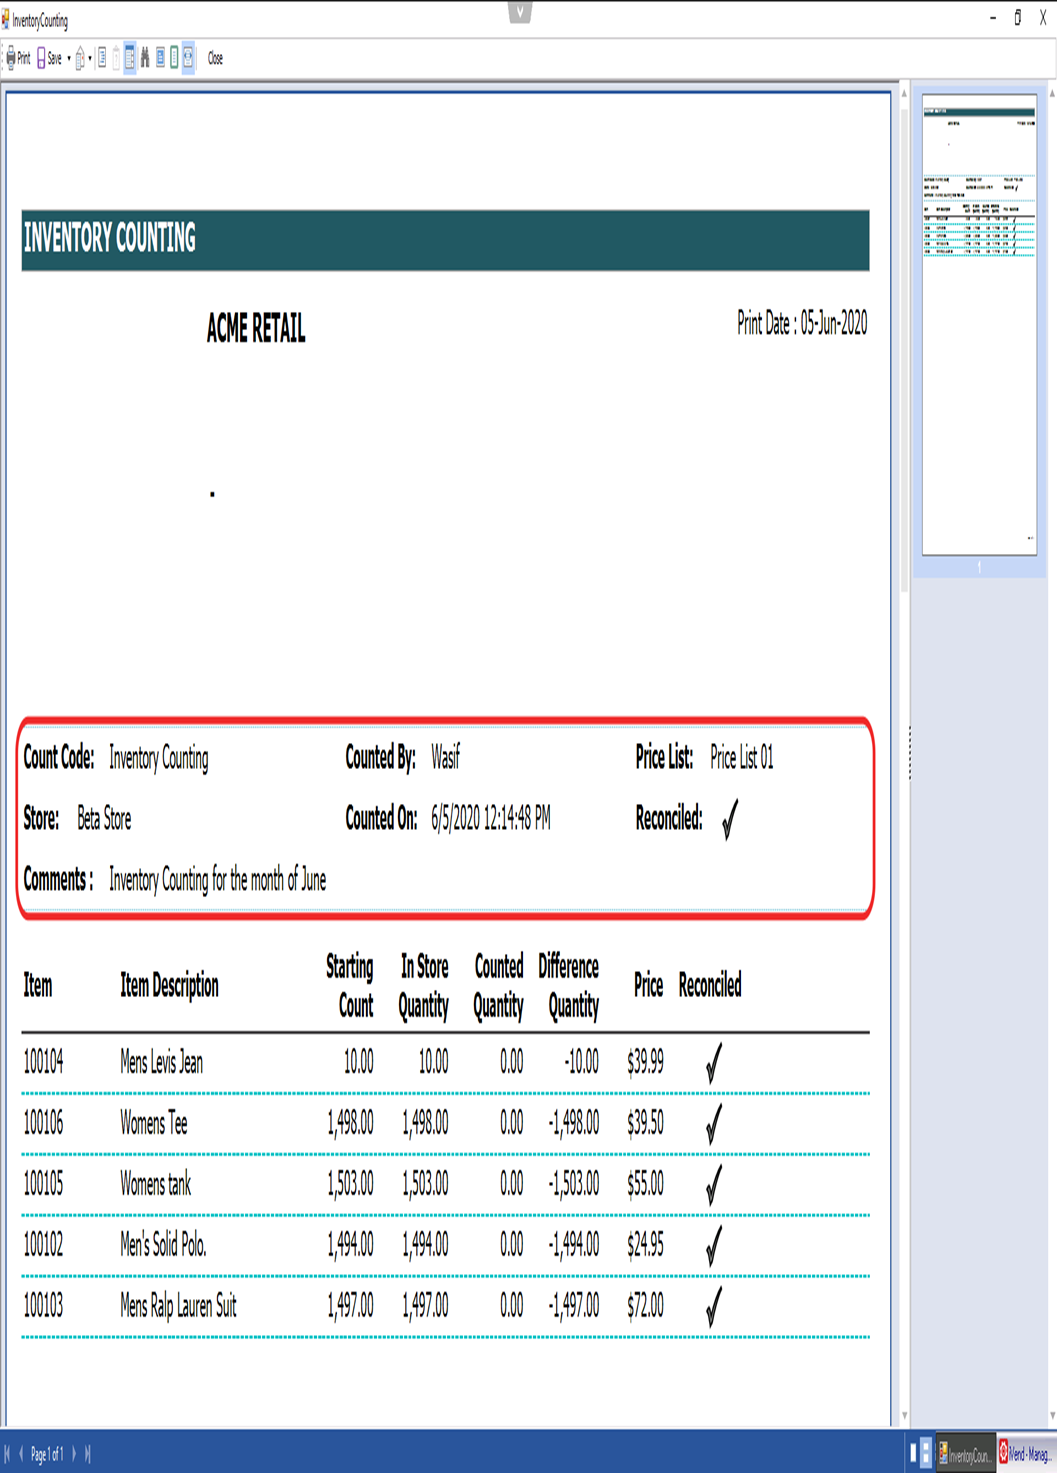
In the following example, the screen shows that the counted quantities are finalized but not posted and this is because the Reconcile and Reconciled checkboxes are unchecked. Once these are checked then the differences will be actually posted to system.
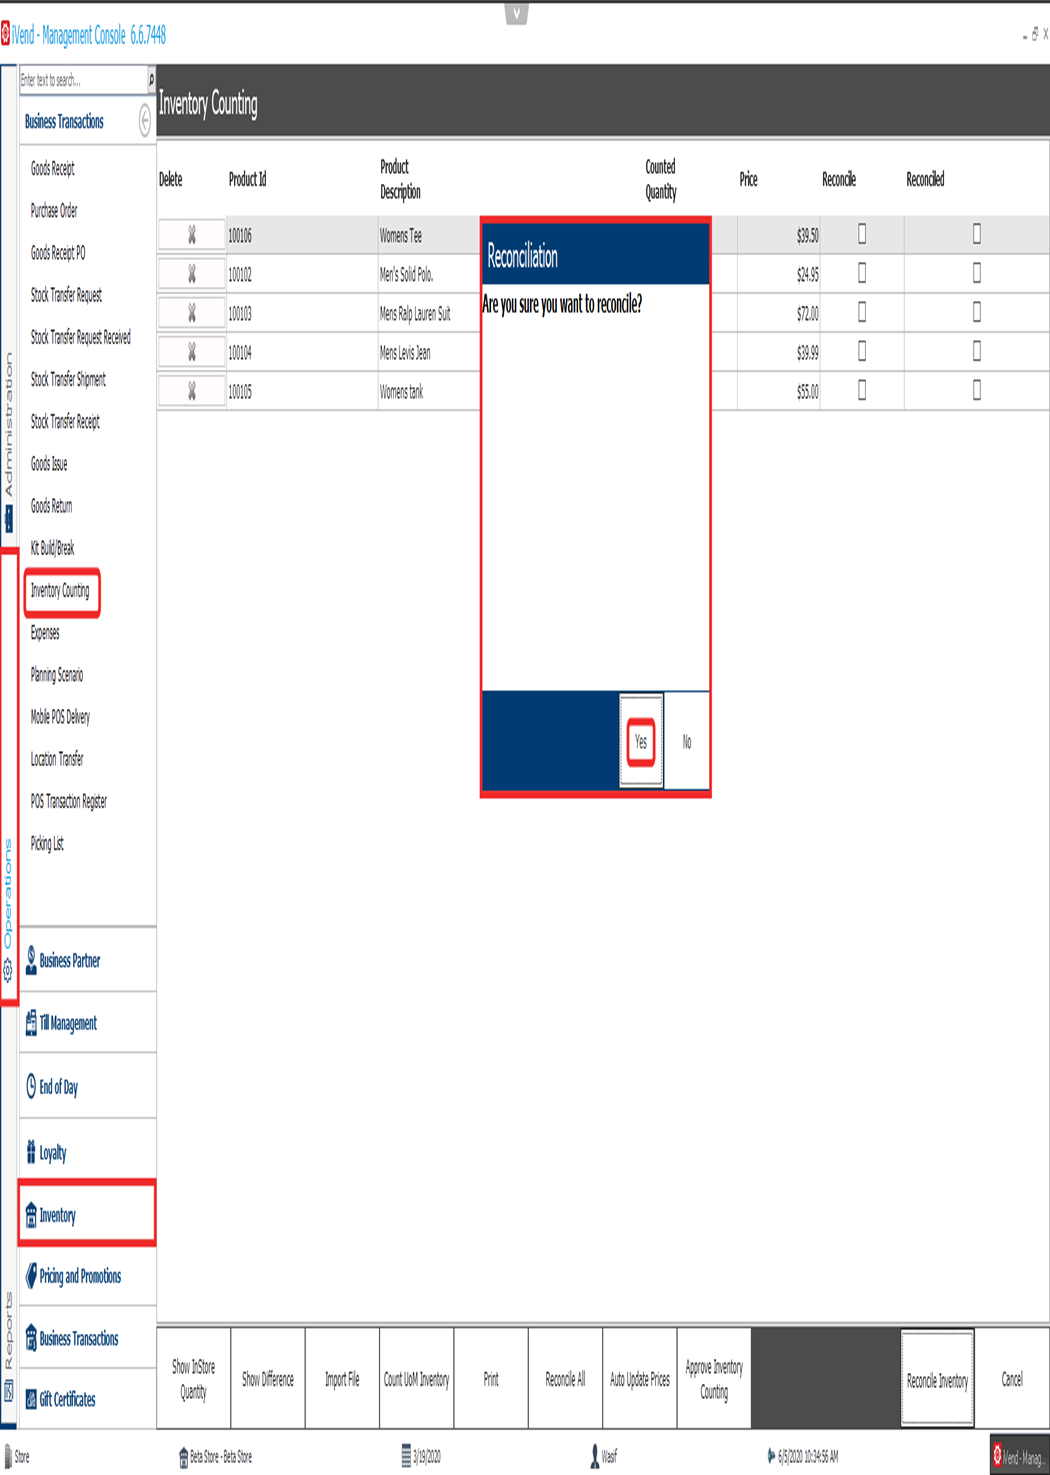
To reconcile the inventory, finally counted quantities need to be verified by the user and the Reconcile checkboxes for each product needs to be selected. For selection of all products, click on Reconcile All otherwise manual selection can be performed by clicking on Reconcile checkbox next to each product individually. The following screen illustrates that all products have be Reconcile checked ready to complete the reconciliation process.
Finally, after all physical variances have been checked and verified by the user, the reconciliation can be processed. Click on the [Reconcile Inventory] button and upon confirmation the reconciliation of the inventory will be posted.
· If the difference for the products quantity is positive, then the system will create a Goods Receipt document automatically.
· If the difference for the products quantity is negative, then the system will create a Goods Issue document automatically.
· If there is no difference in quantities then the system will not create any Goods Receipt or Goods Issue documents.
Note: Upon completion of the stock take process if the same Inventory Count is viewed again through Inventory Counting screen, then the Reconciled checkbox will be checked for all those products for which the reconciliation was done. The Reconcile Inventory button will still be enabled until such time that all products in the Inventory Count have been reconciled.
Note: You can view the inventory status by selecting the products to see the adjusted inventory quantities through the stock take process.
This concludes the document on - Consolidating Stock Take Counts.


Related Articles
Stock Management with Handheld Devices
Stock Management with Handheld Devices The iVend Handheld module in iVend Retail versions 6.2 and above allows its users to manage store inventory using a iVend Handheld device running on Android Mobile OS version 5.x and onwards. The application is ...Try to receive from the stock transfer receipt it take us to the main screen
Problem Statement: Not able to receive the stock transfer receipt. When we try to receive from the stock transfer receipt it takes us to the main screen and nothing is happening. Detail: We went to the "Stock Transfer Receipt" screen and clicked on ...Query Regarding Stock transfer receiving
Environment: iVend 6.6 Problem Statement: Query-1: When the employee enters a file containing a group of barcodes into the system for Stock transfer shipment, the system does not aggregate quantities for similar codes, but creates lines according to ...Stock Takes in iVend Retail
Stock Take Stock-taking or Inventory Counting is the physical verification of the quantities and condition of items held in inventory within a location or warehouse. This may be done to provide an audit of existing stock. It is also a source for ...Unable to receive stock transfer at store
Query: Unable to receive stock transfer at the store because not visible in the “Stock Transfer Receipt” search window. For example; A stock transfer request was made from RW02 Warehouse requesting inventory from RW01 Warehouse as shown below: Then ...